Table of Contents
- 1. Introduction
- 2. TaskPool users
- 3. Pools
- 4. Dynamic fields
- 5. Dynamic fields extension
- 6. User's dynamic fields
- 7. Filters
- 8. Escalation
- 9. Licence
- 10. LDAP
- 11. Files
- 12. Templates
- 13. E-mail reports
- 14. POP3 mapping
- 15. Users notifications
- 16. Authentication
- 17. Helpdesk module
- 18. SLA
- 19. Knowledge base
- 20. External Database Manager
- 21. Cost evidence
- 22. SMS module
- 23. TaskPool instances
- 24. States
List of Figures
- 1.1. Administrator's section
- 2.1. New user creation
- 3.1. New pool creation: General
- 3.2. Pool color
- 3.3. Creation new pool: Workflow
- 3.4. Scheme of workflow
- 3.5. Creation of a new pool: Access restrictions
- 3.6. Creating a new pool: Roles
- 3.7. Creating a new pool: Notification - timing
- 3.8. Notifications according to users
- 3.9. Creating a new pool: Priority
- 3.10. Creating a new pool: SLA schemes
- 3.11. Creating a new pool: Fields
- 3.12. E-mail Interface (IMAP)
- 3.13. E-mail Interface (Verifying login)
- 3.14. E-mail Interface (Google API - method Oauth2)
- 3.15. Login to Microsoft Azure
- 3.16. Login/Logout
- 3.17. Redirect to Microsoft page
- 3.18. Required permissions
- 3.19. Login to Microsoft Azure
- 3.20. Microsoft Azure
- 3.21. New registration
- 3.22. New registration - fill in data
- 3.23. Verifying
- 3.24. Certificates and secret codes
- 3.25. Clients secret codes
- 3.26. Overview
- 3.27. Business applications
- 3.28. Setting up the users consent
- 3.29. Creating a new pool: Cost evidence
- 3.30. Scheduling
- 3.31. Scheduling by task edit
- 3.32. Linking tasks
- 3.33. Task linking
- 3.34. Card tags
- 3.35. Card Pools (Tags)
- 3.36. Tags - task editing
- 3.37. Task editing - Tags
- 3.38. Tags - comments
- 3.39. Tags - Task overview
- 3.40. Card Files
- 4.1. Examples of dynamic fields
- 4.2. Dynamic field creation, type Text field
- 4.3. Dynamic field Textfield in reality
- 4.4. Creation of the field's options Selectbox and Radiobutton
- 4.5. Dynamic field Selectbox
- 4.6. Dynamic field Radiobutton in reality
- 4.7. Dynamic field Multi Selectbox in reality
- 4.8. Dynamic field Checkbox in reality
- 4.9. Dynamic fied DateTime in reality
- 4.10. Setting SQL selectbox
- 4.11. Dynamic field Protocol (file)
- 4.12. New field Signature
- 4.13. Check field Signature
- 4.14. Completed signature
- 4.15. New field Html
- 4.16. Check field Html
- 4.17. Completed Html
- 5.1. Change in the value of the dynamic field in relation to the state of the workflow
- 5.2. Change of the task's state according to the change of the dynamic field
- 5.3. Transitions limitation among the values of the dynamic fields
- 6.1. Administration: User's dynamic fields
- 6.2. Administration: Dynamic field
- 6.3. Administration: Dynamic fields
- 6.4. Dynamic user fields: Absence module
- 6.5. Setting the absence time
- 7.1. Administration: Filters
- 7.2. Administration: Rights for the filters display
- 7.3. Definition of the filter
- 8.1. List of escalations
- 8.2. Definition of escalation
- 8.3. Removing escalation
- 9.1. Administration: Licence
- 9.2. Language configuration
- 10.1. Administration: Setting the customer
- 10.2. MFA configuration
- 10.3. Google Authenticator
- 10.4. Code and QR code
- 10.5. MFA code
- 11.1. Administration: Files
- 12.1. Administration: Templates
- 12.2. Creation a new template
- 12.3. Templates usage
- 13.1. Creation of e-mail report
- 13.2. Email report - button Run
- 14.1. Administration: POP3 mapping
- 15.1. Users' notifications
- 16.1. Authentication using LDAP
- 16.2. Creation of a new authentication using LDAP
- 16.3. Authentication using the database
- 16.4. Test of a successful connection
- 16.5. Authentication configuration using the sample database
- 16.6. CAS configuration example
- 17.1. Administration: Pools
- 17.2. Example of usage of placeholder's strings
- 17.3. Helpdesk: Basic setting
- 17.4. Helpdesk: Basic setting
- 17.5. Setting the helpdesk notifications
- 17.6. Send a message to the HD user
- 17.7. New HD task
- 17.8. Helpdesk: HD Form
- 17.9. Example of helpdesk form without authentication
- 17.10. Example of helpdesk form with authentication
- 17.11. Helpdesk: Error reports
- 17.12. Example of web thanking
- 17.13. Helpdesk: Signature
- 17.14. Automatic signature in reality
- 17.15. Example of a header of the requirement history
- 17.16. Example of list of commentaries of the requirement history
- 17.17. Example of footer of the requirement history
- 17.18. Example of the tasks list
- 17.19. Helpdesk: LDAP/DB
- 17.20. Example of log in screen
- 17.21. Example of password change
- 17.22. Example of forgot password screen
- 17.23. Example of registration
- 17.24. Helpdesk: POP3-LDAP
- 17.25. Helpdesk: POP3-LDAP
- 17.26. Helpdesk: e-mail interface
- 17.27. Copy the Helpdesk
- 18.1. SLA time configuration
- 18.2. Display without active SLA (deadline yesterday)
- 18.3. Display with active SLA (Reaction tomorrow)
- 18.4. Re-calculation of the manual time according to SLA
- 19.1. Knowledge base configuration
- 19.2. Using the knowledge base in TaskPool
- 20.1. Icon for EDM access
- 20.2. External Database Manager
- 21.1. Administration: Cost evidence
- 21.2. Assignment of the activities to the group of activities
- 21.3. Common settings - Cost evidence
- 21.4. Records lock at the workplace
- 21.5. Billing List
- 21.6. Locked billing
- 21.7. New billing
- 21.8. Adding records to billing
- 21.9. Print template of billing
- 22.1. Setting of dynamic field to implementers
- 22.2. Add number for sent sms
- 22.3. SMS module activation
- 22.4. Example of SMS notification configuration
- 23.1. Instance Link Settings
- 24.1. Set custom status names and icons
List of Tables
Table of Contents
Preambule
"TaskPool is constantly evolving. In version 4.1 has still the original graphical form of administration, as version 2.92. The new interface is in progress. So please excuse some minor differences in the Administrator's Guide, which may not always agree with the current version. We try to keep up with the changes. If something is not obvious, do not hesitate to contact our support."
Task
requirement, task, job
Workflow
Process of the task runs from its creation till its implementation and archivation, in other words cycle of the task.
Pool
Separate space for administration of the category or type of the task where we can:
Define own rules of processing
Define own data structure of the requirement using the dynamic fields
Define separate team for work with requirements in the given pool
Filter
A defined rule for the task display matching the conditon or a set of conditions.
Dynamic field
New data tab of the task defined by the administrator for a particular pool.
Workplace
A page of the system, where there is a list of tasks of the particular pool or filter and then other information (summary of the users, statistics, toolbar).
Archive
The space where are placed all implemented, moved, exported or deactivated tasks.
User (implementers role)
The user who logs in TaskPool using the standard page and has an access to the TaskPool Workplace with archive. He/She can have different roles in each pool. Number of these users are allowed by the licence.
Customer (authority role)
A system user who accesses the Customer interface for entering and viewing specified requests. The number of these users is not limited in the standard license.
Author
The user who creates the task becomes its author. It can have all system roles at the same time (except for viewers).
Administration part
This section is allowed only to the administrator of TaskPool and it is used for configuration of the whole system.
Administrator of the system
Administrator's ccount is defined when licence creation. Only this role is possible to run TaskPool. Administrator of TaskPool can also have other roles within each pool with a view of the administrator's section.
Notification
E-mail informing about action which was done by some of the users of TaskPool.
Module of Helpdesk and helpdesk user (customer)
Module of Helpdesk is for customers or other users for creating tasks in TaskPool without access to TaskPool itself. These users have the role of submitters and enter each task via external web interface. Each user sees only their own requirements or if they have a role of manager of submitters, they also see requirements of their subordinates. Number of these users is not limited. The users are informed about the chages in their requirements via notification emails.
Roles in TaskPool system
| SUBMITTER'S side | IMPLEMENTER'S side |
|---|---|
| Manager of submitters - the role at the side of the submitter, which oversees the requirements realization for the submitter's side. | Service manager - the role at the side of the implementer, which oversees the implementation of the requirements. |
| Submitter - the role at the side of the submitter, which can create each requirement. | implementer - the role at the side of the implementer, which attends the requirements. |
| Observer - the role at the side of the submitter, which has right to only observe the tasks. | Observer - the role at the side of the implementer, which has right to only observe the tasks. |
NOTE: The Observer on the submitter's side can only see records belonging to this side, hidden comments of submitters, time records, etc. Similar situation is on implementors side.
There are also functions Co-implementer and Co-submitter. Co-implementers and co-submitters have the possibility to add comentaries into the tasks and get the notifications from them. Their allocation to the task is described in the user's manual. Co-submitters could be given full rights as the implementer's, see chapter 3.3 Access limits.
The following table describes complete rights of the individual roles, where:
MS = manager of submitters
S = submitter
Os = observer on the submitters side
SM = service manager
I = implementer
Oi = observer on the implementors side
and on:
- the role has the right to do the given activity
- the role has no right to do the given activity
- the role can have right to do the given activity in depends on the settings in the pool administration on the card "Workflow" (more in the chapter 3.2 Workflow)
Table 1.1. The rights of the individual roles
| Activity | MS | S | Os | SM | I | Oi | ||||||
|---|---|---|---|---|---|---|---|---|---|---|---|---|
| viewing the tasks |
|
|
|
|
|
| ||||||
| Entering the tasks |
|
|
|
|
|
| ||||||
| entering the autotask |
|
|
|
|
|
| ||||||
| take over the task |
|
|
|
|
|
| ||||||
| task assignment to the implementer |
|
|
|
|
|
| ||||||
| task commenting |
|
|
|
|
|
| ||||||
| task completing |
|
|
|
|
|
| ||||||
| task controlling |
|
|
|
|
|
| ||||||
| task confirmation |
|
|
|
|
|
| ||||||
| task deactivation |
|
|
|
|
|
|
NOTE: When viewing the tasks, it is possible to set each of the roles to only see their own tasks. This is done in the pool administration on card "Access restrictions" (chapter 3.3. Access restrictions).
You can get into the administrator's section via button "Administration". For the TaskPool administration you will use the bookmarks in the administrator's section (Escalation, Fields, Filters, Pools, Users, Licence key, Customer settings, Templates, Files, POP3 mapping, Notification, SLA, E-mail reports, Authentication, Knowledgebase, User dynamic fields, External Database Manager, SMS, Cost evidence, Autotask).

For coming back you will use the button "Workplace".
On the card "Users" in the administrator's section there is a list of TaskPool users. First, there are the active users and then the closed users. Number of administrators is not limited, but it has to be at least one. With high number of administrators, you can search for administrators name and it will filter out.
When clicking on administrator and scrolling down, you can checked or unchecked the field "Administrator".
When you click on the icon New the form will appear for a new user creation in the system. Only the administrator can create new user, after that, each user can edit all settings themselves.
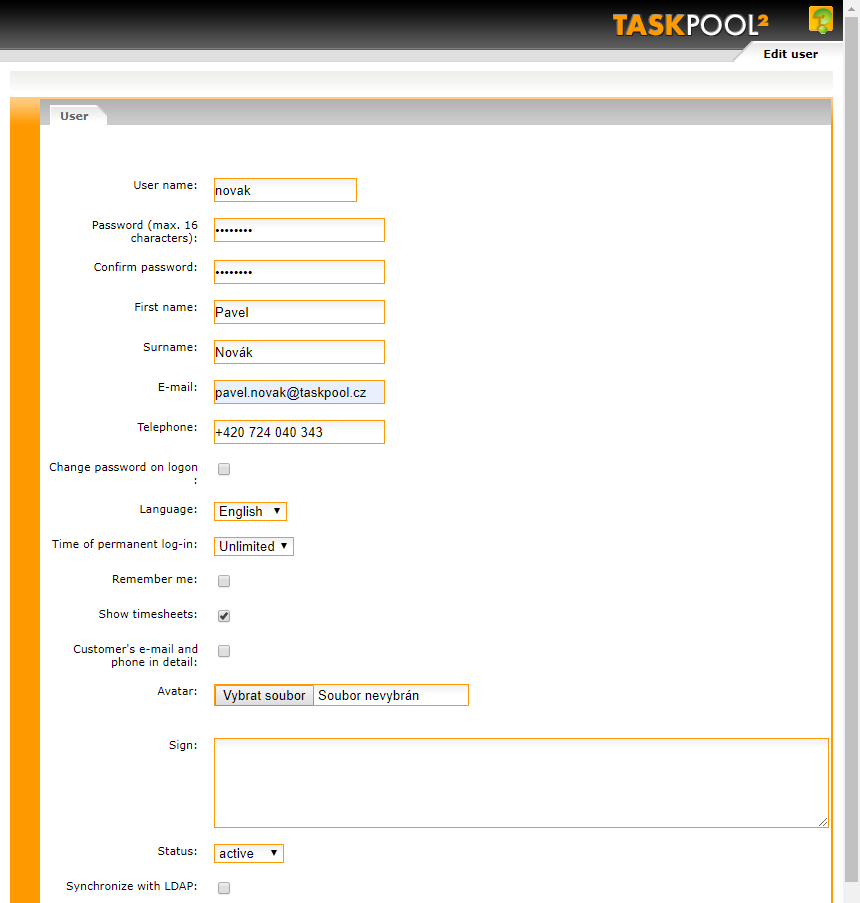
Username and password are the standard resources for login to the system. First name and the last name will appear in every record of a change being made to the system by that user. Notifications about changes in the tasks that concern the given user will be sent to the specified email. Field for telephone number is only informative. Default language, in which to login to the system can be selected for each user.
Permanent login will only work if this field is checked in the users profile. At the same time you can set, for how long will the login be valid.
With the button Show time records we turn on the display the so-called "timesheets", more in the chapter 21. Cost evidence.
In the field Status we can set, if the user will be active or inactive, in second case the user will be denied access to the system and will not receive notifications. We use this choice in case, when the users action in the system TaskPool becomes meaningless. The user cannot be removed due to already established links, all changes and entries made by the user before deactivation will remain in the system. The inactive users also do not count towards the licence.
The last choice is if the given user will be synchronized with LDAP. More about LDAP in the chapter 10. LDAP.
We can edit the created user via clicking on the name from the list of the users at the card "Users" in the administrator's section. The window will appear as if you create the new user with the difference that there are two more options of setting. They are "Notifications by pools" and "Membership in pools".
After clicking the button "Notificaltions by pools" in the form of the user's editing there will appear the form about setting the notifications timing according to each pool. Choosing the particular pool you will continue in setting the timing in a similar way as for creation the new user (or his/her editing).
After clicking this button there are pools listed in the left column, where the user is a member. In the right column there are pools listed where the user is not a member. At each pool there is a link "edit", which allows the administrator to set the pool and he/she can easily edit the membership of the user in the specific pool.
Table of Contents
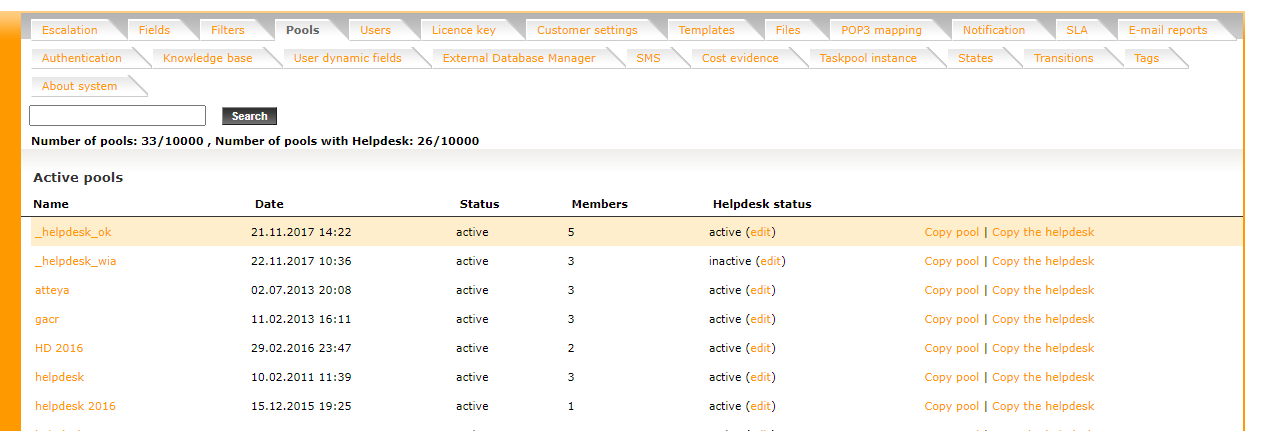
We can find already created pools on the card "Pools" in the administrator's section. Again there is a united convention of the whole system, orange texts are links with relation to other functions. In this case it is possible to open a form "Pool edit", where you can set the features of each pool. In the list there are active pools first and then closed pools.
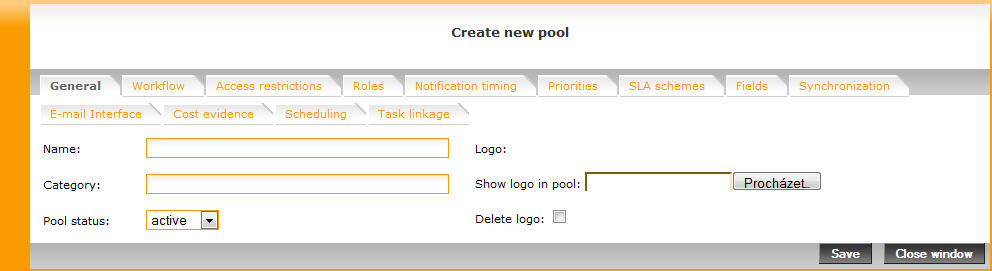
Form for a new pool creation can be opened by clicking the button New. Below the bookmarks in the upper part of the form there is each card of the pool setting hidden - General, Workflow, Access restrictions, Roles, Notification timing, Priorities, SLA schemes, Fields, Synchronization, E-mail Interface, Cost evidence, Scheduling, Task linkage. (see the following subchapters).
On the card "General" we set the basic features of the pool. Already created pool cannot be deleted, but deactivated. The reason is obvious, there might be some relations to the other part of the system. Closed pool is not therefore counted to the licence.
A field Category is not obligatory tab. It can associate each pool with similar purpose (e.g. Helpdesks) and serve better handling with the pools thanks to the filters. See more in the chapter 7. Filters.
The pool color will mark each task with a specific color in the workplace and in the detail of the task. It enables more intuitive work with tasks, for e.g. all helpdesk tasks are yellow etc.

In case of using pool Logo , it is displayed in the workplace on the left side of the top bar.
On this card the process of task implementing in the given pool is defined.
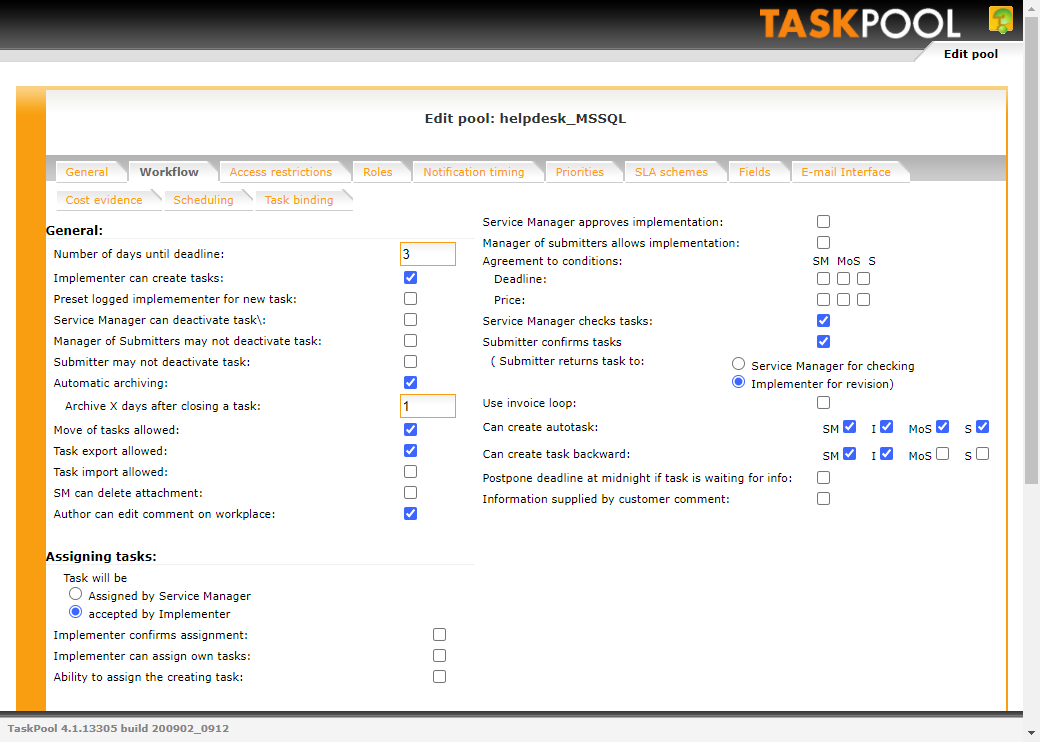
The following options determine the rights of each role in a particular pool. The following is a description of more complex settings:
Number of days until deadline is default setting of the deadline for the new task in the given pool, i.e. number of days necessary for completing the task. The time could be changed by SLA, if it is set. See more in the chapter 18. SLA.
Automatic archiving means, that complete tasks (they have a green icon of the exlamation mark) will be put automatically into the archive after two days.
Move of tasks is an option thanks to which we can move tasks from the given pool into the other one. Moved task will be put into the archive of the mother pool in the status "Moved" and there will be written a new link to the moved task. There will remain all the values and history of the moved task and it will be created in the status "Assigned to implementation". Moving is suitable to use if the task was created by mistake in the different pool. If you know this would not appear, we recommend switching this configuration off. The form for task editting will be simplier.
ATTENTION! If we move the task to the pool, which does not contain the same data item (e.g. dynamic fields) as the original pool, the moved task may lose data.
Export / Import of tasks. If set in the system linking two or more instances of systems with each other is possible with these options turn on pools where events will be offered Export and pools, which will be offered as target in the linked instance. Transferring to the imported task history of the exported task. The amount of information transmitted depends on the configuration of the target pool.
Selecting Assigning Tasks changes the assignments of implementer and co-implementers.
If the task is Assigned by Service Manager, the implementer cannot take it over himself. Otherwise, the implementers themselves take over tasks without the need for assignment.
Implementer confirms assignment allows the implementer to confirm the assigned task. You can accept or reject the assigned task.
Implementer can assign own tasks means the ability to assign his task to the implementer to other implementers. If the option is not checked, only the Service Manager has this permission.
Ability to assign the creating task extends the form of a new task with the ability to assign implementer or co-implementers (depending on the role display matrix in Access restrictions). The service manager has always this option enabled.
Swithing on the string Service manager approves implementation we determine that the task can be taken over by the director after approving of the task implementation by the service manager. At the scheme there is the string shown with a red colour. Similar is the string Manager of submitters allows implementation.
By the string Agreement to conditions we can set the right to the deadline and price endorsement. If the right will be given only to e.g. service manager, other users can only submit a change to the conditions and the service manager must approve them or decline them.
Service manager checks tasks means that after completing the task by the implementer, the task will continue to the service manager who will check the implementation and then he/she can confirm the task or give it back to the revision. The task will not be fiinished until it is checked. Therefore it cannot be put into the archive without its confirmation. At the scheme there is a string shown by a yellow colour. Similar is the string Submitter confirms tasks. It is shown by a green colour. If both strings are switched, task finished by the implementer goes first to the service manager check and then to submitter's confirmation.
If it is active Use invoice loop, tasks will remain in the pool after completing, or check, until the service manager marks it as "Invoiced". At the scheme below there is a string shown by a violet colour.
Implementer confirms assignment means that the service manager submits the new task to the implementer only and he/she has an option to accept the task or decline it. At the scheme below there is a string shown by an orange colour.
Information supplied by customer comment - if the task is in the Waiting for information state and the customer adds a comment (either from the customer interface or from the e-mail), the task switches to the previous state.
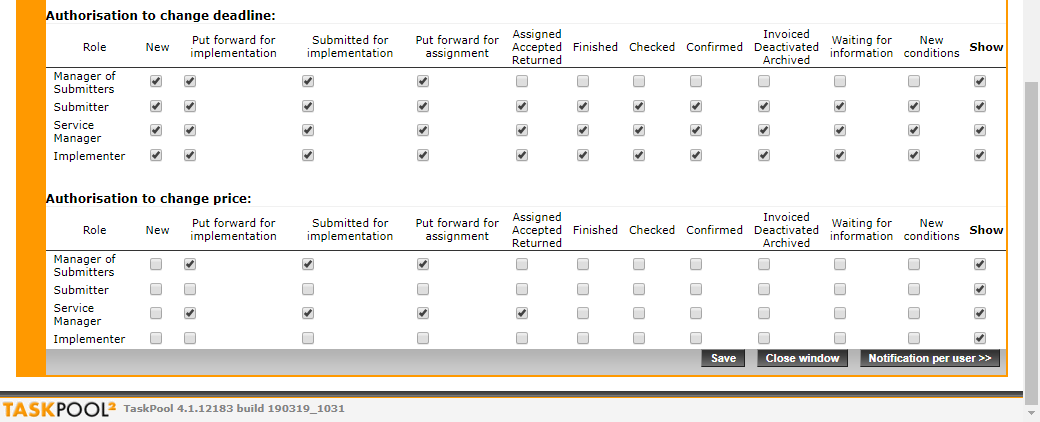
At the bottom of the screen there could be rights set for an editing option, price display and deadline to each roles in each task status.
Here you can see the scheme how workflow can go through.
If there are a lot of submitters and implementers, it is essential to administrate tasks display and notifications sendings. At this card it is possible to set which tasks will be accesible to which submitters and implementers and whom the notifications will be sent to. Each submitter, or implementer can see all tasks and get the notifications or see all the tasks and get notifications only from their own tasks. The last option is that each submitter or implementer can see only their tasks and get the notifications from them.
You will get the simplier pool to each submitters/implementers.
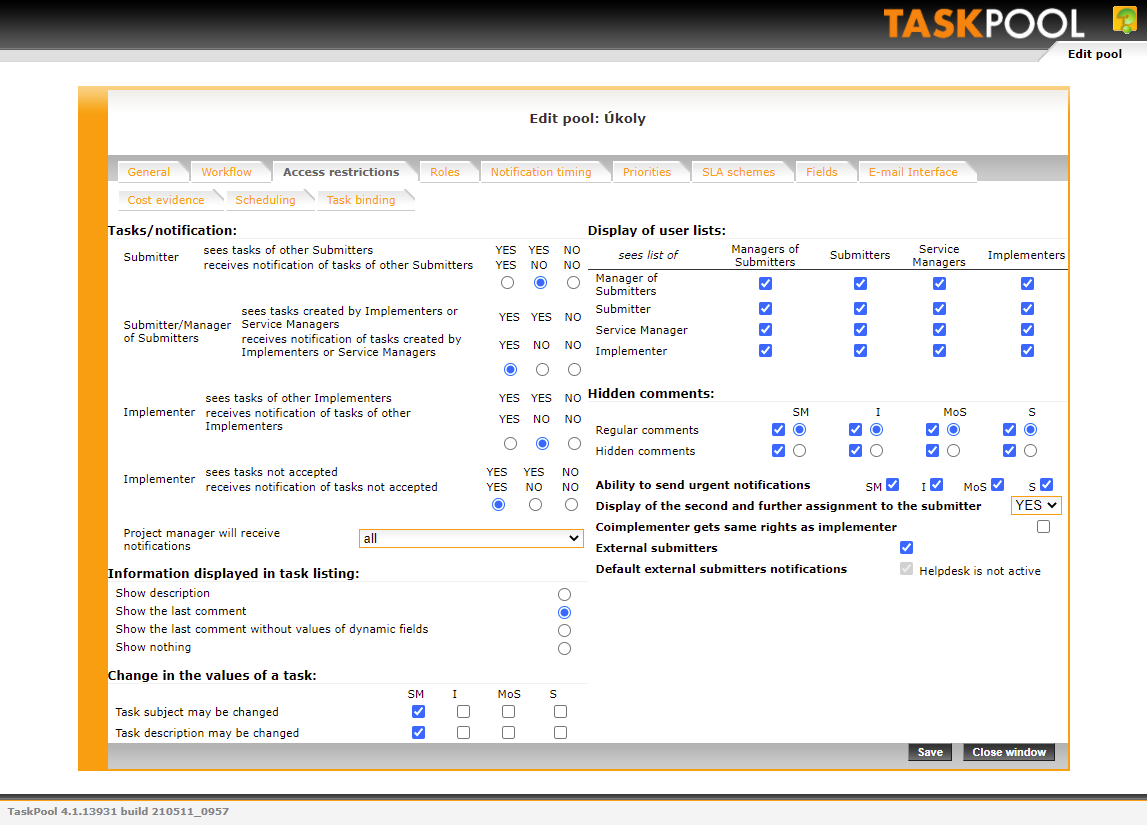
In the section Display of the users' list the rights are set, which role sees which role in the arbitrary list of users. This list can be found e.g. when assigning the task to the implementer etc. It is set as a default that all users see all of the given pool, we recommend keeping this setting.
In the section Hidden commentary we can set, which roles have the right to create the hidden commentaries to the tasks. Generally a hidden comment of someone from the agents side (implementer, service manager) is not seen by the submitters side (submitter, manager of the subbmiters) and so the other way. It is possible to allow that the commentary will be at every task hidden by default. This can prevent the possible leakage of internal information.
Option to send urgent notifications means that the given role will have checkbox at the bottom part "Urgent". If the checkbox is ticked, all the users of the pool will recieve the notifications with the status "URGENT !!!". This option is there because some of the users cannot recognise the difference between the urgent and less important notifications, therefore it is an option not to allow these notifications to be sent.
If the option will be switched off Display the submitter the second and other assignement, the submitter of the task will see only the first assignement to the implementer in the history. If the task is assigned to the other implementer, then this tab will not be seen in the history. If the option is active, then the submitter will see all the assignements for the whole cycle of the task.
Next option is Co-submitter overtakes the implementer's rights. If this checkbox is switched on, the co-submitter has the same rights as the task implementer. If it is switched off, the co-submitter can only add some commentaries to the task and receives the notifications from it.
The next is option to activate External submitters. For each task, it activates a field where you can list e-mails separated by a comma, on which they will be customer notifications are sent (as well as to the external task submitter).
Another option allows you to send eitherDefault external submitters notifications (according to the helpdesk settings), or a custom notification defined in the tab Notification.
The users are created and editted at the TaskPool level. The roles are assigned to the users by the administrator at the pool level. In each pool it is possible to define accessible number of the users (according to the licence). Each user can be given one of six roles in the particular pool. Each pool must consist of at least one service manager.
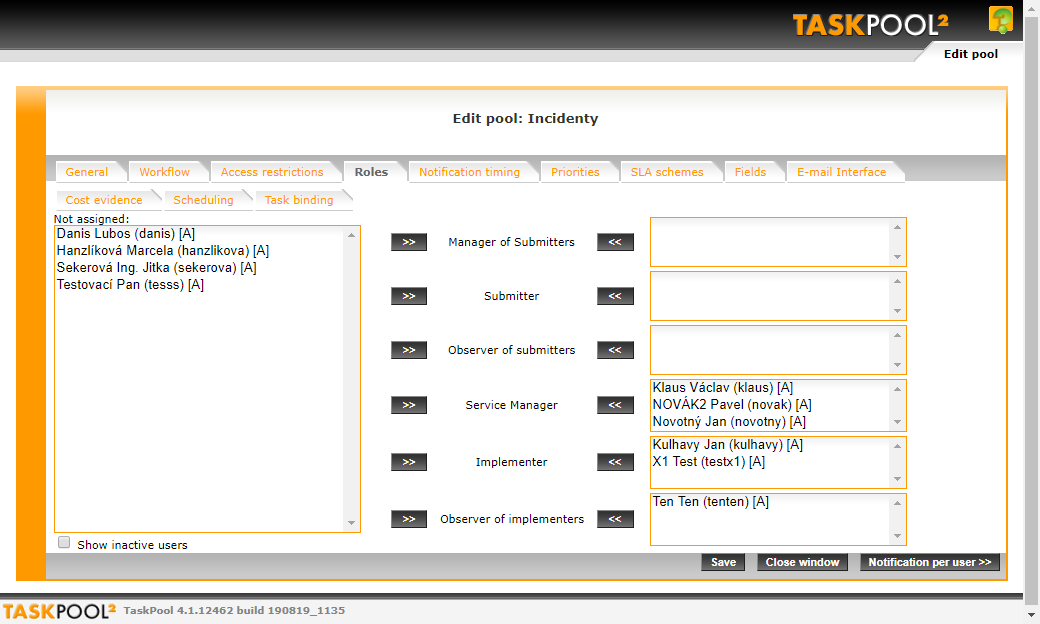
At the end of each user there is [A] or [N], which corresponds with the status active or inactive. In the list of not assigned users there are active users displayed. By ticking teh field Show inactive users the list will be added by these too. If there is "Not assigned" in the field, the users are not displayed, it is necessary to create them first. (see the chapter 2. Users).
You can label only one or more users in the left field and thanks to the arrow ">>" you can assign these users to the given role. Similarly it is possible to move vice versa. A change in the roles is possible to be made anytime during the pool existence, as well as the other setting of the pool features.
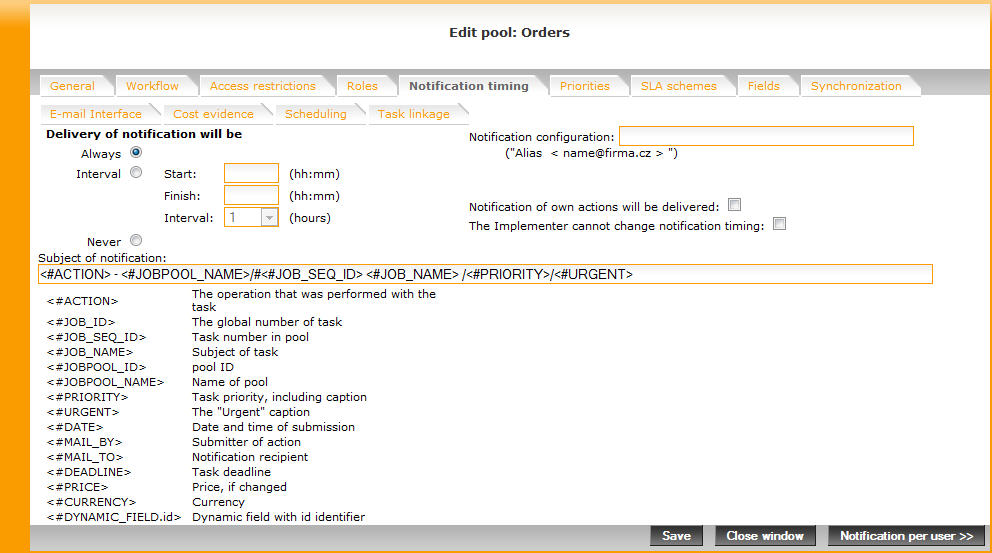
Notifications are e-mail notices to the users about the changes in TaskPool. At the card "Notification - timing" we can set timing of the e-mail sendings. Also we can set adress of the submitter and which format there will be for the subject of the notification.
Note: Notifications can be send except e-mails also via SMS, see more in the chapter 22. SMS.
Delivery of notifications will be
In this section we set timing of the notification itself. An option Always garants that notification will be sent straight away when the task is changed. Sometimes it is annoying and therefore it is possible to set a period of the sending and the time from and to the notifications will be sent. We can set e.g. sending the notifications from 8:00 to 17:00 with a period of one hour. This overall e-mail then will consists of the notifications from all the tasks, which were changed during the last hour. If we select Never, the notifications from the pool will be never delivered. The exception is the urgent notification. If the field "Urgent" is ticked during the task editting, the notification will be sent to all pool members.
Subject of notification
TaskPool enables subject configuration of the notification e-mails. It is possible to set a different subject of the notification for each pool separately. It can be used for e.g. better filtration of the incoming emails.
Note: This setting is not related to the periodical notifications, whose format of the subject is fixed.
At the configuration of the sample for the subject of the notification you can use these placeholder's strings:
<#ACTION> - The operation that was implemented with the task
<#JOB_ID> - The global number of the task
<#JOB_SEQ_ID> - Task number in the pool
<#JOB_NAME> - Subject of the task
<#JOBPOOL_ID> - Pool ID
<#JOBPOOL_NAME> - The name of the pool
<#PRIORITY> - Task priority (if the user can see it), including caption (e.g. string "Priority: Not specified")
<#URGENT> - The urgent caption, if it is ticked at the task
<#DATE> - Date and time of the submission
<#PRICE> - Price if changed
<#MAIL_BY> - Submitter of an action
<#MAIL_TO> - Notification recipient, the user who is notificated
<#CURRENCY> - Currency, if it was not changed
<#DEADLINE> - Deadline of the task, if it was changed
<#DYNAMIC_FIELD identifikatorPole> - Value of the dynamic field with identificator "idenitificatorField". The values of the dynamic fields will appear in the subject of the notifications only when the change of the dynamic field will be made. If the change will not be made, the value will not appear. There is also the name of the subject of the notification. If the notification recipient is the user of the role, which has no right to see the dynamic field, the subject of the notification will not be visible for him/her.
Operating strings are put into the subtitutional strings according to the syntax: <#DYNAMIC_FIELD identificator[Always][NoLabel]>
Always - it makes the dynamic field always shown in the subject of the notification, i.e. not only when it is changed.
NoLabel - it is shown only without the caption of the value of the dynamic field.
Note: Using of the dynamic field TextArea in the subject of the notification is possible, but more-lined tabs in the notification system moves to the single-lined. We recommend avoiding their usage in the subject of the notification.
Examples (assumptions are fields Radio Button with identificator "pb", with a caption "Saved at the branch:" and optional values "Prague" and "Brno"):
<#DYNAMIC_FIELD pb> - In case of the change, field will be shown e.g. "Saved at the branch: Prague", if the change is not made, nothing will appear. <#DYNAMIC_FIELD pb Always> It will always be shown e.g. "Saved at the branch: Prague"
<#DYNAMIC_FIELD pb Always NoLabel> It will always be shown e.g. "Prague"
<#DYNAMIC_FIELD pb NoLabel> If there is not a change made, it will be shown only e.g. "Prague", if not, nothing will appear.
Then it is possible to enter any static text, which will be then shown in the subject of the notifications (e.g. name of the company, section). Statistical text is entered without quotation marks or other marks.
- Example
ComArr: <#JOB_NAME> - <#ACTION> (<#JOBPOOL_NAME>) /#<#JOB_SEQ_ID> /<#PRIORITY>/<#URGENT> can mean that the notification will have this subject:
"ComArr: Not functional e-mail - Task assigned (IT support) /#720 /Priority="Quite serious"
Submitter of the notifications
According to the field in the e-mail "From" can the notifications be easily sorted in the post into the tabs, according to the pool they were sent from.
Notifications according to users
This option enables to set each user of the pool a unique timing of the notifications. Button "Notification according to users" will be shown when editing already created pool (it is not possible to edit it when a new pool creation because there are not any users put yet). It is at the bottom on the bar next to the buttons "Save" and "Close the window".
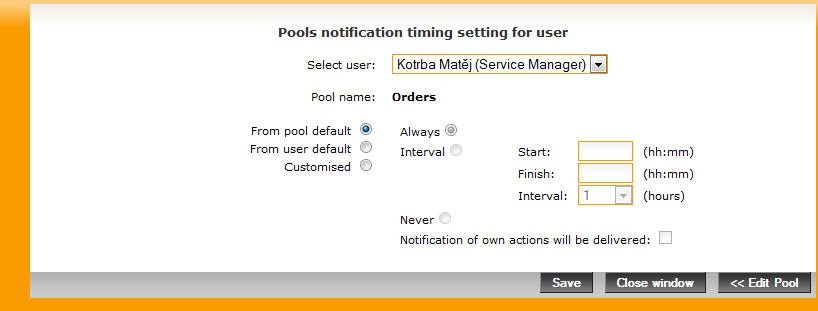
In the selection field on the top it is possible to select a particular user and then change the setting for him/her:
From the pool by default - timing of the notifications is taken from the pool settings.
From the user by default - timing of the notifications is taken from the user's profile which is possible to be set by the same way as in the pool.
Individually - timing of the notifications is possible to set individually for the given user without respect to the user or the pool settings.
On this card it is possible to set number of priority levels used by the given pool (e.g. from 1 to 4) and also the names of each priority in the supported languages (Critical, High, Medium, Low etc.). You can also determine which priority will be a default during the task creation.
Then it is possible to set, if the priority will be shown as ID (the number 1-4), or as Label (the name set of the priority level). It is possible to set for a detailed display and list of the tasks separately.
At the bottom part of the form the right to see the priority of the task according to the roles is possible to set (column "Display") and then the right to change the priority of the tasks according to the roles and tasks status (other columns).
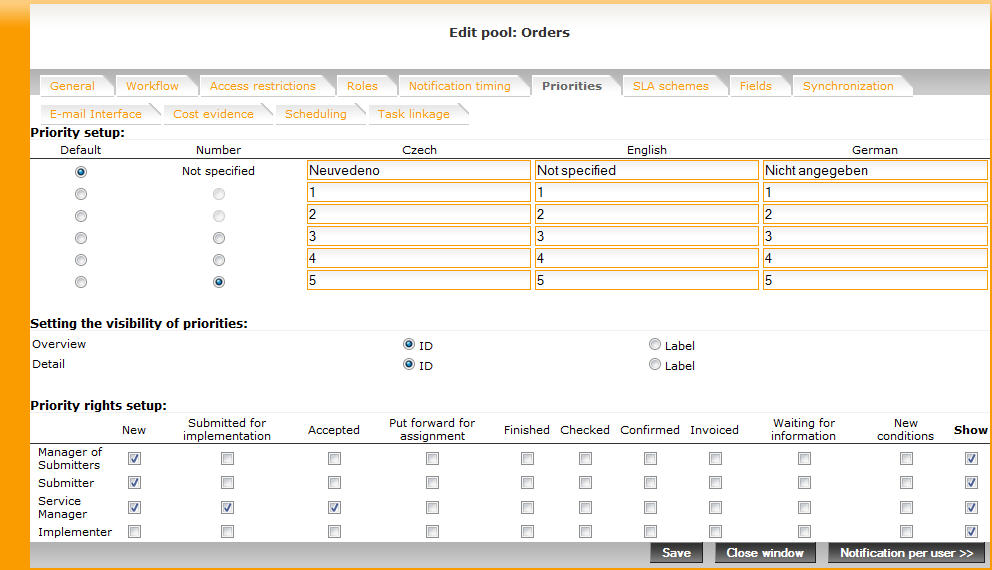
When configuring in the image, all roles see the priority, while Manager of submitters and Submitter can determine the priority only when creating task and Service manager can change the priority when creating and in the conditions Entered, Taken over, Proposed for allocation and New conditions.
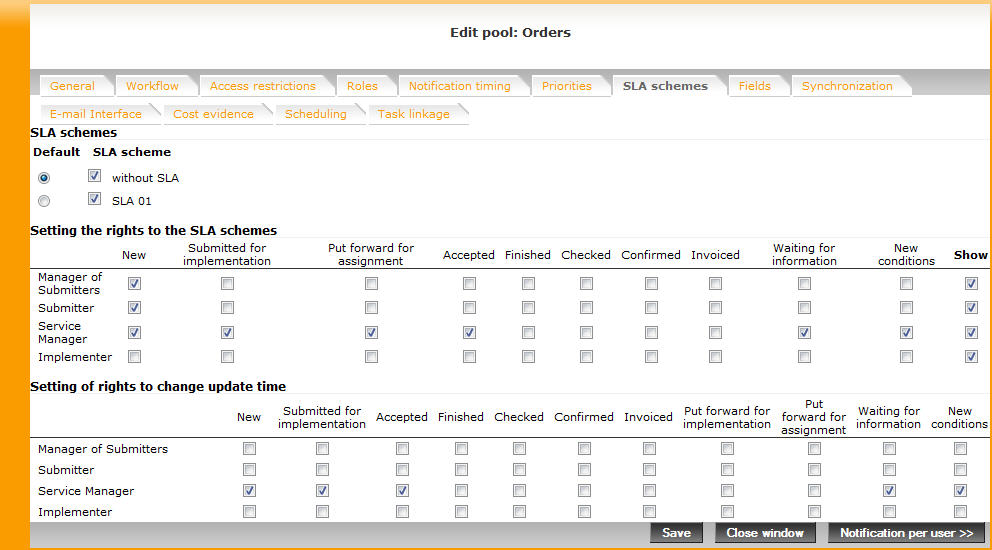
On this card it is possible to set, which SLA schemes will be used for a given pool and which will be a default one. Setting the rights for a change and SLA display and also for manual update time setting is similar to the settings of the priorities or the dynamic fields. More about SLA schemes configuration see in the chapter 18. SLA.
On this card it is possible to set, which dynamic fields will be displayed in the pool and which roles they will be displayed to. Dynamic fields from the global list of the created fields are assigned to each pool. See more in the chapter 4. Dynamic fields.
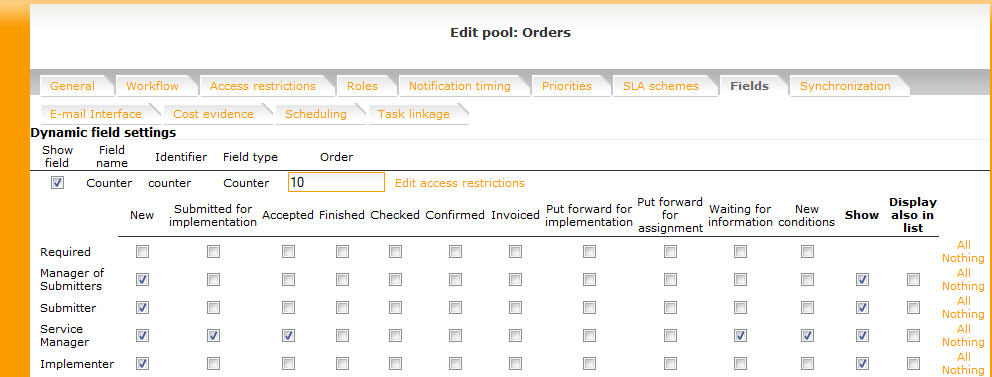
At the fields, which we would like to enter into the pools, is neccessary to tick checkbox "Show field" and create a value "Order", according to which fields in the task will be displayed below each other. As an order the different positive numbers. The field with the lowest number will be above. We recommend fields numbers e.g. 10, 20, 30 etc. because of the possibility to add fields between those which already exist, then you can use numbers e.g. 1, 2, 3 for them, otherwise it will not be possible.
Rights to see and edit the fields is possible to set similarly to settings priorities after clicking the link "Edit access rights". Each role is possible to be set exactly connected to the status of the task where these roles will have an option to be edited.
On this card there are not any information displayed normally. If TaskPool is synchronized with a different system (MarkTime, COBS), there will be configured a setting of synchronization. TaskPool synchronization with the other system is quite complicated for a standard user, therefore we recommend consulting it with ComArr stuff.
Taskpool enables to set choosing e-mail box and transform them to tasks. Then the users of TaskPool as well as helpdesk users create the tasks or add commentaries just via e-mail sending to the given e-mail address.
For the e-mail recipients' requirements is used protocol IMAP, POP3 or Gmail API, known mainly from the e-mail clients, which is used for downloading e-mails to the computer. The princip is similar here, but e-mails are entered into the TaskPool as a new task. This setting is for each pool separately. It is clear, which pool the tasks will be entered to.
For receiving e-mails it is necessary to change the state active and fill in the configuration tabs.
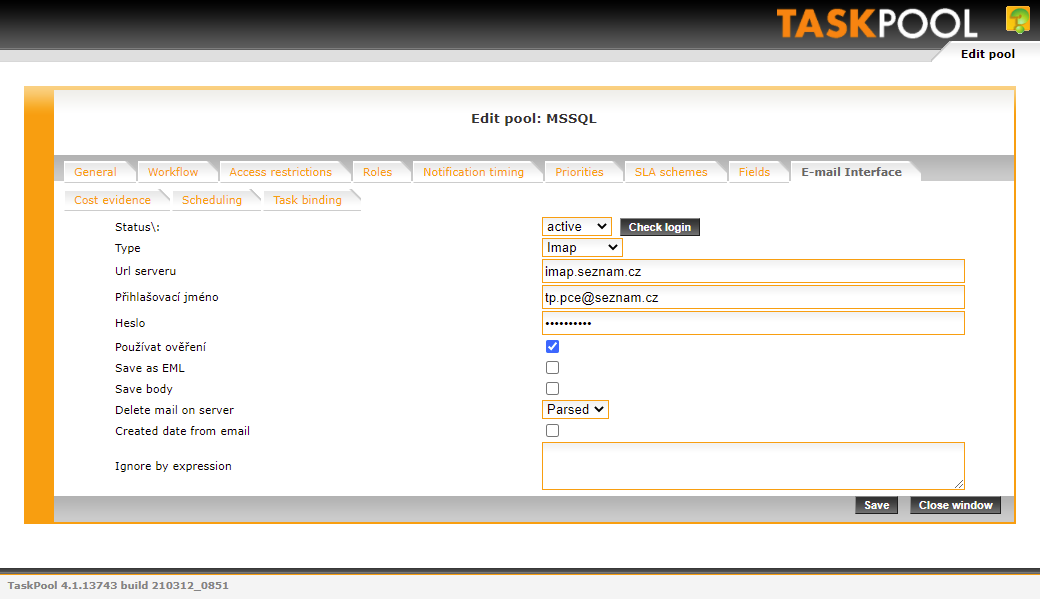
Using the button Verify login we will verify if logging successful or not, thanks to the small window that will pop up.
Server URL: IMAP or POP3 mail server address (eg: imap.seznam.cz)
Login name: usually e-mail (for example taskpool@seznam.cz); in the case of Office 365 it can also be used for a shared mailbox (for example e-mail@company.com/shared_e-mail@company.com)
Password: e-mail password
Use TLS: in most cases, the connection requires authentication to be turned on
Save as EML: the entire e-mail in EML format is saved as a task attachment
Delete mail on server: Never - the e-mail remains after reading in the mailbox; Always - after reading, the e-mail will be deleted; Parsed - only e-mails transferred to the Taskpool will be deleted, the others will be kept in the mailbox
Created date from email: the time of creating the task will be the time of receiving the e-mail; otherwise, the e-mail read time will be recorded
Ignore by expression: you can enter expressions in the field, the occurrence of which will prevent the e-mail from being downloaded to the TaskPool
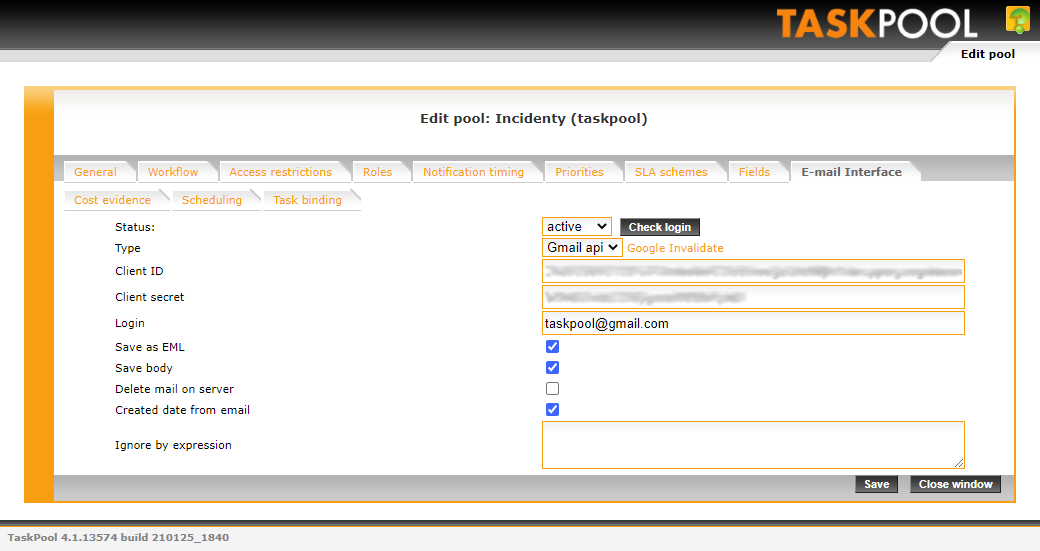
Client ID a Client Secret: these values are defined in the Google / Google Workspace account settings. Users of production server taskpool.net it is not necessary to set these values, a connection is already defined for them. Users of the on-premise solution must create this verification for your gmail account ( https://console.cloud.google.com).
Login: e-mail from which tasks will be retrieved.
At the moment, when the e-mail will arrive to the given address after activating the function, TaskPool creates a new task of it in the given pool. Subject of the e-mail is understand as the subject of the task, text of the e-mail is saved into the task description. Deadline will be set by default for a given pool. If the implementer of TaskPool will answer to this e-mail, the answer will arrive to the original sender (submitter) onto his/her e-mail. If he/she answers again to the e-mail, reaction will be written as a commentary to the existing task. Submitter does not need to know that there is TaskPool on the way.
For the permission of e-mail interface for the TaskPool user is needed to map their names and addresses which e-mail can arrive from. These addresses do not need to be the same to addresses where the notifications are sent to these users. Mapping is done at the card "POP3 assignement" in the administrator's part. See more in the chapter 14. POP3 assignment.
Except the option of creation the requirements from the internet also Helpdesk module allows the receiving the requirements via e-mail. This is possible to do for authenticated users of Helpdesk (LDAP, or DB authenticating) as well as for anonymous users (if it is allowed in the Helpdesk setting). See more in the chapter 16. Helpdesk module.
The conflicts might appear when one e-mail address is assigned to the TaskPool user as well as Helpdesk user. Priority is the order which is used for collecting the POP3 mailboxes:
Firstly, system finds all the mapped e-mails from the TaskPool users and assigns them to the tasks.
Then it finds and selects messages from authenticated Helpdesk users (LDAP or DB authentication) and assigns them to the tasks.
If there is allowed an anonymous task creation in Helpdesk settings, then the rest of the e-mails in the mailbox will be put into the anonymous Helpdesk anonymous users. If the anonymous task creation is not allowed, rest of the emails will be removed.
Firstly you need to fill the Type, where you will choose from the menu OAuth2 Imap, after that you will fill the login name, URL and from Azure you need to add data to Client ID a Client secret (More in Setting OAuth 2.0 for TP). Then you need to save the data and close the window.

Again you will open Email Interface and there will be newly displayed Login/Logout.

By clicking on Login you will be redirected to the Microsoft page, where the rights are approved.

Submit, and if everything went well, it has to show up Okey.

Go back to Email Interface and by Key F5 refresh the page. The filled fields shoul appear date, acces token a refresh token. The data needs to be saved again and close the window.
We can check the login using the button Verify login (More in Description of e-mail interface).
Enter the web page in your browser (https://aad.portal.azure.com/).
Login to the user, which has authorization to manage Microsoft Azure (account Microsoft 365 with role Global administrator or user with permission to change Application registration).

Choose from left column item Azure Active Directory and then Application registration.

Choose the option New registration.

Fill name Taskpool and as identificator fill in the URL adress of your application TaskPool.
Example: https://firma.taskpool.cz/oAuth2LoginCallback

Then choose from left menu Verifying and below fill in the URL adress for logout and check option Tokeny ID (used for implicitn and hybrid tokes) and save.
Example: https://firma.taskpool.cz/index.do

Choose the menu Certificates and secret codes, choose Clients new secret code and fill in Description and choose validity 24 months.

Generated code Value copy and paste to TaskPool as item Client secret.

Choose Overview and copy the value ID aplications (clients) and paste to Taskpool as item Client ID.

Furthermore you must choose Business applications and pane Consent and authorization.

And check, if it is chosen option Allow user permission for applications.

On this card there are also sets of the rights for each group of time records. More about the time records configuration in the chapter 21. Cost evidence.
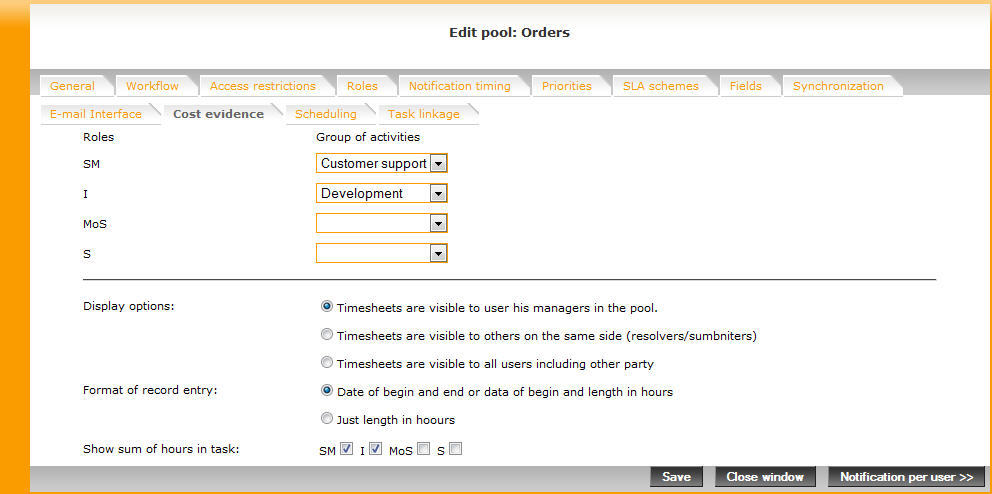
For each role we can assign one group of activity. In our case the service managers were assigned the group of activity Customer support and the implementers were assigned a group Development. When time record creation, each role will see all activities from the given activities and it will be possible to write into them.
In the other part of the screen there are settings of display options. They are these:
Timesheets are visible to user and pool managers - time records are visible only for a particular implementer and all service managers of the given pool. Submitters records will be visible only for a particular submitter and all service managers of the given pool.
Timesheets are visible to the others on the same side - except particular implementers the records are visible for the other implementers and service managers of the given pool, actually except the submitters the records will be visible for other submitters and managers of the submitters in the given pool.
Timesheets are visible to all users including the other side - it is completely open setting. Every user who has any role will see the time records of each user of the given pool.
Format of the records editing might be the following:
Date of the start and end or the date of the start and number of hours - when time record editing there is always necessary to insert the date and the time of the activity start and then you can select the number of hours or the end of the activity.
Just number of hours - when time record editing there is possible to set only the number of worked out hours.
Then it is set which roles will have the record displayed of all time to the given task.
The scheduling function serves for a clear record of the timetable of individual tasks. The solution of each bag can be planned for any date or time period. The scheduled pocket scheme can then be imported into calendaring software, tested with Microsoft Outlook 2007 and 2010 and Mozilla Lightning, Apple iCal and Google Calendar.
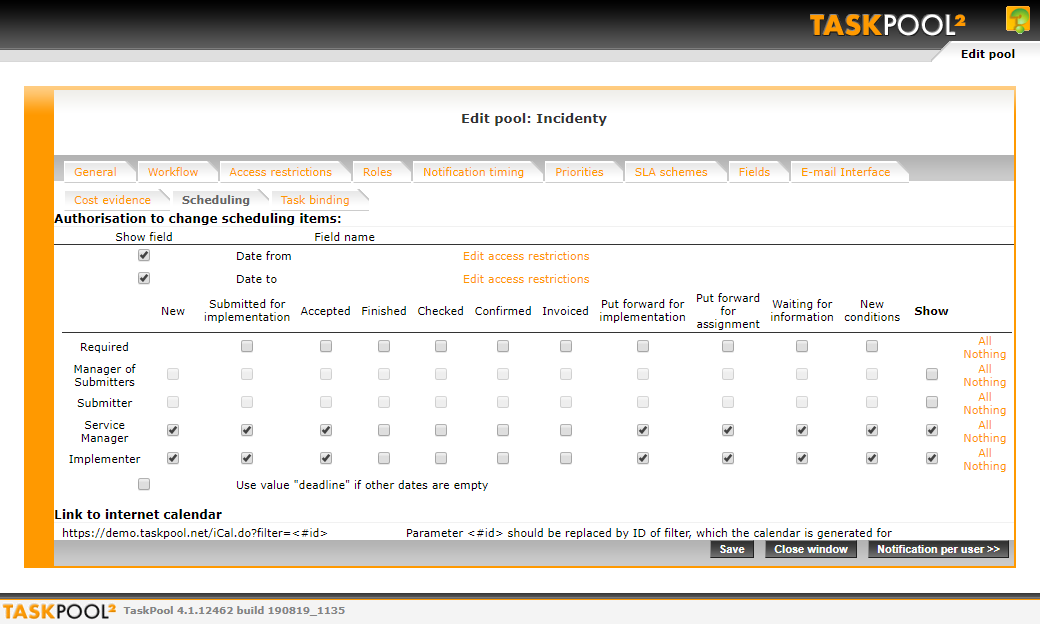
Planning rights are set in the same way as for dynamic fields, so the planning right can be assigned eg only to the solving side, etc. It is also possible to set in which states this field will be mandatory. In the editing of the pocket, the next two items are displayed to the authorized roles, in which the scheduling dates are filled.

In case of active dialing se value "deadline" if other dates are empty there is no need to fill in individual dates. If at least one field is blank, TaskPool automatically substitutes a deadline value. For better control of bag planning, however, we recommend that you disable this option.
Scheduled tasks can be imported into calendar systems either automatically or manually. Both procedures are described in the user manual in chapter 11. Scheduling.
There are two ways to get a calendar's URL. Here will be described just the one that requires the assistance of an administrator.
For example, we will use import to Mozilla Lightning, the import procedure in other applications is similar. Use the option File -> New object -> Calendar... open a window to create a new calendar.
On this tab, it is possible to specify the possibilities of links between individual tasks. Binding of tasks is described in the user manual in chapter 6. Linking tasks.
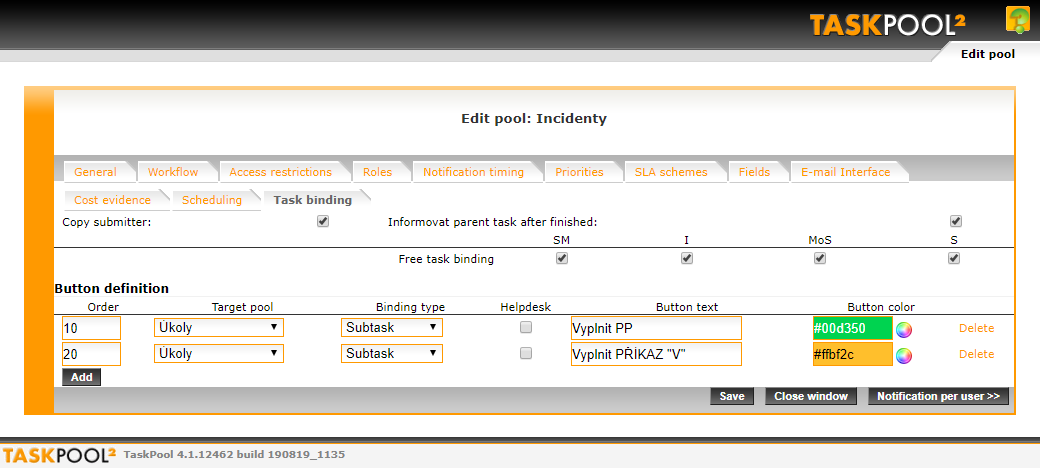
Free linking of tasks allows individual roles to create ties in a particular pool to any other pool to which they have access. Thus, they can create new parent tasks, sbutasks and links to a given task, or bind these tasks to other existing tiles.
Copy submitter - use this option to copy the original task submitter to the target pool (if the target pool configuration allows it).
Notify parent task after finished - if this option is checked, a comment will be inserted in the parent task when the subtask is ended (finished, deactivated, moved or exported). If the last subtask is ended, it reports All Subtasks ended.
In this tab, you can also set buttons to simplify link creation. The button predefines which link and to which pool it will be created. In the Edit Bag window, these buttons will appear below the comment window, and when you click on them, the form for creating a new bag will automatically appear in the preset pool.
The Add Link window may look like this:
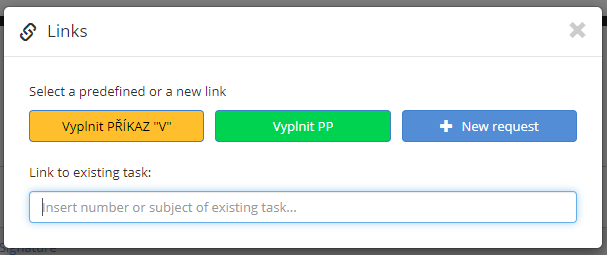
If the user (role) has the right to freely link the tasks, it is accessible by clicking on the link below the buttons.
Configuration of each pool is possible to copy. Only configuration is copied, tasks created in the given pool are not copied. The copying is possible to be done by clicking the button "Copy Pool" in the list of the pools. The form will appear after a new pool creation with the difference that the whole configuration including the name will be the same as the copied pool configuration. We recommend changing the name of the pool and then click the button "Save". In the list of pools there will be a new pool with the same configuration. It is possible to copy Helpdesks in a similar way, see the chapter 16.16 Helpdesk copying.
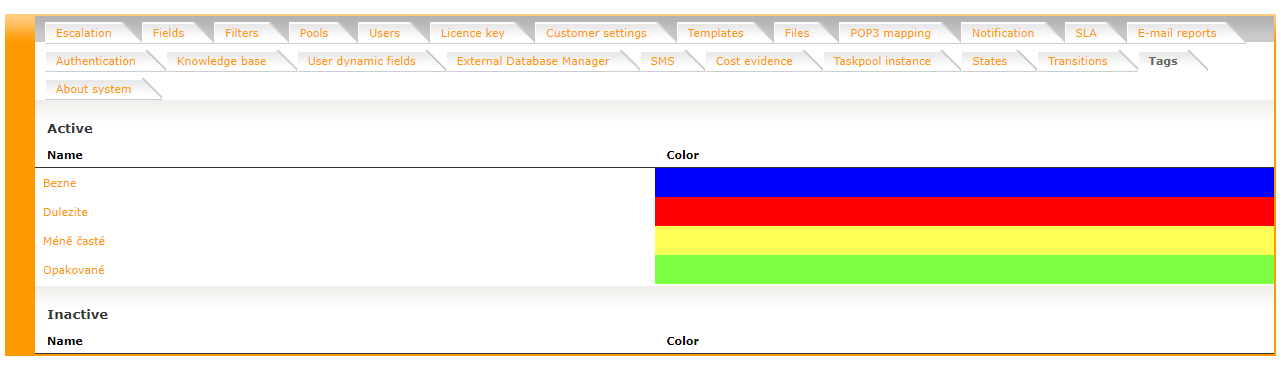
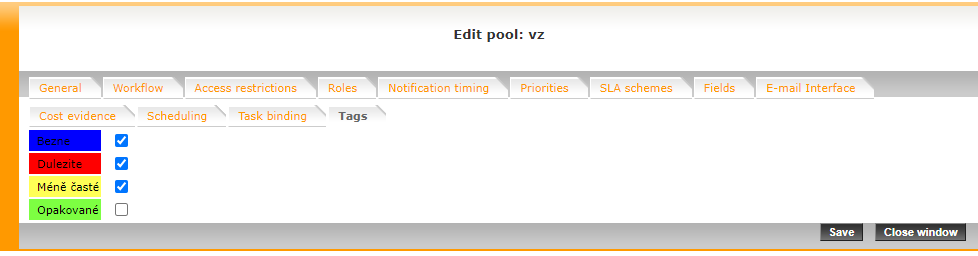
On this card it is possible to add new tags. On the left click on "New", where you set a name and color of the tags. Then click "Save" and "Close window".
Move to card Pools, where you can click on the task name.
In task editing click on card Tags and check them. Then click "Save" and "Close window".
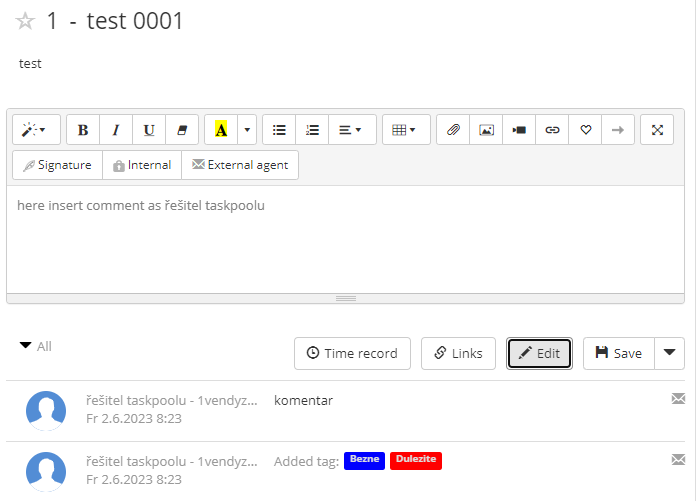
In task click on "Edit". In the right column you can filter or choose unlimited number of tags from the menu. Save it again and the change will appear in the comments.
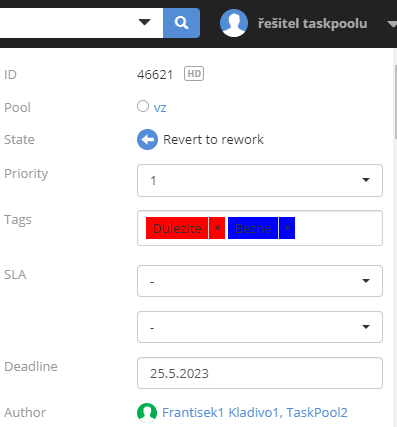
In the task overview you can see set tags, which are color-coded.


Table of Contents
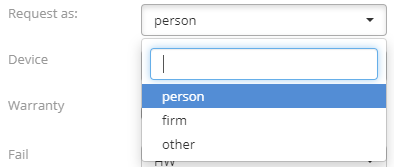
Dynamic fields enables to define arbitrary additional data structures. They are possible to be created in the administration of TaskPool and assigned to each pool.
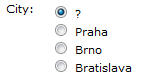
Dynamic fields actually represents the other features of the task and they are possible to be used for saving different values in the task or e.g. in combination with filters for task changes according to these values. Dynamic fields also enables to display data from the external databases in the task.
Creation and editting of the dynamic fields is on the card "Field" in the administrator's section. Creating is done by a button "New" and editting by clicking onto the name of the existing field.
In the form for a new field creation we firstly select a type of the dynamic field, identificator (it is a name, which identifies possitively the field - a unique for each one), then the name of the field according to the languages and default field value. Default value will be displayed until the first adjustment of the field, e.g. at the text fields it is preselected text.
At the field "OnChange" is possible to write arbitrary javascript. There could be more these scripts; they are divided by a semicolon (";"). These scrips are always automatically implemented after the field loads. We can create e.g. dependences between the fields. This is described and set in the demo configurations, which our staff will show you if requested.
These features have all fields in common. Other features differ due to the type of the field and they will be described in the following chapters.
This field is for writing an arbitrary text into one line. After the selection the type of the field, the general features, size of the font and maximal number of the characters, can be assigned, all in numbers.
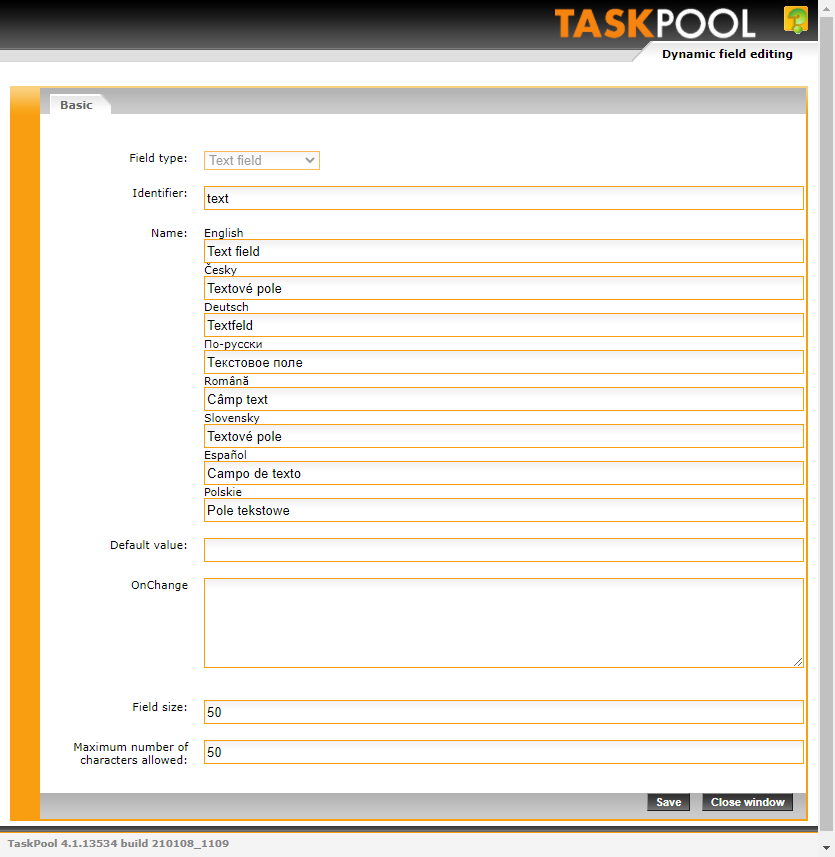
In reality the field looks like this one:

Dynamic field Textarea is similar to Textfield, but with a difference in a possibility to write a text onto more lines. We can set a number of lines and their width during the creation.
These two types have a similar setting, only display is different. We select the type of the field and create options of the selection except the general features. We create these options on the card "Options" in the field edit.
In the field "Default value" we insert an ID of the default option.
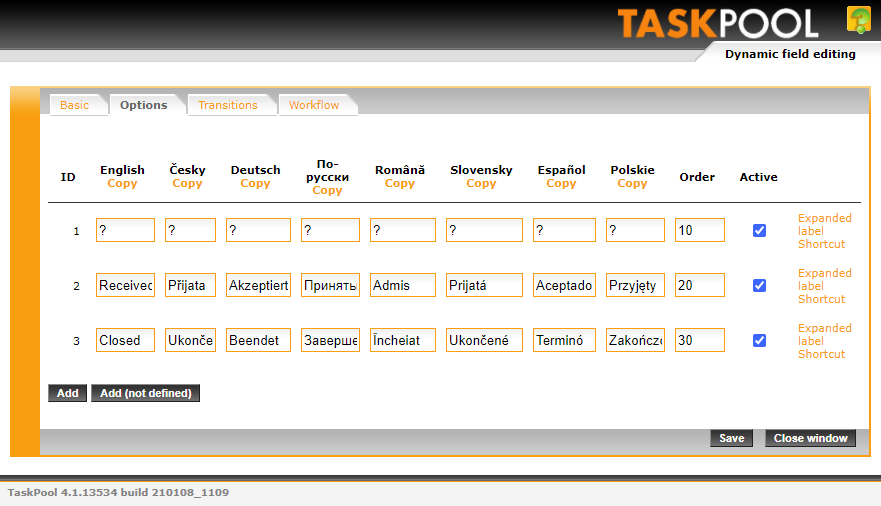
The Selectbox field has a whisper that makes it easier to find the record you're looking for.
Note: Functions of the cards "Transition" and "Workflow" in the Selectbox settings are described in the chapter 5. Dynamic fields extension.
Dynamic field Multi Selectbox works similar as klasic Selectbox, but it allows you to select several options at once.

This type of the field is a checkbox. Except general features, this field does not have any other setting options.

The field type Number is similar to Textfield with a difference in keeping only the numerical value. TaskPool controls the entrance values and do not allow the difference from the numerical ones. For the decimals the point is used in the field (in the field is then e.g. 10.564, at the integers it is 10.0).
This type is presented by a counter. The value insterted into this field do not replace the original value when task modification, but it is added. It means when we write into the type Counter with value 20 value 5 after modification, then after saving, the value will be 25 in this field. Each modification of the field is written in the task history.
Value of this field can be decimal (e.g. 15.27), and TaskPool uses the point in the field Number.
This field is suitable for e.g. number of kilometres. We do not recommend using the field for worked out hours, there is a special function in TaskPool implemented, see more in the chapter 21. Cost evidence.
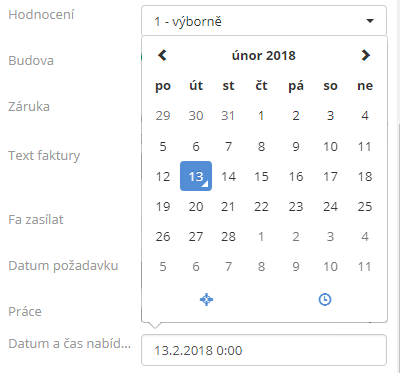
As the name shows, the values of date, time, actually values of date and time equally, can be kept in these fields. The expanded options can be used for categorization e.g. in filters we can search specific time periods. We can use standard arithmetical operators (<, >, =).
Tabs are inserted in format:
Field Date - day.month.year
Field Time - hour:minute
Field DateTime - day.month.year hour:minute
For the dates inserting the IMHO calendars can be used.
For configuration of this field the basic knowledge of SQL language and Javascript is essential. If you do not have this knowledge, we recommend consulting this configuration with ComArr stuff.
SQL selectbox is a field, where it enables to use external database. We use it e.g. when we want to use selectbox with a big amount of otpions, which are saved in the external database or for creation gradually depended fields. We avoid the configuration of each option seperately into the classical selectbox. It can be a selection of a type of device, workplaces etc. Number of options is flexible because it does not work with statistical options, but with SQL requirements.
The creation is correctly configurated authentication for SWL selectbox. In this authentication the database is determined, which will be used for option selection SQL selectbox (more about authentication in the chapter 17. Authentication).
As at the classical Selectbox we can choose the AutoComplete usage. The AutoComplete is suitable when we have a big amount of options.
Let's repeat that the orders are inserted into this field, which are implemented gradually after the dynamic field changes and when the value of this field loads. Each orders are divided by a semicolon (";"), which is a Javascript code. At SQL selectbox might be these orders:
LoadDependentOptionsByHdUsername('variable') – up date SQL selectbox with a name "variable" when parameter HDUsername used. HdUsername is a user name of the logged-in user at Helpdesk.
LoadDependentOptions('variable', this.value) - up date SQL selectbox with a name "variable" when the parameter of the actual values of this dynamic field used.
LoadDfValuesFromDb('n','SELECT a as dfa FROM … WHERE …') – setting the values of the dynamic fields via query from the database, when the authentication number 'n' is used for a query.
Example 1)
LoadDependentOptionsByHdUsername('CSlocation')...a new list of options is created into the dynamic field CSlocation while value HdUsername used.
Example 2)
LoadDependentOptions('CSdevice', this.value)...a new list of options is created into the dynamic field CSdevice when the actual values of this field used.
Example 3)
LoadDfValuesFromDb('3','SELECT z.sn as CSsn, z.pn as CSpn,
   p.name as CSproject, z.id_tp_sla as sla_schema FROM device z
   JOIN project p ON(z.id_project = p.id)
   WHERE z.id = \':fieldValue\'', this.value)
...into the fields CSsn, CSpn, CSproject, sla_schem will write the values from the SQL query, while into \':fieldValue\' inserts actual value of this field and use the authentication number 3.
Note: From these examples it is obvious that not only dynamic fields can be addressed, but also task variables.
Only SQL orders for option selection are set on the card "Options".
A selection "Connection to database" can offer all configurated authentications. The selected authentication will be used for option SQL selectbox selections.
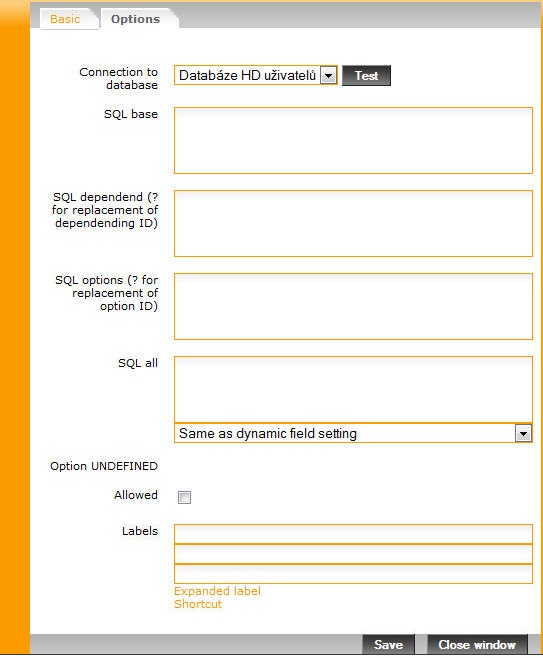
Basic SQL returns a list of values which should be insterted into SQL seletbox after page authentication.
Example 1)
SELECT l.id as optionIdent, l.name as label FROM location l
   WHERE l.id = 0
...returns a list of all locations, where id = 0.
Example 2)
SELECT 0 optionIdent, '' as label, '' as shortcut
...tops us the empty values into the selectbox.
It returns the list of all dependent options SQL selectbox, which can be selected. This link is used only in case of dependent open (LoadDependentOptions...). A set is possible to limit also depending on subordinate dynamic field or helpdesk user.
Example 1)
(SELECT 0 as optionIdent,'' as label, '' as shortcut)
   UNION SELECT l.id as optionIdent, l.name as label
   FROM location l LEFT JOIN user at
   ON (u.id_customer = l.id_customer)
   WHERE l.active = 1 AND u.login = '?'
...we select the list of locations according to the helpdesk customer. But in this example there is not a subordinate dynamic field, which would give its own value for limiting the set, therefore it is necessary to reopen it again to variables display, because the set should be limited according to the actual helpdesk user. We will say which value should be used - user name of the helpdesk user. This is done on the bookmark "Basic" in the field "OnChange" where we write an order "LoadDependentOptionsByHdUsername('location');", when 'location' is a name of the SQL selectbox variable.
Note: To work this properly also at Helpdesk, the input <#hd_login> must be used in the helpdesk form (can be also hidden). More in the chapter 16. Helpdesk.
Then in an example below the value "active" is used at the locations to display only active locations. This structure is used "(SELECT 0 as optionIdent,'' as label, '' as shortcut) UNION" before the order from the database selection to have also an empty value in the list (i.e. no value selected by default). In the setting "default value" can then select 0, to have this empty line by default.
Example 2)
In the subordinate SQL selectbox "device", which is dependent on the particular location, SQL can be this for options selection:
(SELECT 0 as optionIdent,'' as label, '' as shortcut)
   UNION SELECT id as optionIdent, tag as label FROM device
   WHERE id_location = '?' AND active = 1 ORDER BY label
Into the superordinate SQL selectbox is necessary to insert this order "OnChange": "LoadDependentOptions('CSdevice', this.value)".
It is for values selection, where the particular options are displayed (e.g. in the task list).
Example 1)
SELECT l.id as optionIdent, l.name as label
   FROM location l WHERE l.id = '?'
It is for a wider definition of all options. The overall list is used for ad-hoc search (Quickfilter) and when dependent values HDUsername list in case it is not the helpdesk task.
Although there is an option how to display it at SQL selectbox, there it is possible in addition to select if the searching element in Quickfilter will be displayed as Autocomplete or Selectbox. It is because the set displayed in SQL selectbox can be mostly limited by a superordinate field, but the sum of all options might be pretty large.
Example 1)
SELECT l.id as optionIdent, l.name as label FROM location l
For each SQL Selectbox it is possible to enable the option "Undefined". This option is worked on TaskPool level, it can not exist in the database. The option Undefined is not the content of the SQL task, but if used, it always sticks to the result of the SQL task and it contains the value zero ("0").
The option undefined is not good to use, where some of the tasks cannot contain this value. In these cases it is correct that the SQL task returns this option directly - either the option should already be included in the database or its display should be arranged by modifying the SQL task using UNION operator.
The option undefined is possible to set a label in each of the three languages, including an extended label and an abbreviation.
Example 1) Simple SQL selectbox
Dynamic field has an identificator "Category".
SQL basic: SELECT 0 optionIdent, '?' as label
   UNION SELECT k.ID as optionIdent, k.category as label
   FROM category k WHERE k.active = 1
SQL dependent: (empty)
SQL options: SELECT k.ID as optionIdent, k.category as label
   FROM category k WHERE k.ID = '?'
SQL all: SELECT k.ID as optionIdent, k.category as label
   FROM category k
Default value: 0
Example 2) SQL selectbox dependent on the other SQL selectbox
Dynamic field has an identificator "Subcategory". In this example we are using SQL selectbox configured according to an example 1 and moreover we are going to create the second dependent SQL selectbox "Subcategory".
Into the configuration of superordinate field (in an example 1) we are going to write "OnChange" this order: LoadDependentOptions('Subcategory', this.value);
Subordinate SQL selectbox "Subcategory" reaches then these values:
SQL basic: SELECT 0 optionIdent, '?' as label
SQL dependet: SELECT 0 optionIdent, '' as label UNION SELECT pk.ID as
   optionIdent, pk.subcategory as label FROM subcategory pk
   WHERE pk.category = '?' and pk.active = 1
SQL options: SELECT pk.ID as optionIdent, pk.subcategory as label
   FROM subcategory pk WHERE pk.ID = '?'
SQL all: SELECT pk.ID as optionIdent, pk.subcategory as label
   FROM subcategory pk
Default value: 0
Example 3) SQL selectbox dependet on logged-in user
Dynemic field has an identificator "Location".
In the field "OnChange" we will write this order: LoadDependentOptionsByHdUsername('location');
SQL basic: SELECT 0 optionIdent, '?' as label
SQL dependet: SELECT l.ID as optionIdent, l.location as label
   FROM location l join users u on (u.location = l.ID)
   and u.username = '?' and l.active = 1
SQL options: SELECT l.ID as optionIdent, l.location as label
   FROM location l WHERE l.ID = '?'
SQL all: SELECT l.ID as optionIdent, l.location as label
   FROM location l
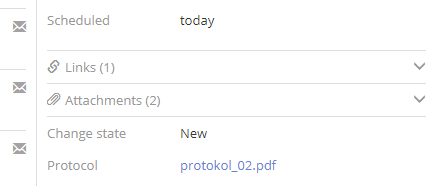
In addition to attachments that can be added to comments, you can create and display a specific attachment type and display it directly between dynamic poly. Examples are Offer, Contract, Invoice, Protocol and other types of attachments. This attachment can be overwritten new file and keep it up to date. The history of changes is recorded in the history in the task detail.
A text field whose content is visually hidden from the author and other users (replaces * with characters).
A text field with a link to URL, FTP, mail-to, etc. protocols can be displayed. URL link opens in new browser tab.
Signature field, where a signature can be entered by mouse or by touch on the touch screen. At the profile we click on Administration and choose card Field. Add "New", fill in data and save.

We click on card Pools a search for task and open it. In the card Pools we find the signature, check it and using "Adjust access restrictions", set other parameters, then save.

In task detail click on "Edit" and in right column down write the signature to the signature field, which can be removed by the cross. Save it and the changes will be visible in task history and signature will be seen in right column down.

Html field, where you can enter a link that will be displayed and clickable.

Click on card Pools and search for task, open it. In card Field then find html, check it and by "Edit access restrictions" set next parameters. Then save it.

In task detail click on "Edit" and in right column down into the html field paste the link, which can reach the page. Save and changes will be seen in task history and html will be seen in the right column down.

Table of Contents
For understanding this chapter we recommend reading the chapter 4. Dynamic fields first.
Fields type of Selectbox have some wider features, which influence workflow of the overall pool, and enables administrator to adapt the cycle of implementing the tasks to the company's requirements.
Tasks can change their status only according to the values of the dynamic fields and vice versa. It is possible to create own status of tasks (e.g. for sale department "Order", "In production", "In stock", "Dispatched"). TaskPool then distinquishes the status itself and the user do not have to use them (Assigned to implementation, Taken over, etc.). The own company's terminology can "overlay" the TaskPool terminology.
Then it is possible to set the rules for transition among the options of Selectbox. All transitions are allowed by default, i.e. it is possible to move from any options of Selectbox to the other one. This extension enables to set the exact rules for these transitions. E.g. if the goods are being dispatched, it means they cannot be in stock yet. We can set the possibility to enable transition between the "In stock" and "Dispatched", but not from the other side.
These settings are defined for each field of type Selectbox separately.
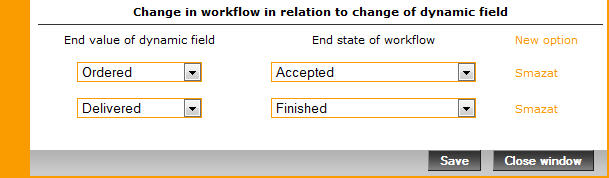
Value of type Selectbox for the task can be changed automatically according to the change of the state of the task (automatic or done by the user).
For each dynamic field of the type Selectbox it is possible to define the condition thanks to a triple of values, while completing the change of the dynamic field will appear. This triple of values consists of:
End state of workflow - the change of the state (e.g. Finished), which would start the change of the dynamic field's value.
Initial value of dynamic field - the value, which the dynamic field would be changed from. If the actual value of the field is different from the value set here, action for change of the state will not be done.
End value of dynamic field - the value of the dynamic field, which will be set into the field after the action completion.
For a successful action the two conditions must be completed (change of the state to the end state of the workflow and initial value of the dynamic field).
Conditions are defined thanks to the selections of possible values of selectbox and are independet on the users' roles in the pool and the actual workflow of the pool. If the user has no right to change the value of the dynamic field and will make a change in the workflow (e.g. completes the task), dynamic field will remain without a change. About the changes of workflow and values of the dynamic fields the users are announced by notifications and these changes are recorded in the task history.
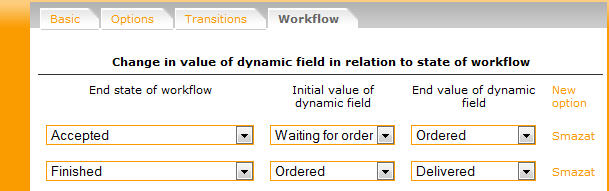
For the example in the picture: If anyone in the pool (who has the right to change the value of this dynamic field) completes the task and at the same time there will be the value of this Selectbox Ordered, then the value of the field will be automatically changed into Accepted. It is similar when task takeover.
For each dynamic field of the type Selectbox it is possible to define a condition thanks to duo of the values, while completing the change of the taks' state will be done. Duo is:
End value of dynamic field - the value of the dynamic field which starts the automatic action
End state of workflow - the value, which state of the task will be changed to, if the dynamic field is changed to the end value in conditon
Conditions will be defined thanks to the selection of the optional values from the given selectbox. Conditions are independet on the users' roles in the pool and the actual workflow set in the pool. If the user does not have a right to change the workflow and will change the dynamic field, the workflow will remain without changes.
About the Workflow and the dynamic fieds changes the users are announced by notifications and these changes are recorded in the task history.
TaskPool consists of the status, which is not possible to enter automatically, because other parameters are necessary for the state's change.
Status, which is not possible to enter automatically:
On behalf of somebody assigned to the implementation - requires the submitter's value
submitted to assignement - requires the submitted implementer's value
Assigned - requires implementer's value
New conditions - requires deadline value, e.g. price
Conflicting situation and its solution
During the task implementation there could appear so called conflicting situations. These situations appear when the workflow should be changed into the state which is not possible in the given pool. For example, in the given pool it might not be possible to select the state Confirmed, but there might be a rule which requires this change. These situations are then implemented according to the following key:
Table 5.1. Procedure when solving conflicting situations
| Conflicting state | Action in case of the given state is not possible in the pool |
|---|---|
| Solution submitted | Assigned to solution |
| Checked | A) Waiting for archiving B) Without action |
| Confirmed | A) Waiting for archiving B) Without action |
| Invoiced | Waiting for archiving |
Note: rule A) counts, when there is not any other state in the workflow, rule B) counts, when in the workflow there is another state before archiving.
Conflicts flowing from the different roles position
The other conflicts might appear, caused by the differences in power of each role, e.g. submitter cannot assign the task. These conflicts are implemented by a following way (number labelling of the task status described in the chapter 7.2. Filters definition):
Task assignement is possible only for the implementers and service managers. It is transition from StateID < 10 to StateID > 10. The user who will cause the transition is then mentioned at the task as a implementer (it is not at the state Waiting for information).
When the transition from StateID > 10 to StateID < 10 is the implementer taken away (it is not at the state Waiting for information).
It is possible to precede these conflicts by setting the rights for editing of the dynamic fields in each state. They are set in the configuration of the pool on the card "Field" (see the chapter 3.8. Field). Submitter is not allowed then to edit the field until the task is assigned.
Other extension is Transition limitation among the values of the dynamic fields. It means that the value of the dynamic field can be dependent on the previous value. In reality we can determine which values can be changed to the present value and which ones not. These limitations are independet on the users' roles and workflow of the given pool.
Configuration of the transition limitation can be done for each combination of the previous and the new values of the field thanks to a matrix of checkboxes. Lines of the matrix mean the previous value of the dynamic field, columns then describe the target value. If the field is ticked, the change of the field will be allowed. On the other side the transition will be prevented.
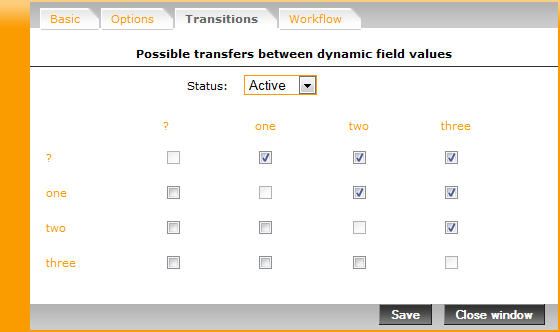
In the example in the picture it is possible to transit among each value of the field only "ascending". If I change the field onto the option "two", come back to "one" and "?" will not be possible.
If it is possible, configure the field so that the conflits will not appear. In most of the cases it is possible to do so. The best alternative is to prevent the conflict appearance using the settings of the rights for the dynamic field editing. (see the chapter 3.8. Field).
If the conflicts appears anyway, conditions are evaluated in the following order.
Workflow and the rules of TaskPool
Transition limitation among the status of the dynamic fields in relation to the status of the dynamic fields
Change of the state of the dynamic field in relation to the change of the workflow
Change of the state of the workflow in relation to the change of the value of the dynamic field
Other collision can appear, when more fields are changed and these changes can cause more changes in the state of the task. We strongly recommend using only one field for the state changes.
Table of Contents
This function enables to add the dynamic field not only into the pools, but also into the users' configuration. The usage can be in e.g. efective monitoring of employees' holiday. We can also set each company's areas to every user, which he/she is in charge and then filter them according to it and send notifications to those users, who are responsible for the area. Configuration is in the administration on the card "User dynamic fileds".

Assigning to the user is thanks to the button Use. As soon as the field is assigned, the button is changed into Cancel.
ATTENTION! When removing the dynamic field from the users profile, data may be lost.
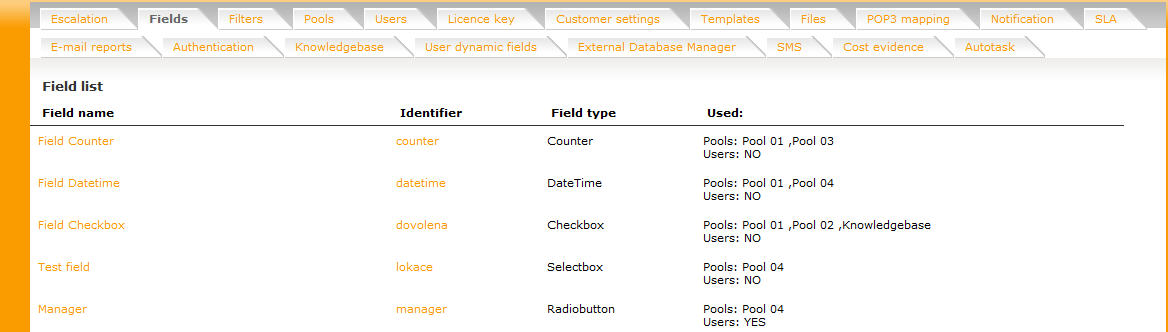
If the field is used at the user, it is possible to view it in the list of the dynamic fields on the card "Field" in the administrator's section. In the column "Used" we can see "Users: YES".
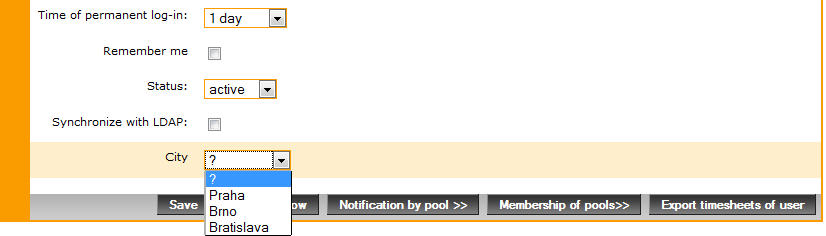
If the field is assigned to the user, it will be displayed in the form for user's configuration. Each user can open the configuration by using the click on their own name in the right top corner of the screen. Administrator can also edit the profiles of all users clicking on the name on the card "Users".
In our example, we assigned the chekbox to the user, if the user is on holiday and the selectbox, where there is an area of the company where the user is in charge. These fields will be added to the bottom part of the user's configuration.
Each user can edit these fields without any restrictions. If he/she goes on holiday, then he/she opens his/her profile and ticks the checkbox "Holiday". Then we can filter all the tasks, which are implemented on the holiday. In case of this identificator "holiday", the condition for the filter will be:
task.takenByExt.dynamicFields.holiday = 'on'
Each dynamic field can be assigned to the pool, and to the user at the same time. We can configure an example field "Area". The field can be declassified to the submitter and he/she then inserts the requirement, during which the area is specified. TaskPool can send notifications thanks to it only to those users, who are in charge of the given area. In this case the condition is exceptionally inserted into the field "To" in notification configuration (possibilities of notifications will be then described in the chapter 15. User's notifications).
<#implementers.dynamicFields.area=task.dynamicFields.area>
In this case TaskPool will send the notification to all users where the value of the dynamic field will be the same as the value of the pool in the task.
The so-called Absence Module is an extension of dynamic user fields. This is functionality allowing each user to define the period when he will not be available. TaskPool then not allow the allocation of absentee users..
The absence module is configured in the administration at the bottom of the "Dynamic user fields" tab.

For correct functionality of this module it is necessary to have defined two dynamic type fields Date or DateTime. One is then used as a field to enter the beginning of the absence and the other to enter its end. In our example, we have configured two Date fields with labels "Holiday from" and "Holiday to" (the order is governed by the identifier of the relevant dynamic field. After clicking the button Save the absence module field appears in the user profile editing.
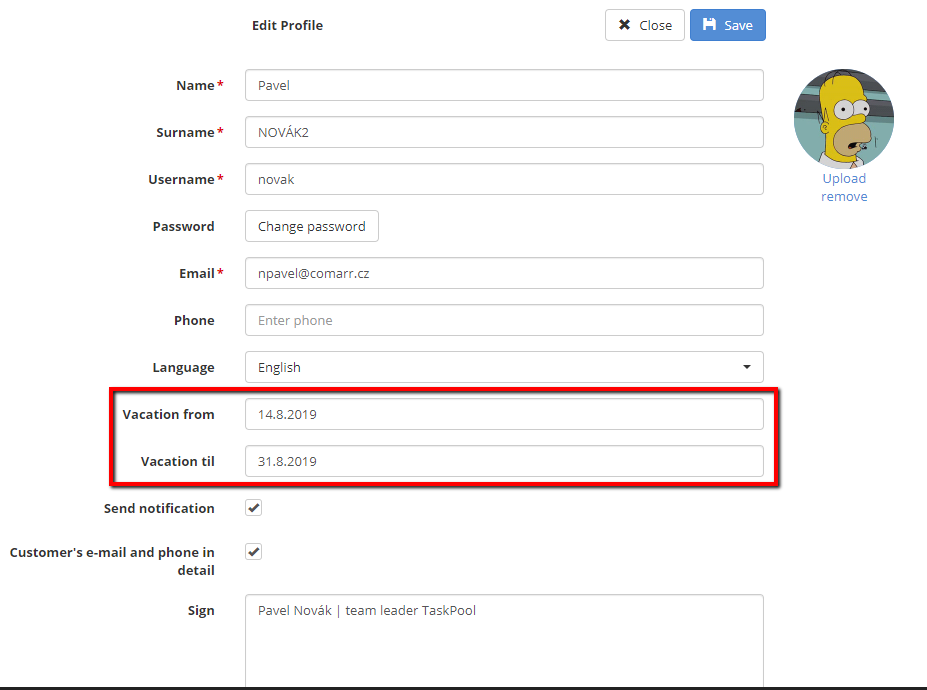
The time of absence can be defined by each user and the administrator has the right define the absence time for all system users.
Escalation and filters related to the absence of users shall be generated using conditions for dynamic fields of users, help can be found under the escalation / filters edit form in "To" and "Dynamic Fields" sections. More about filters in chapter 7. Filtersand about escalations in chapter 8. Escalations. Here we show some sample settings for working with the absence module.
A filter condition that displays all tasks with an expiration date when away their solvers.
task.takenByExt.dynamicFields.dovolenaOd <= task.deadline & task.takenByExt.dynamicFields.dovolenaDo >= task.deadlineNote.: Identifiers "dovolenaOd" and "dovolenaDo" should be change based on what dynamic fields are for the absence module used.
An escalation that removes the solver from all tasks with a completion date in the absence of their investigator.
The condition will be the same as the filter, the escalation only needs to be set to perform script. This script will remove the task from the solver (ie the task will not be taken over again) and will look like this:
task.assign=0;
Table of Contents
It is a definition, about the tasks which should be displayed in the workplace. This definition can be used within one pool or more pools. Each filter has its own name. Using the filter is then easy - the user can switch between the filters, which he/she access, thanks to the selectbox for the filter selection at the workplace. Into the selection then it can be put default filters of the pool and also defined filters by the user or the administrator.
Pool
It is actually the filter defined at the level of TaskPool (the systematical filter in TaskPool is called Pool and it is automatically generated by the TaskPool system during a new pool creation). Displaying the task from the pool X in the pool Y is not possible. Each task belongs to only one pool.
Filter defined by the administrator
It is the filter created and edited only by the administrator of the TaskPool. The administrator can enable the users to use these dynamic filters.
Filter defined by the user
It is the filter, which the user can define himself/herself. Definition options are the same as at the administrator's filter, with a difference in impossibility to access the filter for other users.
Creation and edition of the users' filters is possible in the user's section using the button "Other actions -> Filters". The list of "My filters" will be displayed, i.e. filters, which the user has the access to.
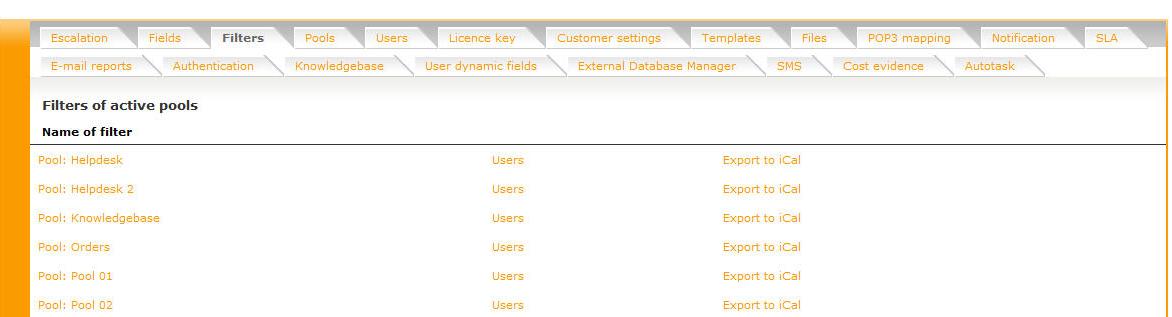
Entire access to the list of filters (default filters of the pool, administrator's filters, users' filters) and their editing is enabled in the administration section on the card "Filters".
A new filter can be created by clicking "New", editing the existing one can be opened by clicking the given filter.
The system filter is automatically generated by TaskPool system when a new pool creation and it displays all the tasks, which are covered in this pool (of course the access limitations in the pool setting are respected). In the list of filters you can find systemic filters in the section "Filters of the active pools" and "Filters of the closed pools".
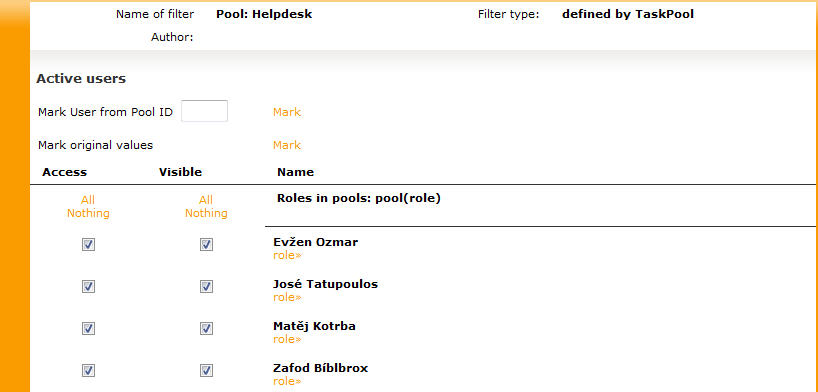
Systemic filter is not possible to edit by the user or the administrator. The administrator has only the possibility to set the rights for the access to this filter and after clicking Users at the filter. The rights are set thanks to the checkboxes "Access" and "Visible".
In the top left corner of the form is the textfield visible "Mark user from the Pool ID". We can write the ID into it and after clicking the Mark, system will mark all users who have the membership in this pool.
This filter is possible to create and edit also from the user's section, not only in the administrator's section, thanks to the button "Other actions -> Filters". For a new filter creation click onto the button "New", for editing the existing one, click the name of the filter. The other author can also edit the user's filter. The administrator can also edit the filter and assign it to the users, but after one of these actions the filter stops to be the user's filter, but the administrator's filter.
Filter is defined thanks to the form for creation or editing the filter. We open it by clicking the button "New" or onto the name of the existing filter. Help and the list of the used strings to any sections can be opened below the form by clicking one of the butons Sort | Conditions | etc.
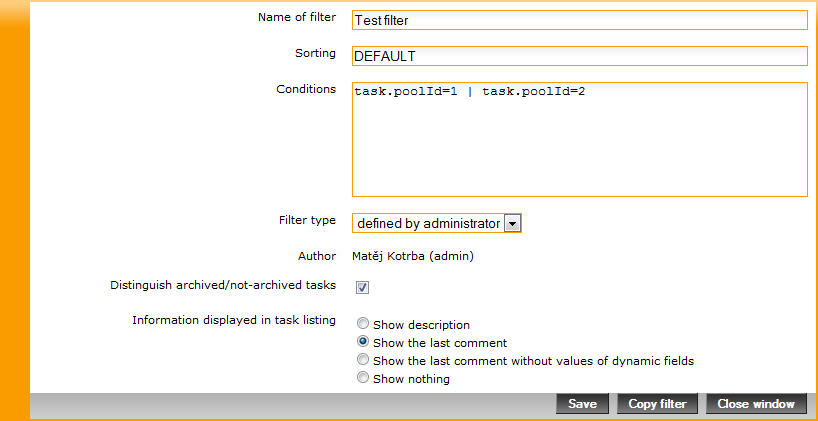
An option Sorting the system determines tasks display of the given filter. We recommend writing the option "DEFAULT", sorting the tasks then remains the same as in the default filters of the pools. Sorted can be also e.g. according to the ID of the task and its other features, you can see more by clicking Help "Sorting".
If you do not tick the field Distinguish archived/not-archived tasks, the active tasks, archivated tasks as well as deactivated tasks will be put there.
Information displayed in the list of the tasks is the setting, which will appear at the tasks on the workplace in the field "Commentary". See more in the chapter 3.3. Access limits.
The Conditions are the most important when filter definition. They determine which tasks will be displayed by which filter. To the definition of the conditions is possible to use nearly all the tasks' features and thanks to logical operators "&" (AND) and "|" (OR) the conditions are possible to be combined. See more by clicking Help "Conditions". Features for filtering the tasks can be found in Help "Task features".
List of all ID status, pools, users, dynamic fields and others is displayed in Help "Actual values".
Syntax for conditions settings is object.features. The subject can be the feature or the dynamic field. If we come back to the picture of filter definition, we can see the condition:
task.poolId=1 | task.poolId=2
Thanks to this condition the tasks in the filter in the pool with id=1 and together with the task from the pool id=2 will be displayed. If we want to display e.g. only tasks from the pools which are already finished, we must extend the condition to stateId:
(task.poolId=1 | task.poolId=2) & task.stateId=20
Note: When using the logical operator "|" (OR) it is necessary to use the brackets because of less priority than the expression "&" (AND).
Other examples of the filters:
pool.category LIKE 'helpdesk'- if we use category of the pool (set at the administration of the pool on the card "General"), this filter displays all the tasks from the pools with a category 'helpdesk'task.takenBy=curruser.id- we can easily create the universal filter thanks to this condition, it will display all the tasks, taken over by the currently logged-in user.task.isStarred = 1- this condition is used to display favorite tasks (marked with an asterisk). This list is custom (every user see their favorites), but the filter can be created as an administrator and then assign to the individual (or all of the) users.
We can use all the other conditions by the similar way, syntax for each condition separately is described in Help "Features of the task" below the filter definition.
Each filter can be copied and its copy can be saved with a different name. After clicking the button Copy the filter in the form for editing the filter, the name of the filter will be deleted. The new filter will appear in the list adn the previous filter will remain the same after the new name writing and saving it. The filter is possible to modify arbitrarily before saving.
Escalation is a function that extends the control mechanisms of the system. The list of escalations is available in the Administration in the Escalation tab. In addition to the name and definition, the list displays the impact on server performance (in seconds).
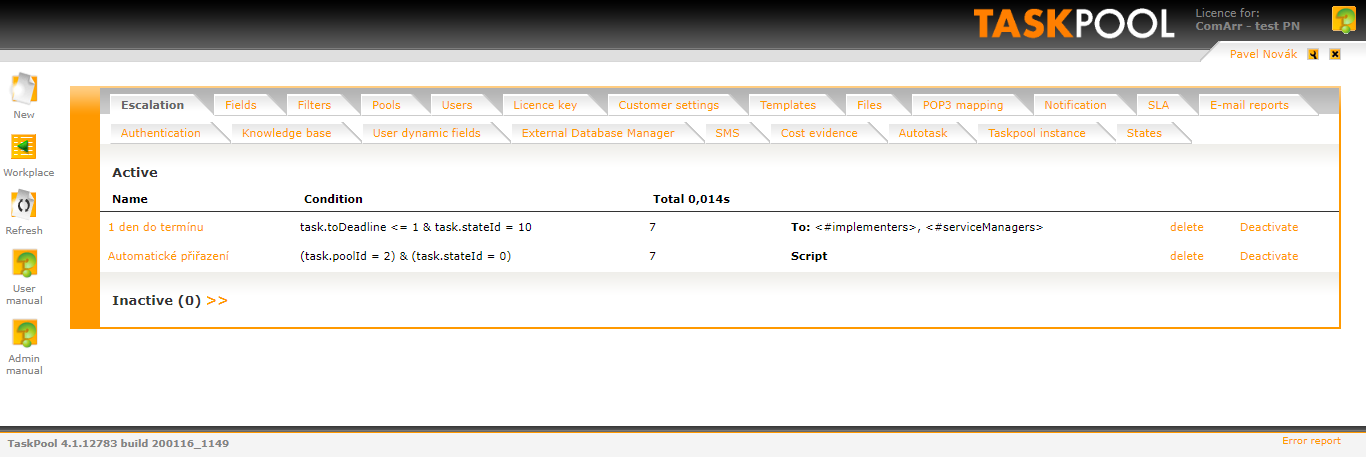
If the condition is met, escalation allows two types of activities to be performed:
Sending emails
Using e-mails, we can automatically notify users of bags that meet a defined escalation condition. Compliance is checked every minute for all bags. The main difference from the notifications is that the conditions are checked without having to change the state of the bag. For example, we can set up an e-mail alert that the bag is expiring and nothing happens to the bag. The notification always checks the fulfillment of the condition whenever the bag is changed. Each escalation is sent only once once its condition is met, so there is no risk of duplicating the sent e-mails (unless the Retry option is selected).
Execution of scripts
Scripts can be used to make changes to tiles automatically. E.g. if the customer does not comment on the delivered bag solution within one week, the task is automatically approved by escalation after a week, etc.
Both functions are described in more detail in the following subsections.
The Condition field defines the circumstances in which the escalation should be sent. The definition of conditions works the same here as for filters, so in case of doubt, read the chapter 7. Filters. Help can be called up again by clicking on individual links below the form.
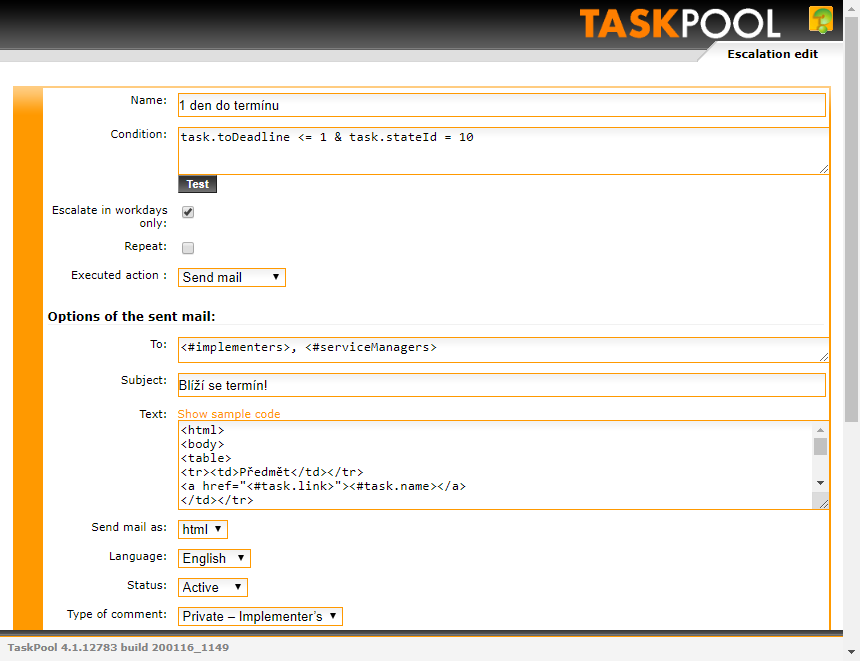
Below the condition definition is the Test button, which is used to test the definition and its impact on server performance in terms of duration in ms.
Escalate only on weekdays triggers escalation on weekdays only.
The Repeat option allows you to review and perform the same action on the wallet repeatedly. If unchecked, the action on each tile is performed only once (unless the button is pressed Save & Reset ).
Executed action sets whether the escalation will be used to send emails or execute scripts. Both options are discussed in the following chapters.
Syntax for setting the conditions is the same as at the filters: object.feature. The subject can be the task or the dynamic field. Features of the tasks for escalation are not the same to the features of the tasks for the roles of the filters.
Table 8.1. Examples of the escalation condition
| Condition | Meaning |
|---|---|
| task.poolId=1 & task.toDeadline<=1 | Announce the tasks from the pool with id=1, where the number of days till the deadline is smaller or equal to 1. |
| task.stateId=0 & task.priority=1 | Announce the tasks which are at the state "Assigned to implementation" and have the priority number 1. |
Note: If the condition will be matched, to the given task is changed the mark for sending of the given escalation. It prevents the duplicity of escalations, matching the conditions is checked every minute. This mark is possible to be cancelled by clicking the button Save & Reset. Thanks to it the given escalation will be saved at the tasks, which it was already sent to. The mark of the escalation will be deleted. At that moment the escalations will be sent to all the tasks matching the given condition.
Field "To"
To the field "To" is possible to insert an ID of the user, e-mail address or any other placeholder's strings (this information can be found in the Help below the form). If we use the placeholder's strings, an e-mail will be sent to all users of the given role.
Table 8.2. Placeholder's strings for the recipients
| Placeholder's string | Meaning |
|---|---|
| <#serviceManagers> | All service managers in the given pool |
| <#implementers> | All implementers |
| <#submitters> | All submitters |
| <#managersOfSubmitters> | All managers of the submitters |
| <#submitter> | Submitter of the particular task |
| <#coSubmitters> | Co-submitter of the particular task |
| <#implementer> | implementer of the particular task |
| <#coImplementers> | Co-implementer of the particular task |
Into the field with the recipients it ís possible to insert more values, or e-mail addresses or placeholder's strings, divided by the semi colon or comma, e.g. "2; 3; josef.novak@taskpool.cz; <#serviceManagers>; <#implementer>".
Field "Subject" and "Text"
Into the field "Subject" and "Text" can be inserted subject and body of the sent e-mail. Placeholder's strings can be also used for the automated filling the values, offered in the section Help "Features of the task".
Placeholder's strings have the syntax <#object.feature> for using in the text. The subject can be the task or the dynamic field. The features of the task are the same as the features of the escalation condition setting and they are placed in the Help below the form.
Sent e-mail as
Sent e-mail can have a form of the simple text or HTML.
Language
Language of the sent e-mail. According to this value e.g. the names of the dynamic fields are filled.
State
Escalation can be deactivated here. It is not necessary to delete it directly, if it is not used temporarily.
Sort of the commentary
After the matching the escalation condition the task is written systemic commentary that the escalation has been sent. In this commentary there is an overall list of the recipients of the escalation message. The form of the commentary can be also set here - public (standard commentary, visible to all, who have the right to see the task), non-public submitters' one (hidden to the implementers) or non-public implementer's (hidden to the submitters). The last offered option is "No comment".
By using scripts we can perform with the task various actions automatically based on a fulfilled condition. This function can be used among other things to automate the workflow, which is repeated in the company, etc.:
if the costumer do not react on the task in 14 days, deactivate the task
if the deadline has passed, change the value of the given dynamic field
if the task is more than one day not taken over, automatically give it to the given implementer
...and many others. Script execution conditions are again defined in the same way as for filters. (chapter 7. Filters).
The number of actions the script performs can be any number. Individual commands are separated by a semicolon. The syntax is as follows.
task.property = valuetask.dynamicFields.identifikatorPole = value
As "property" we can use the value stateId,
deadline, assign and waitForAssign.
We can change the state of the task using escalation, its deadline, assign tasks to the implementers
(possibly propose for allocation), or remove it by the implementer. We can further change the
value of the dynamic fields.
On the right side of the assignment can have these values:
number
task.stateId = 20- will set the value stateId for 20, so it completes the tasktime allocation
task.timesheetallocation=number- time allocated to work on the taskremoving the co-implementer
task.addcoimplementer=2323- will remove co-implementer from the taskremoving the co-submitter
task.removecosubmitter=users_number- will remove co-submitter from the taskadding labels
task.addtag=32- will add th labels to the task, which are seen in the task overviewremoving labels
task.removetag=32- will remove labels from the taskpriority
task.priority=2- setting tasks priority, which is seen in the task overviewstring
task.dynamicFields.descriptionOfTheProblem = 'this is a text string, which writes the script into the
			dynamic field with the identificator descriptionOfTheProblem'
now - a variable containing the current date and time, it is also possible to use time with possible addition/subtraction of the given section, the units are d (days), h (hours), m (minutes), e.g. now-10m (current time minus ten minutes)
today - a variable containing the current date, also possible to use, e.g. today-3d
null
and any variable from the following list:
'id' | 'name' | 'sequenceid' | 'poolid' | 'stateid' | 'createddate' | 'createdby' | 'takenby' | 'takendate' | 'approvedtime' | 'confirmedtime' | 'finishedtime' | 'handover' | 'tohandover' | 'lastcommentdate' | 'hdnote' | 'hdusername' | 'hdcompany' | 'hduserid' | 'sidetask' | 'price' | 'price2' | 'newprice' | 'priority' | 'deadline' | 'newdeadline' | 'currency' | 'newcurrency' | 'todeadline' | 'slaschemaid' | 'slapriorityid' | 'slapriorityseqid' | 'fixtime' | 'reactiontime' | 'relativefixtime' | 'relativereactiontime' | 'relativeworkingfixTime' | 'relativeworkingupdatetime' | 'relativeworkingreactiontime'
NOTE.: The values, that we assign into the dynamic fields must respect the format of the field, e.g. into the filed of type number cannot be assigned the text string etc. Task time items must be in the format "YYYY-MM-DD", e.g. "2018-03-23". These values can only be applied for the field type textfield, date and datetime. If we wanna change the value of the dynamic field type checkbox, surve as values 'on' and 'off'.
Example 1)
task.stateId = 20; task.dynamicFields.wayOfSolving = 3- when the condition is met, the script completes the given task and change the dynamic field (Selectbox, Radiobutton or Multiselectbox) with identificator "wayOfSolving" to the value of id=3.
Example 2)
task.dynamicFields.completionTime = 'finishedTime'- will fill the dynamic field with identificator "completionTime" by the value of real task completion.
Example 3)
task.assign = 0- removing task from the implementer.
The possibility of obtaining a value in a script type escalation
from an external database using an SQL task -
(task.name = authentication 12 'name' 'select * from contact where id = <#helpdeskId>')
In the task history on the right side is a list of escalations, which took place over the given task. It is possible to remove it by clicking on the cross.

Licence is sent by the ComArr staff when purchasing the product TaskPool.
By clicking on to the card "Licence" in the administration section the following window will appear:
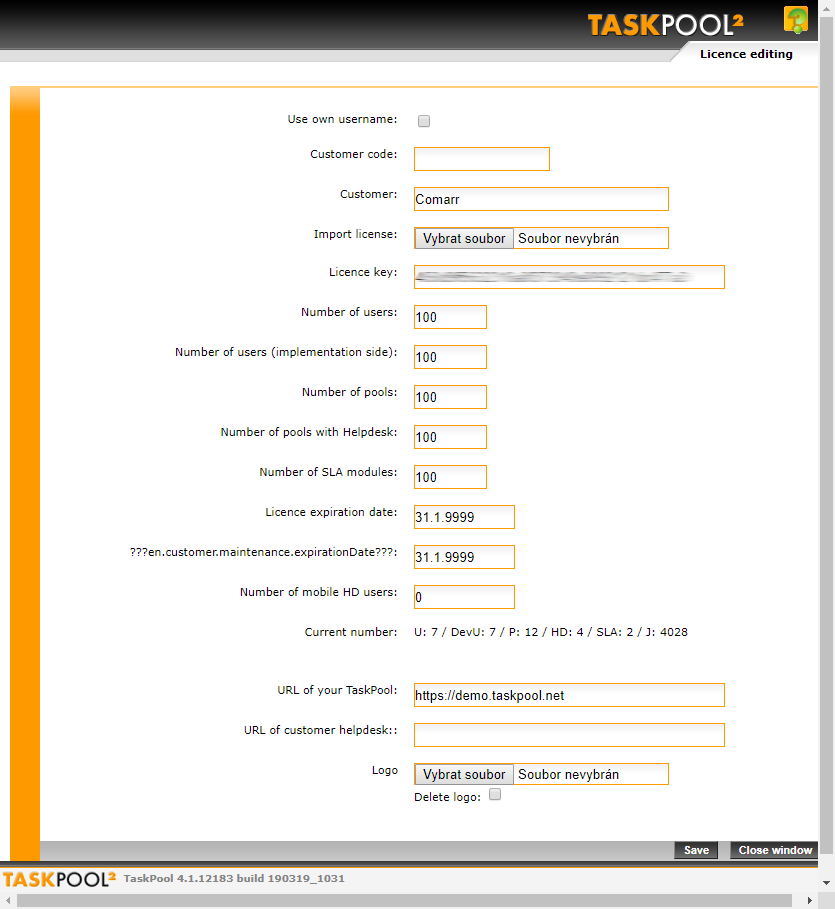
Parameters of the licence Number of the users, Number of the users (implementer's side), Number of the pools, Number of the pools with Helpdesk and Number of SLA modules are related only onto the active users and pools. Deactivated users and pools are not counted to the overall number. Number of the tasks is limited in all cases.
The field Number of the users (implementer's side) shows the maximal number of the users who can be in the roles of the implementer's side at once (implementer and the service manager). The difference between the overall number of the users and number of the users on the implementer's side can be filled by the users who are on the submitter's side (submitter or the manager of the submitters).
Current state of the usage is displayed in the field Current number, where:
U - number of the users
DevU - number of the users at the implementer's side (developer users)
P - number of the pools
HD - number of the pools with Helpdesk
SLA - number of SLA schemes
J - number of the tasks (jobs)
HD mobile - number of the active helpdesk submitters
ATTENTION! All data must be filled precisely according to the order and the delivered licence (e.g. company including the spaces, diacritics, capital and small letters - case sensitive), otherwise the licence will not be functional. The field Number of the users and Number of the pools is not possible to be changed without a change of the content of the field Licence.
It is possible to insert the company's logo of the licence owner, which will appear in all windows of the system at the right top. Logo displayed at the right top can be changed in each pool settings separately.
If you insert the address, where TaskPool is mapped into the field URL (e.g. http://taskpool.yourcompany.de), this URL will appear in all notifications. Also an e-mail of the sender wil be mentioned: taskpool@taskpool.yourcompany.de. If you want to change this address, you can do so in the setting of the particular pool.
ATTENTION! When incorrect URL inserted there will not be a functional links to the particular tasks and attachments to the tasks.
URL of the customer's Helpdesk is URL of the link "Error report" at any page of TaskPool at the right bottom corner. This link is set as "http://helpdesk.taskpool.cz" by default, which is the customer's Helpdesk of the ComArr, spol. s r. o. By filling the own URL you can change this link.
The field Use an own username and Code of the customer is used when authenticating the users of TaskPool via LDAP and the procedure of their filling is described in the following chapter. If you do not want to use this authentication, leave both fields empty.
Language configuration serves administrators to narrow the choice of languages in the administration. Sets, which languages will the customer use.

Table of Contents
LDAP (Lightweight Directory Access Protocol) is a protocol which enables the effective sharing of the structured information via TCP/IP. In reality it means e.g. the list of the employees of the company, their usernames, home directories, personal information, e-mail addresses or number of the telephones. The structure of the information in LDAP can be imagined as a tree, whose branches consists of particular data.
One of the function of LDAP is a possibility to authenticate the user when log-in TaskPool. The advantage of this method is that the authentication is mainly the same username and password for all applications used via this form. Another advantage is that the overall process of the authentication is possible to automatize and thanks to this create an entrance to the user-friendly system. authentication can then be done by running the file, which automatically opens the browser and logs in the particular user. This automatic log-in is possible to be used into TaskPool as well as into Helpdesk. This kind of log-in is described in the chapter 10.3. Authenticator.
Records of the users must be searchable in LDAP according to the atributes consisting of ID, which is used for log-in of the user to the PC.
Example:
the user is logged in using an ID: novakj
in LDAP must be possible to search the particular record e.g. using: (uid=novakj)
found record must also consist of the other fields which are mapped into TaskPool:
obligatorily: surname, e-mail
optionally: telephone, company
Then the system requirements must be matched:
LDAP server and possible access of the server with TaskPool installation to this one
TaskPool version 2.1 and later
These steps must be done necessarily for LDAP authentication good run:
In the administrator's section of TaskPool on the card "Licence" it is necessary to tick the option "Use own username" and into the text field "Code of customer" insert the code, e.g. bell. Log-in TaskPool is then possible only after writing this code in the log-in dialog.
ATTENTION! If you tick the option "Use own username" and save the settings, the option is not possible to change!
If there is not a field "Code of customer" in the log-in dialog, then it is necessary to edit the line
customer.default.codetocustomer.default.code=YourSelectedCodein the fileTaskpool.properties(which is in the home directory of TaskPool in the subdirectory WEB-INF).Value
customer.default.codein the fileTaskpool.propertiesmust be the same as the code of the customer (if the line is e.g.customer.default.code=nameofcompany, the code of the customer isnameofcompany).On the card "Setting the customer" in the administration section it is necessary to fill the values of the required parameters. After filling the data you can test it by the button "Test connection". All fields must be filled, otherwise LDAP Synchronization will not work.
Note: Atribute "Search base" must be in most cases in the brackets.
By clicking the button "LDAP Synchronization" the synchronization will be done, where we can select other ways of mapping.
At the users, who we want to use LDAP authentication, we tick the option "Synchronize with LDAP" in the form of the user's edit. If this setting is not saved, then it will not be possible to edit his/her personal data (until the field is ticked again).
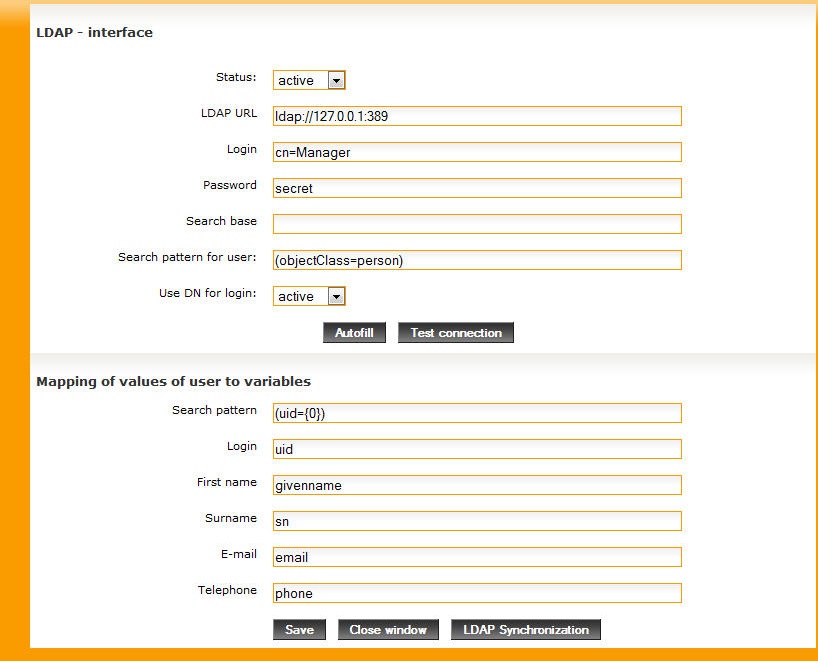
Authenticator is for automatic log-in to TaskPool, or to Helpdesk thanks to authentication towards the server LDAP. Authenticator finds out the user after run, who is logged in on his/her computer and then opens a window of the browser at the log-in page of TaskPool. TaskPool verifies the data towards LDAP server and logs in the users automatically.
Authenticator can be found in the distribution of TaskPool in the directory "\WEB-INF\tools". There are the directories "TaskPoolLogin" and "HelpdeskLogin". From their names is obvious, that one is for log-in to TaskPool and the other one to the Helpdesk.
Startup files "TaskPoolLogin.bat" and "HelpdeskLogin.bat" can be stored e.g. at the file server and opened remotely. It is not necessary to instal every workstation separately.
The virtual Java Runtime is a condition to run the file at the workstation. It is nowadays the standard part of each operation system. Another condition is functional LDAP authentication configured in TaskPool.
Directory "TaskPoolLogin" consists of three files:
TaskpoolLogin.bat - startup file of authenticator
TaskpoolLogin.jar - authenticator itself (Java library)
TaskpoolLogin.cfg - configuration file
For a correct function the configuration file is needed. These three tabs are necessary to be set there:
authURL = [URL TaskPool]/LDAPLogin
e.g. if URL is http://www.taskpool.net , this value will be http://www.taskpool.net/LDAPLogin
loginURL = [URL TaskPool]/login.do?ldap
e.g. if URL is http://www.taskpool.net , this value will be http://www.taskpool.net/login.do?ldap
customerID = [code of customer] - the string is filled here, which you enter into the field "Code of customer" at the log-in page of TaskPool. If you do not fill any code during the log-in, the string will be found in the file "WEB-INF\Taskpool.properties" on the line "customer.default.code=".
After the correct filling of these data the file is possible to run "TaskpoolLogin.bat" and the user will be logged-in to TaskPool automatically.
There is possible to change the configuration file:
authURL = [URL Helpdesk] - you can find it in the configuration of Helpdesk on the card "LDAP/DB". It is here as LDAP Login URL: http://[URL]/servlet/HelpdeskLoginLDAP?eid=[id]&authId=?????
The parameter "authId=?????" is the most important. Instead of the question mark you enter ID LDAP authentication, where you want to use the automatic log-in. The ID authentication is found on the right from the name of the authentication in brackets. If you have only one active authentication, ID is not possible to enter.
loginURL = instert URL on helpdesk form
After the correct filling of the data run the file "HelpdeskLogin.bat" and the user will be automatically logged-in to Helpdesk.
In the administration on the card Licence at the bottom, you can set in the section MFA konfigurace two-factor authenticator. Check for whom it should be required. Save the data and logout off the Taskpool.

Install authenticator on the smart phone device and login. We recommend Google Authenticator or Microsoft Authenticator.

Login to TaskPool again and window with code and QR code should appear. Using an authenticator you installed, scan the QR code.
ATTENTION! Write the code somewhere safe and save it in case of losing a smart phone device!

After scanning the QR code, a code should appear in the authenticator, which is constantly changing. After login it will pop up the window where you will write into the column MFA code. It will be displayed during every login.

In the administration section it is possible to save the files onto the server, which will be used by TaskPool after that. These files can be used e.g. in the configuration of Helpdesk (16. Helpdesk) or in printed templates (12. Templates).
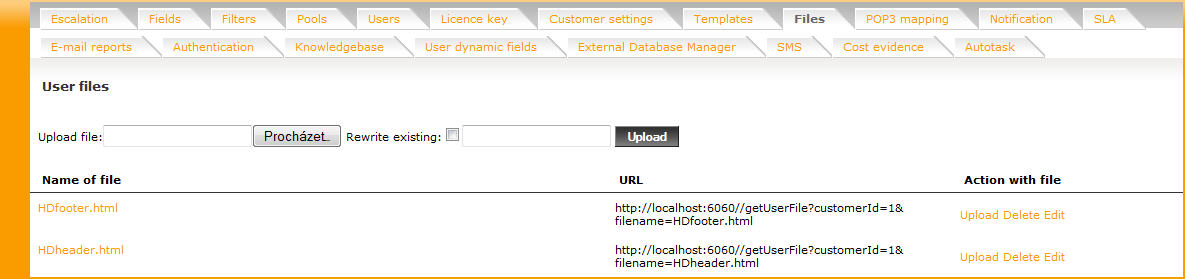
After the file upload on the server there will be a link to the file and its URL in the list. This URL can also be used as an external URL for the downloading the file by the customer etc.
NOTE: If the given file is used right on the server (e.g. in the helpdesk templates), a way to it can be entered as relative, which is from the programmers point of view more elegant solution, in our case as:
..//getUserFile?customerId=1&ilename=HDhlavicka_cs.html
If we upload the files, which are already uploaded and have the same name, or the up date of the file was done, it is only needed to tick checkbox Rewrite existing. We avoid the classical way Delete -> Upload.
The system of TakPool enables to export the tasks from the current filter in the workplace into the form of data file. Data then can be processed in the different application. Standard forms of export are from CSV, HTML, XML and RTF.
Configuration of the templates can be found in the administration on the card "Templates". In the upper part are written the system templates, whose content is immutable for the user. After the Taskpool system upgrade, their content can slightly change. If you want to keep the same shape of the given template, it is possible to create a copy and use the template as user.
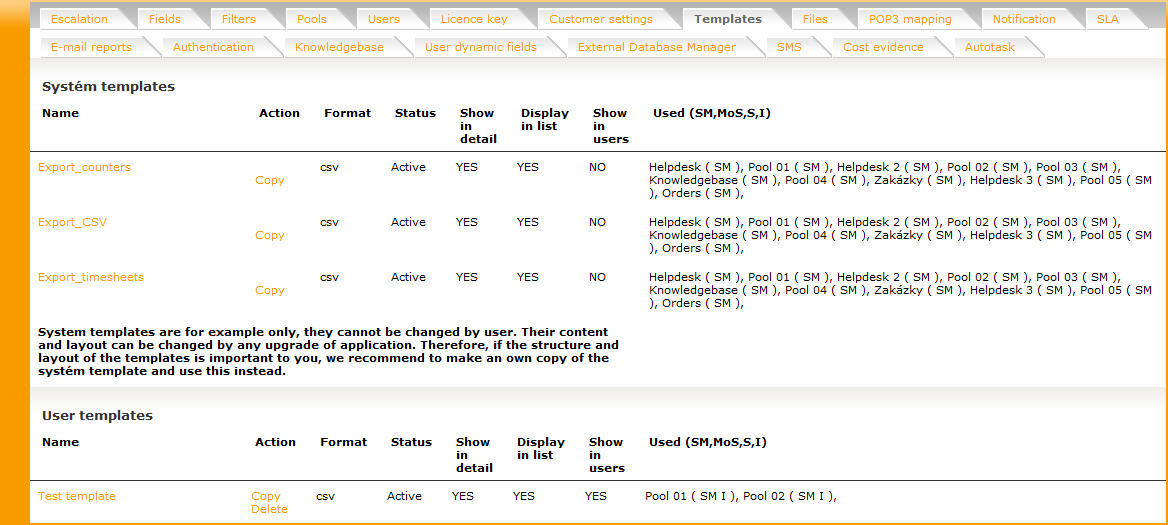
There are several available default templates, active by default for all pools.
ATTENTION! All tasks from the currently displayed filter are taken as input data for the template listing.
Billing - more in Billing
Export_counters - exports all fields type of counter.
Export_CSV - exports currently displayed filter into the form CSV. Output file of this template consist of all information of the displayed tasks.
Export_timesheets - exports the time records (more in the chapter 21. Cost evidence).
Export_user_timesheets - exports the time records of the given user, this function can every user activate from their profile.
Next are available the templates, whose output is statistical graphs. Their names and uses are very intuitive, they will not be discussed further here.
After clicking the button New the window for a template definition is displayed.
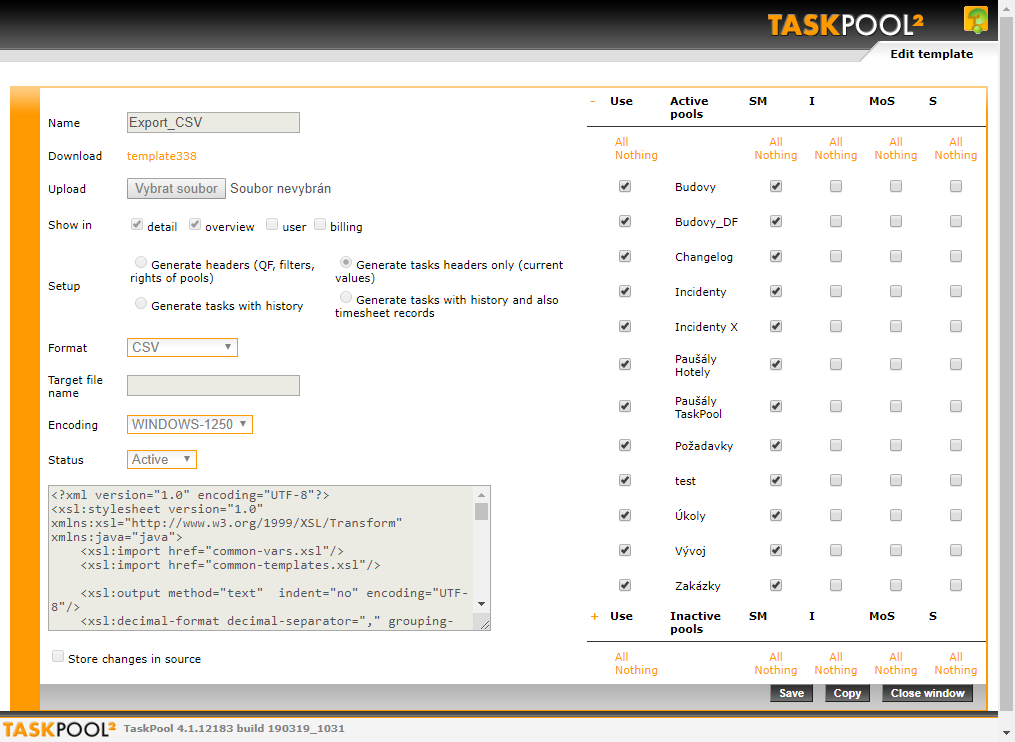
- Name
Accessible templates are displayed to the users via button "Print" in the workplace. The name of the template will be displayed in the list as a possibility for export.
- Upload
The file is possible to upload thanks to this option with a source code of the template. If we write the code manually, this field is not necessary to fill.
- Displayed in
The setting, where the template will be displayed in the list, detail of the task or the detail of the user.
- Setting
There we can set, which data will be generated during export. E.g. without ticking the field "generate history" will not be possible to use any data from the task history. If the values are not used in the templates, the ban of their generation will make the export of data quicker using the templates.
- Format
Resultant file, which will appear by export, is possible to select between HTML, XML, CSV and RTF.
- Encoding
The coding of the output is set here, the selection is UTF-8 and WINDOWS-1250.
- State
The template is possible to deactivate here.
- Access limits
Setting the access limits is for each template separately. It is defined which pools and which roles the template will be accessible (service manager, implementer, manager of the submitters, submitter).
Definition of the templates for the system TaskPool is done thanks to XSLT transformations. XSLT is used for a transformation XML documents or other XML (e.g. for different DTD), into HTML, or into the other types of the files.
Display the list of the tasks is possible to transform into XML format. This display can
be gained if we delete last two parameters in the URL address of the task list, (which has
e.g. this form:
http://www.taskpool.net/list?source=tp.sbs&method=lf&xsl=lf.xsl&format=html)
actually everything from the parameter, xsl (URL then will be
like this: http://www.taskpool.net/list?source=tp.sbs&method=lf).
This display consists of XML list of all the tasks in the current filter, including their
characteristics and parameters settings and provides the wide possibilities of exports,
which are limited only in your fantasy and company's needs.
When outputs creation it is possible to use e.g. own css templates or pictures, and it is via users' files described in the previous chapter.
Defined templates are saved in the directory /logos/customer_[id]/templates/ in the root directory of TaskPool. The whole directory logos should be backed up, because the information is not in the standard distribution of TaskPool.
Note: Back up is desribed in the installing and upgrade manul in details.
For the template usage directly in the system of TaskPool is only needed to go to the button "Print" in the workplace and the offer of the accessible templates will be displayed for the given pool, the given display and the given role.
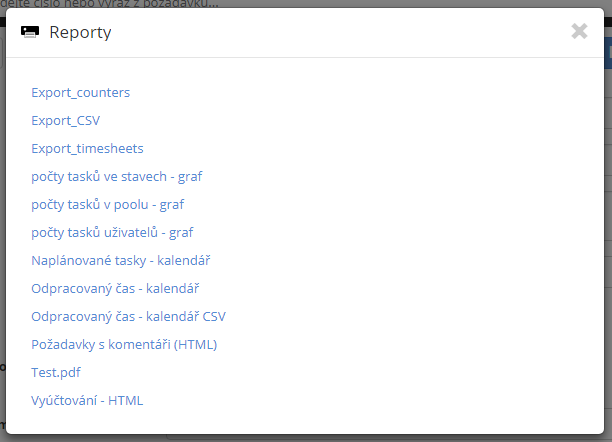
E-mail report is the function using the templates described in the previous chapter. It enables to export files from these templates automatically and send them to e-mail addresses in the selected time period. A new report will be created in the administration on the card "E-mail reports" by button "New". The form for configuration is like this:
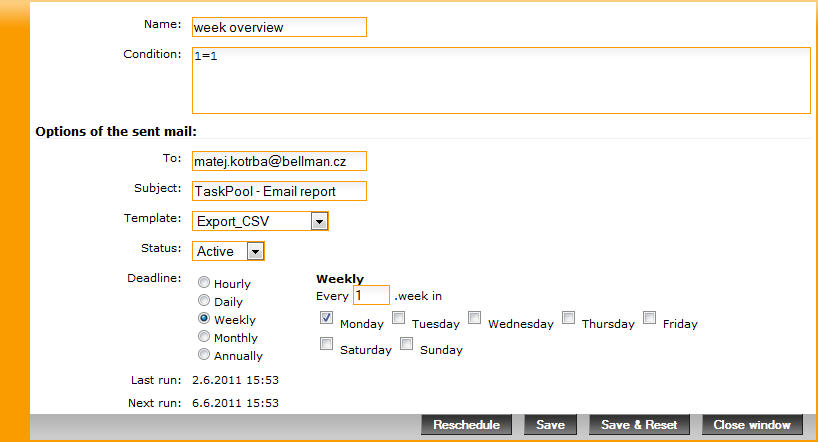
The help to each configuration is again placed below the form. In the field Condition we select, from which conditions will be the report sent. The conditon in the picture is that the report will be always sent.
In the field To is possible to write only seperate e-mail addresses compared to the escalations, they will be divided by the comma or the semi colon. The field Subject is the subject of the sent e-mail. In the section Templates we select which template will be selected to do an export.
Deadline is set similarly as at autotasks. After clicking the button Reschedule the TaskPool will count the last and following start of the e-mail report. By clicking the Safe & Reset we will save the given report and reset the date of the last start.
In the event of an email report error, the administrator will get an email about the error that occurred.
New button Run, which provides generating the report and sending an email.

Setting POP3 can be done during the task creation by the user without log-in into TaskPool. The user will only send an e-mail to the address and TaskPool creates the task from it. The subject of the message will become the subject of the task, the body of the message and its description.
On the card "POP3 mapping" e-mail addresses are mapped to the particular user of TaskPool. If the e-mail will arrive from the mapped address, the task will be created, as if the user inserted it via classical interface and he/she will be there as a submitter.

If you activate the button Automatic mapping of active TaskPool user, the system will assign all the users standard e-mail addresses, where the notifications will be sent to. More than one address cannot be insterted to the same user. Also the same address cannot be used for more than one user. The address must be unique.
Then it is necessary to have an active e-mail interface for the pool, which we want to insert the received tasks to. This setting is done for each pool separately and we can find it on the card "E-mail interface" in the pool settings. In the chapter 3.10. Card E-mail Interface you can find out more details about the e-mail communication. There it can be set a particular mailbox, which will be selected by TaskPool for creating the tasks.
This function is the same as the feature of the Helpdesk module, where e-mail interface is for helpdesk users (see the chapter 16.16. E-mail Interface at Helpdesk). When there are two same e-mail addresses there might appear conflict when mailbox collection. TaskPool implements conflicts in the addresses in the following way:
Firstly, it will find and select all e-mails in the mailbox from the mapped users of TaskPool and assigns them to the tasks.
Secondly, it will select the messages from the authenticated users of Helpdesk (LDAP or DB authentication) and assigns them to the tasks.
If there is allowed an anonymous task creation in the Helpdesk settings, then the rest e-mails in the mailbox will be inserted as requirements of the anonymous user of Helpdesk. If anonymous task creation is not allowed, the rest messages will be deleted.
Table of Contents
Except the default notifications from the pool we can also define the users' notifications. Their advantage is a possibility to configure the way of their sending, as well as their content and recipients. The possible disadvantage is the necessity of manual configuration. Users' notifications can work separately or as an addition to default notifications. Thanks to the conditions it is possible to set e.g. supervision of the selected tasks and makes the sorting in the private incoming mails easier.
Users' notifications concatenate the dynamic filters and notifications. The specific condition is set for notifications sending and when any tasks changed the condition is evaluated. The condition can be e.g. deadline expiration or the value of the dynamic field. If the condition is matched, the set recipients will be sent a pre-defined message. Which tasks can be used for notifications sending and which are not important for us can be determined by this mechanism.
The principle of notifications is very similar to the escalations, which are described in the chapter 8. Escalation. The basic difference is the fact that escalations are checked in the time period, but for the condition matching is a check done every task change. Thanks to this it is possible to gain a stronger check of the selected task, or a higher urgency when tasks implementation to their implementers.
A different system of notifications sending suits each user of TaskPool. It is possible to switch off the default notifications from the pool sending and configuration of e-mail sending only to some actions thanks to users' notifications.
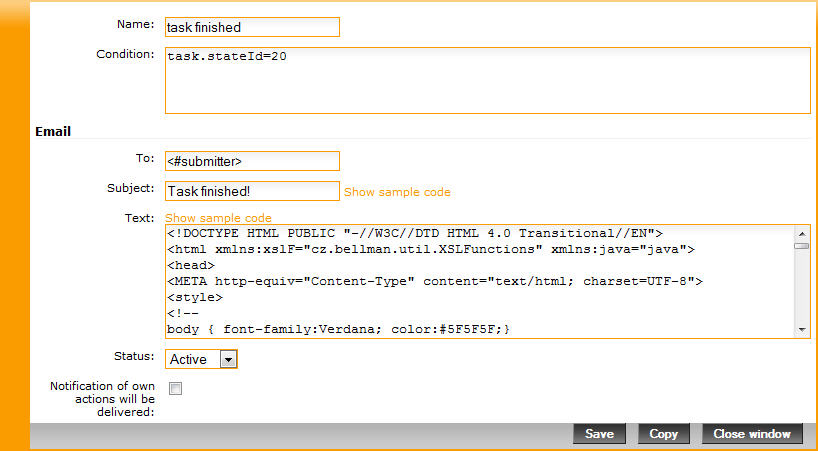
Notification in the picture will inform the submitter of the task about its completion. The field Condition works in the same way as at the filters and escalations and the field To works the same way as at escalations, which is described in the Help below the form. In the field Text there is the body of the notification. The sample code is available, which is the same as the code of default notifications and is changed dynamically according to the task value. The text of the notification is of course possible to be arbitrarily changed and the text can be written as static.
Placeholder's strings can be used in the text of the notifications. It is possible to set the display of nearly all features of the task and adapt the view of the message.
In the users' notifications is against filters and escalations, moreover it is possible to use the features of the task "history", thanks to which we can obviously see the task's history.
Some features mentioned below might not exist for the given action (e.g. if the task is added a commentary without any other action, then the variable <#task.history.assignedTo> will not be matched). If we use such a variable, no text will be displayed (other variables will work normally).
The features mentioned here cannot use the definition of the condition for the notifications, but only for text configuration!
Table 15.1. Variables for the configuration of the body of e-mail message
| string | Meaning |
| <#task.history.action> | Action, which is done together with the task (e.g. "Task changed") |
| <#task.history.created format="yyyy"> | Time of the task change (in optional format like "EEE yyyy.MM.dd G 'at' HH:mm:ss z"), more info on internet under java.text.SimpleDateFormat |
| <#task.history.createdBy> | User, who made the change |
| <#task.history.assignedTo> | Name of the user, who the task was assigned to (need not exist) |
| <#task.history.comment> | Commentary to the done action (need not exist) |
<#task.history.comment format="html"> | Commentary in html format (for example bolt font, table etc) |
| <#task.history.url> | URL assigned to the task (need not exist) |
| <#task.history.deadline> | Deadline of the task |
| <#task.history.price> | Price |
| <#task.history.currency> | Currency |
| <#task.history.priority> | Priority |
| <#task.history.stateId> | State of the task after change status of the task in the chapter 7.2.) |
| <#task.history.publicId> | Type of commentary (0 - public, 1 - submitter's, 2 - implementer's) |
| <#task.history.dynamicFieldsObj> | The list of changed dates of the dynamic fields. Each object in the list has the feature name (returns the name of the field) and value (returns the value of the field). |
| <#task.history.attachments> | The list of attachments (need not exist). Each object has the feature uploadDesc (name of the attachment) and uploadId (id of the attachment into the link). |
<#block:Iterate[task.history.attachments]> <#task.history.attachments.attach> <#endBlock> | Insert attachments into the notification (e-mail) |
| <#recipient.firstname>, <#recipient.lastname> | Name and surname of the message recipient |
| <#task.priorityLabel> | Naming the task priority as it is labelled in the setting |
<#if "attachment_count > 0"><#hd_attachment><#endif> | Link to attachments |
There is a similar work with the dynamic fields. We can also use the parameters value and name. Their usage is shown in the following table. The way of the usage is then described in the following subchapters.
Table 15.2. Variables for the dynamic fields usage
| string | Meaning |
| <#task.history.dynamicFieldsObj.name> | Name of the dynamic field |
| <#task.history.dynamicFieldsObj.value> | Value of the dynamic field |
NOTE: The values "id" represents the identificators of the given dynamic field and it is neccessary to change them according to the specific configuration.
For the definition of the view of the notification's body, it is possible to use several functions, which might make the list more user friendly or highlight the most important information. Functions which enables the work with variables, which return the list (e.g. the list of the dynamic fields or the attachments). Functions, which can be used are:
If - test for matching the certain condition
NotEmpty - test for filling the data into variables
Iterate - repetition of the certain action
Functions are described below in detail. Syntax for using the function is:
<block:NameFunction[condition]>
    Code, which should be executed
<#endBlock>
In an example the element #block is necessary to be used before the function usage and close the code, which should be executed.
Elements #block is possible to group. We can use the function inside the other element #block, but the elements must be numbered. Syntax is then the following:
<block1:NameFunction[condition]>
    Code, executed for function 1 before function 2
    <block2:NameSecondFunction[condition]>
        Code, executed for function 2
    <#endBlock-2>
    Code, executed for function 1 after finishing function 2
<#endBlock-1>
Arbitrary number of functions can be put like this.
This function is commonly used for testing the certain condition matching. If the condition is matched, then the code which borders the functions is executed. As a condition it is possible to use any condition in the current format of TaskPool, which we have met in the filters and escalations. Help to the task features is mentioned below the configuration form.
Function If usage in the examle of a hidden commentary:
<#block:If[task.history.publicId=1 | task.history.publicId=2]>
- hidden commentary
<#endBlock>
This function validates the case, when some variables are not filled with data. Its usage is not obligatory. If the variable is used in this case, which is currently empty, TaskPool will not write any text,which is not an error. This function is possible to be used also for making the orientation in e-mail better. If we want to know mainly each change of the price, we can highlight the change in the body of the e-mail.
The name of the variable is like a condition given to the function, which we want to test. Syntax is this one:
<block:NameFunction[variable]>
    Code, which should be executed, in case the variable is filled with data.
<#endBlock>
Example with a change of price will be e.g. like this:
<block:NotEmpty[task.history.price]>
    <h2>The change of price was executed,
    new price is <#task.history.price>.</h2>
<#endBlock>
In case of price change it will be announced in the message with capital letters.
This function is for listing the variables. The name of the variable is written into this condition, which returns the list.
Using the function Iterate is in the example of listing the dynamic fields:
<table>
<#block:Iterate[task.history.dynamicFieldsObj]>
<tr><td><#task.history.dynamicFieldsObj.name></td><td>
<#task.history.dynamicFieldsObj.value></td></tr>
<#endBlock>
</table>
In this case the names and values of all changed dynamic fields will be written in the table.
Another case ilustrates the list of all added attachments:
<#block-1:NotEmpty[task.history.attachments]>
<tr><td colspan="2">Attachments</td></tr>
<#block-2:Iterate[task.history.attachments]>
<tr><td> </td><td>
<a href="http://localhost:8180/file.do?id=<#task.history.attachments.uploadId>">
<#task.history.attachments.uploadDesc></a></td></tr>
<#endBlock-2>
<#endBlock-1>This code will write all the attachments names, which will be also active links to the TaskPool attachments. Code of the function Iterate is here inside the function NotEmpty. If the function was used separately (without block NotEmpty), the result will be the table, with the empty links to non-functional pages.
There is an example of the configured notification. It will be appproximately like that one we know from TaskPool. There are all functions in it.
<html>
<body>
<table>
<tr><td colspan="2"><h5><#task.history.action> (<#task.id>)
<#block:If[task.history.publicId=1 | task.history.publicId=2]>
- hidden commentary
<#endBlock></h5></td></tr>
<tr><td colspan="2"> </td></tr>
<tr><td>Message for</td><td><#recipient.firstname> <#recipient.lastname>
</td></tr>
<tr><td>Who</td><td><#task.history.createdBy.firstname>
<#task.history.createdBy.lastname></td></tr>
<tr><td>Date</td><td><#task.history.created></td></tr>
<tr><td colspan="2"> </td></tr>
<tr><td>Pool</td><td><#pool.name></td></tr>
<tr><td>Subject</td><td>
<a href="http://www.taskpool.net/showJob.do?id=<#task.id>"><#task.name></a>
</td></tr>
<tr><td>Description</td><td><#task.desc></td></tr>
<tr><td colspan="2"> </td></tr>
<tr><td>Priority</td><td><#task.priority></td></tr>
<#block:NotEmpty[task.history.comment]>
<tr><td>Commentary</td><td><#task.history.comment></td></tr>
<#endBlock>
<#block:NotEmpty[task.history.price]>
<tr><td>Price</td><td><#task.history.price>
<#task.history.currency></td></tr>
<#endBlock>
<#block:NotEmpty[task.history.price]>
<tr><td>Task Deadline</td><td><#task.history.deadline></td></tr>
<#endBlock>
<#block:Iterate[task.history.dynamicFields]>
<tr><td><#task.history.dynamicFields.name></td><td>
<#task.history.dynamicFields.value></td></tr>
<#endBlock>
<#block:Iterate[task.history.dynamicFieldsObj]>
<tr><td><#task.history.dynamicFieldsObj.name></td><td>
<#task.history.dynamicFieldsObj.value></td></tr>
<#endBlock>
<#block-1:NotEmpty[task.history.attachments]>
<tr><td colspan="2">Přílohy</td></tr>
<#block-2:Iterate[task.history.attachments]>
<tr><td> </td><td>
<a href=
"http://www.taskpool.net/file.do?id=<#task.history.attachments.uploadId>">
<#task.history.attachments.uploadDesc></a></td></tr>
<#endBlock-2>
<#endBlock-1>
</body>
</html>Table of Contents
The function authentication enables to define an acces to administrator of TaskPool into the external database. This database is mainly used for customers evidence. This database can be used e.g. for Helpdesk authentication (16. Helpdesk) or e.g. as a list of possibilities for SQL selectbox (4.10. SQL selectbox).
The authentication can be more types - towards Windows domain via LDAP protocol or towards external relational database system, MySQL, MSSQL or Firebird or by CAS (Central Authentication System).
We will repeat that the access to Helpdesk thanks to the authentication brings several advantages. First advantage is automatic display of personal values (name, telephone or user's address) during the new helpdesk requirement creation. The second main advantage is the possibilty of better monitoring and implementing all requirements, which were inserted to the system by the user.
If there are more authentications used at once in the helpdesk pool, it is important to fill in Name of authentication for the users with understandable names. According to them, the authentication will be selected for the access to Helpdesk.
LDAP (Lightweight Directory Access Protocol) is protocol which enables the effective sharing of the structured information for TCP/IP. In reality it means that e.g. list of the employees of the company, their usernames, home directories, personal information, e-mail addresses or telephone numbers. Structure of the information in LDAP can be imagined as a tree, which branches consist of the particular data.
Authentication via LDAP brings two more advantages against authentication via database. The first advantage is the same log in data for all aplications used via the given company. The second advantage is a possibility of automatization of the whole authentication. Log in than can be e.g. via startup file which logs in the helpdesk user into the system automatically (or into TaskPool). This startup file will be sent to you when required by ComArr staff also with the configuration manual.
Helpdesk offers a possibility of full adaptation of each pages layout to the company's needs of course in case of LDAP authentication.
These systemic requirements are needed for LDAP authentication and the correct function:
LDAP server and possible access to the server with TaskPool installation and
TaskPool version 1.7.3 and later
The user's record must be searchable in LDAP according to the atribute ID, which is used for the log in to the workstation.
Example:
the user logs in using ID: novakj
this record must be searchable in LDAP e.g. using uid=novakj
found record must have atributes of the other fields, which are mapped to helpdesk:
obligatorily: first name, surname, e-mail
optionally: telephone, company
Principle of authentication without automatic authenticator is the following:
The user fills log in and password into the log in screen.
TaskPool finds out the user's ID from LDAP.
TaskPool receives other information from LDAP server and put them into the helpdesk form. The user is authenticated by this and can create the task. Áll previsou requirements are seen.
In case TaskPool does not receive a confirmation from LDAP server about the user's existence and correct log in data, the user is not thought as an authenticated user and has to enter his/her name, e-mail etc. The previous requirements are not seen.
In the picture there is a scheme of log in using the automatic authenticator.
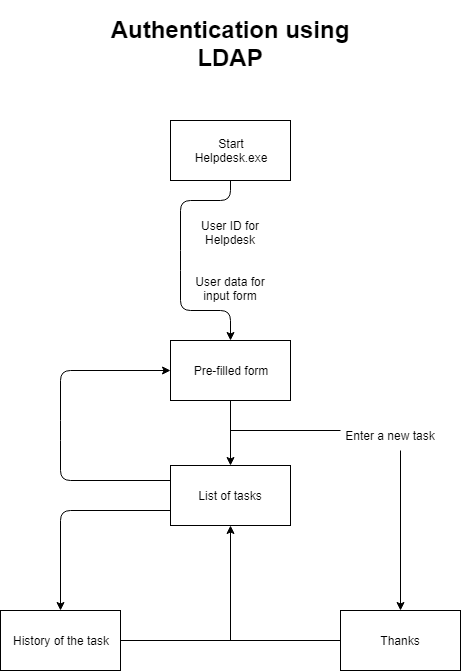
This is important for a correct run of LDAP authentication:
the variables for the access to LDAP server in the setting of authentication
set a layout of the list of the requirements, which the user has already created to implement
set a layout of log in screen
Form for creation a new authentication is opened via the button New on the card "Authentication" in the administration section.
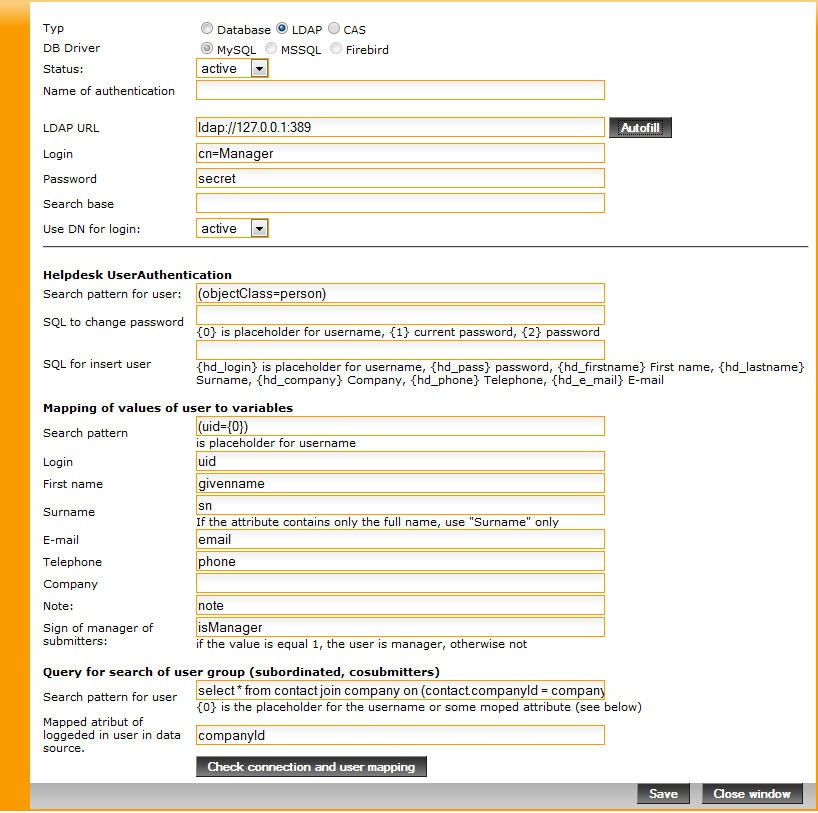
Using the button Autofill we can insert the access strings into the configuration form for LDAP.
Verification can be even more, Therefore each has its own specific name. User then will during login to Helpdesk, e.g. choose their own firm etc. And like most TaskPool functions, so with verification we can easily deactivate.
LDAP URL
URL address of LDAP server in the form protocol://adress:port. Example ldap://ldap.youraddress.de:389 and for Secure LDAP ldaps://ldap.youraddress.de:636
User name
User name which is used for TaskPool log in to the LDAP server. In Active Directory we insert the user name in the form "domain\username".
Password
Password for log in to your LDAP Server.
Search from
Specification of the area where TaskPool should search the LDAP objects. It is Search Base. If there are more organization units in your company (e.g. OU=Sales in O=IBM and OU=Development in O=IBM) and OU=sales is not used during the authentication, it is good to limit the usage only to OU=Developement inserting "OU=Development" or "O=IBM" and the process of user's authentication will be quicker thanks to it. In the basic case the domain will be enough, e.g. OU=Development, O=IBM, DC=IBZ, DC=DE.
Use DN for log in
We determine, if the way to the particular record in the LDAP structure will be added automatically to the log in name: Example:
option Active - login filled in the form: "novak", login used for LDAP connection: "CN=novak,DC=comarr,DC=de"
option Closed - login filled in the form: "novak", login used for LDAP connection: novak
Note: Active Directory need not require this setting.
Search the sample for the users
Filter specification when TaskPool will substitute each user to authenticate their identity at LDAP server. E.g. "(uid={0})", where "uid" is a variable with usernames and "{0}" is a substitute character for the user's username. Another example can be "ObjectClass=person". This sample will search only those user, who have in the atribute the type value person.
Note: When Secure LDAP used, the safety certificates into JAVA are needed to import before using LDAP authentication.
SQL for password changing, SQL for inserting the user
These options are irrelevant at LDAP authentication, TaskPool is not authorized to change access data in the LDAP. This setting can be used when authentication through the database.
LDAP mapping
It is also needed to enter variables LDAP of objects to their captions. E.g. FirsName: givenName, Surname: sn, E-mail: mail, etc.
The button "Test connection" enables to test the configuration functionality.
Note: Fields "SQL for the password change" and "SQL for user's creation" are irrelevant during the LDAP authentication, TaskPool does not have the right to change the access data in LDAP. This setting is possible to use during authentication via the database.
Configuration of the group of submitters will be described in the chapter 17.3. Manager of the submitters at Helpdesk.
In the section Database it is possible to set the authentication of the logged in users in Helpdesk via the external database (e.g. company's database of its clients). As in the case of LDAP the personal data are loaded from the database and they need not be filled.
This authentication is practically the same as LDAP authentication, only the different basis is used.
When using the database interface you can use very useful tool External Database Manager, with which we can manage the data of external databases right from the TaskPool interface, more in the chapter 20. External Database Manger.
Database interface is configured at the same form as LDAP, type of authentication and database is set at the upper part using the selectboxes.

DB string
It is a string used for connection to the database. There are details of connection specified here, like the name of the database, server, port and coding.
For MySQL it can be this string: jdbc:mysql://localhost:3306/customerdb?useUnicode=true&characterEncoding=utf8 - it is a connection to the local server at the port 3306 and at the database "customerdb" and coding "utf8".
For MSSQL (control JTDS) it can be this string: jdbc:jtds:sqlserver://localhost:1433/customerdb - again it is a connection to the local server, port 1433 and the database "customerdb".
Username and password
User name and password for the database connection.
Connection pool
The Connection pool method can be used to faster connect to a database. We do not recommend using it outside the internal network. Cannot be used for LDAP / AD.
SQL for password authentication
SQL requirement, which is used for the password authentication of the particular user.
SELECT count(*) FROM users WHERE username = '{0}' and password = '{1}'
Note: At SQL orders configured at the authentication is necessary to write a semicolon at the end of the orders. Help to each SQL order is mentioned below the field for the given order. Thanks to the button "Autofill" TaskPool will fill the basic SQL query to each field.
SQL for the password change
This order is filled, if we use the possibility of password change by the Helpdesk users themselves.
UPDATE users SET password = '{2}' where username = '{0}' and password = '{1}'
SQL for a user creation
This order is filled if the Helpdesk users use the possibility of the accounts registration themselves.
INSERT INTO users VALUES ('{hd_login}', '{hd_pass}', '{hd_firstname}', '{hd_lastname}', '{hd_company}', '{hd_phone}', '{hd_e_mail}')
INSERT INTO users (username, password, firstname, lastname, company, phone, email) values ('{hd_login}', '{hd_pass}', '{hd_firstname}', '{hd_lastname}', '{hd_company}', '{hd_phone}', '{hd_e_mail}')
SQL for users selection
SQL query returning only one line with the user's data. As a placeholder's string for user's ID can be {0} (where ID is a username).
SELECT * FROM users WHERE username = '{0}' - from this order appears e.g. this SQL query: SELECT * FROM users WHERE username = 'novak.karel';
Mapping
In this section we set a mapping of each data for Helpdesk to the particular columns of the table.
Funcionality of configuration can be tested by the button Authenticate connection and users mapping. In the picture there is a window which appear after the successful test connection.
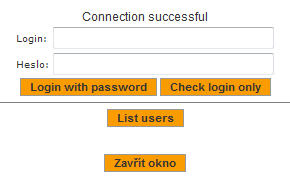
After the successful connection to the database we can do a login test.
To get database validation up and running quickly it is possible to use preset database. A version for MySQL and MSSQL is available. Both databases are in the directory with TaskPool files:
..\ROOT\WEB-INF\tools\edm\database.MySQL.sql
..\ROOT\WEB-INF\tools\edm\database.MSSQL.sql
NOTE.: In this directory are also found files
applicationXml.xml, which serves to activate the already mentioned
function External Database Manager. For easy operation of this function, it is possible to use
the sample variant, more in the chapter
20. External Database
Manager.
To easily start the database, just import the table contained in one of the files to the database server. There we will show the variant for MySQL, for MSSQL is the situation similar.
In the case of MySQL we can import the database in the command line with the following commands:
mysql -uroot -p   //login to MySQL under the user 'root'
create database externalDB;   //database creation
exit;   //exiting MySQL
Now we created an empty database, where we will import the tables from the file
database.MySQL.sql in this manner:
mysql externalDB < c:\database.MySQL.sql -uroot -p
Provided, of course, that the given file is located in the root directly on the disk
C, otherwise, the full path to the file must be provided. Now you still need to
create a user and assign database rights. Of course it is possible to use
a user 'root', we recommend to have for every external database special user due to the bigger safety.
mysql -uroot -p   // login to MySQL under the user 'root'
create user extdbuser identified by 'password';   //creating user 'extdbuser' with a password 'password'
grant all privileges on externalDB.* to extdbuser identified by 'password';
   // to user 'extdbuser' we will assign with this command all rights for the database 'externalDB'
exit;   //exiting MySQL
Now the database is prepared you only need to set up authentication, which we will easily do by clicking on the buttonAutofill on the form for creating a new verification. All neccessary items are filled in the configuration form. Only thing we edit is the access to the database itself. Assuming that the database server is located in the local server on the port 3306, the setting will look like this:

Helpdesk also enables to use the role of the manager of the submitters. The manager can see except his/her own requirements also the requirements of his/her subordinates and can add commentaries to them or approve submitted conditions.
The CAS single sign-on system allows the user to automatically log in to all applications that are part of the CAS service upon logon. CAS also supports single logout.
The TaskPool system is usually added to a functional CAS system, but in principle there is no problem to create CAS for TaskPool separately.
TaskPool must register to CAS system with correct URL.
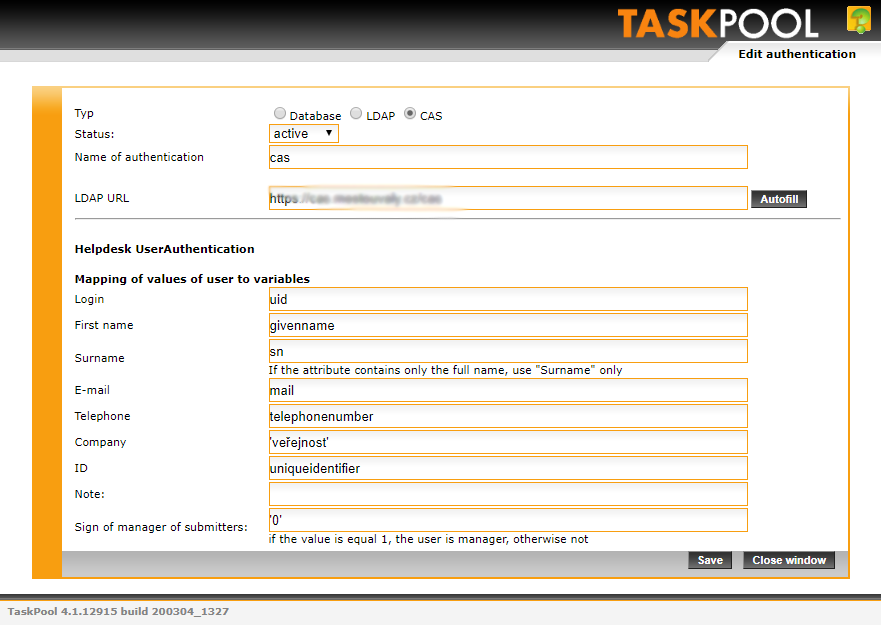
Note: The Company field displays the ´veřejnost´ name in single quotation marks, indicating that this text string is always written to the Company field.
Table of Contents
Helpdesk module is for dividing TaskPool from users of Helpdesk (customers) thanks to the web forms. Helpdesk user need not have an access to TaskPool but can create task. Therefore we will call helpdesk task as a requirement. When the customer creates the requirement from the web interface, in TaskPool it will be created as helpdesk task, which is then worked with like a classical task. Helpdesk user is in the role of a submitter. If the implementer's side answers the requirement, the customer will receive an announcement about the reaction to his requirement and thanks to the web form or e-mail he/she can answer again.
NOTE.: Access to Helpdesku is possible on the one hand without the need to login using username and password, in this case the customer always fills their contact information when entering a new task. Further it is possible to have their own login for every costumer, which eliminates the need to fill in contact information and at the same time it is possible to have a list of all assigned tasks in one place. When using the verifying it is also possible to divide roles of helpdesk users on a clasic submitter and manager of submitters, like in the TaskPool implementers overview. You will read about this problematic more in the chapter 16. Authentication, which we recommend to read first. The problematic of authentication will be mentioned quite often in the upcoming chapter.
Complex module Helpdesk setting is displayed after clicking the link edit in the field "State of the helpdesk" at the particular pool. After clicking a new window will appear, where each setting of Helpdesk module is divided into the bookmarks, similarly as in the pool setting.
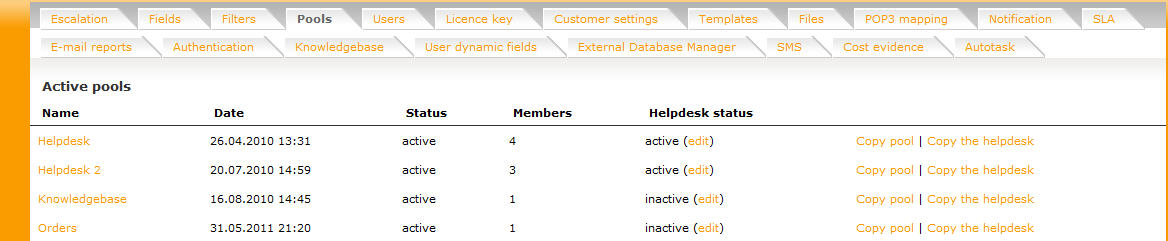
Note: The whole Helpdesk is possible to configure in trilingual modification, see more in the following subchapters.
The appearance of all web forms at Helpdesk is freely configured. The principle of their creation is similar to the classical web page creation thanks to the HTML language. The different is only the creation of each form. Instead of classical HTML fields for input we use the placeholder's strings. These strings make the form creation easier, each placeholder's string represents one field for input at the web form. It is possible to determine, which data in the task will the field represents. The placeholder's strings can be used for a list of certain value, more in the following subchapters.
The list of accessible placholder's strings with the description of their meaning is displayed usually on the left on the card of each form configuration.
Usage of placeholder's strings is simple. The placeholder's string can be only copied (or rewritten) to the required place. In the picture there is an example of the string and the usage in the external link to helpdesk requirement used in the helpdesk notifications. Instead of the placeholder's strings <#id> and <#lang> TaskPool will automatically put the ID to the task and prefered language of helpdesk display.

The first tab of the Helpdesk configuration is the card "Basic setting". In the header of this field we can see, which pool is related to which Helpdesk.
Helpdesk can be deactivated similarly as the pools and the users. It is not possible to receive the new requirements when deactivated (neither via web nor via e-mail), but it is possible to access the history of the requirements. This is possible to be set thanks to the field State.
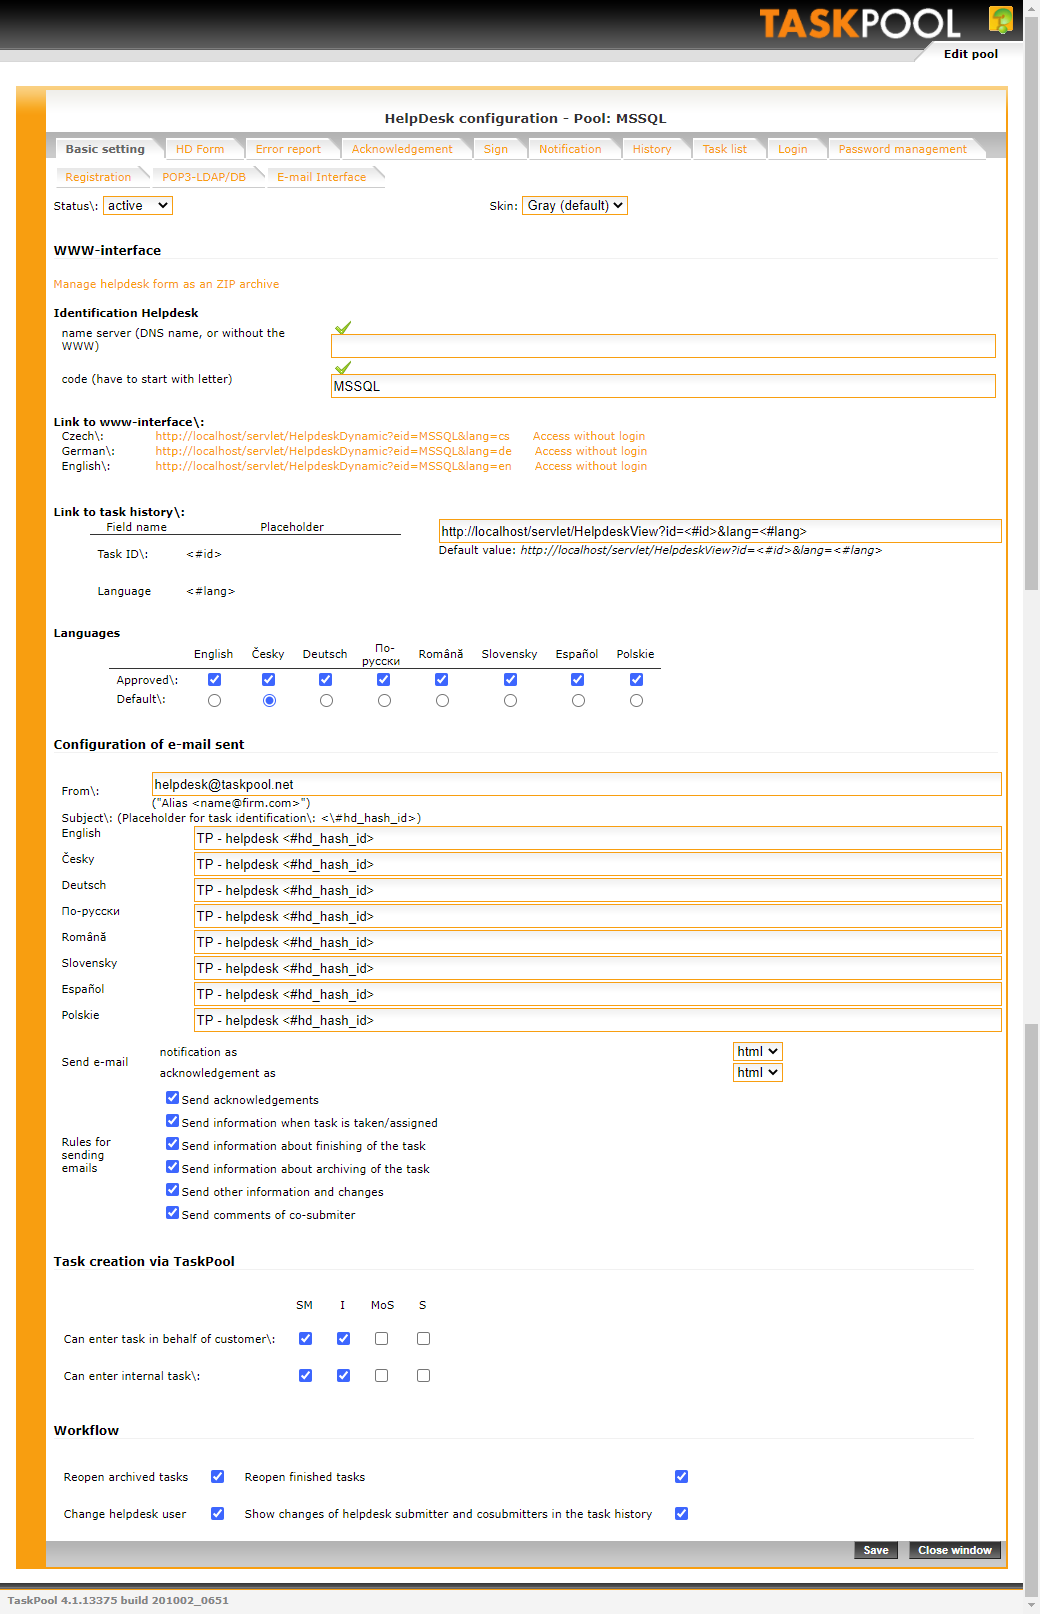
Helpdesk identification code is the string, which will be displayed in the link at the helpdesk task. It is for identification of each Helpdesk, it must begin with a letter. The web interface link links to the Helpdesk itself. The entire Helpdesk can be configured in various language versions (see image above). Links are created to the most commonly used languages.
NOTE: You do not need to complete the configuration in all languages, just configure the language version we will use.
The button Administration of forms thanks to archive is for an easy helpdesk forms. After clicking the possibility of download the form from archive will appear. This archive can be then put into the window for uploading the file and TaskPool will automatically process and record all needed forms. The configuration of all forms is then very easy.

After pressing the Download archive of saved forms button
the system creates a * .zip archive of all forms of the given helpdesk, its
saving to a computer then works in the same way as, for example, downloading files from the Internet. At the same time
we can use such an archive to quickly configure a new Helpdesk, or archive to use
restore backup. In this case, just insert the archive into the file upload window and after
saving TaskPool will automatically process this file and load all the necessary forms. For
the correct names of the individual files in the archive must be observed for proper functionality.
NOTE: If we want to use authentication to enter the Helpdesk, this feature allows you to import a sample configuration. The verification is then needed activate in the Helpdesk configuration, this will be done on the "Login" configuration tab, more in chapter 17.12. Card Login .
WWW-interface is for communication with the customer. It enables sending the requirements, viewing the history and a new commentary creation. This link is automatically generated according to the selected identificator of Helpdesk. After clicking, the user will get into the Helpdesk itself.
For Helpdesk integration into the web pages it is possible to use the inframe. It is the frame, which can be easily inserted into the specific place of the web page. Because of the ordinary disadvantages of tabs iframe we do not recommend this implementation. Better is the implementation to insert the separate group, e.g. subdomena in the Helpdesk web interface.
The code for inserting Helpdesk thanks to iframe can be e.g. this one:
<iframe scrolling="no" height="500" width="560" frameborder="0" src=" http://www.taskpool.biz//servlet/HelpdeskDynamic?eid=Helpdesk1&lang=cs "></iframe>
The link must be the same to the generated link at www-interface. The language is possible to select manually; there are three possibilities.
Link to task history behaves similarly. Below the field for its inserting we can find its default image. If we will operate TaskPool at the server localhost:6060, the link will be this one:
http://localhost:6060//servlet/HelpdeskView?id=<#id>&lang=<#lang>
This is a universal URL, where placeholder's strings <#id> and <#lang> will be replaced by the particular values in notifications. If we use e.g. only Czech version of the Helpdesk, the link can be:
http://localhost:6060//servlet/HelpdeskView?id=<#id>&lang=cs
The other tab on this card is Languages. It is necessary to allow at least one language and set, which will be the default one. The Helpdesk allows, as well as the whole system, trilingual variation of display.
TaskPool sends notifications to helpdesk users. Thanks to these e-mails the communication between the implementer and customer (helpdesk user) runs. The customer will receive the notification about the change of his/her created requirement, the body of the notification consists of the link to the requirement history. After the clicking he/she gets into Helpdesk to the history of the requirement and can continue in communication. Sender is similar as at the notifications in the pool, value which will be displayed in the sent e-mail in the field "From". Subject is the same as subject of e-mail.
Rules for sending e-mails and Task creation via TaskPool will be described in the following subchapters.
The default behaviour of TaskPool is, that helpdesk user adds the commentary to the finished requirement, the requirement will be automatically opened. The option Open already archived tasks can be set not to open these tasks. If this option will not be ticked, the finished or archived task with the customer's commentary will not be opened.
The option Change of helpdesk user enables to create tasks at Helpdesk on behalf of somebody. In reality the helpdesk user can select the other user from the given authentication after log-in to Helpdesk. The task will then be created (see more in the chapter 17. Authentication). Thanking to the requirement will be received to the user, not to the submitter on behalf with an address at its history. The other checkbox in the setting is for the changes of the user and if they will be written into the task history or not.
Note: It is necessary to have the placeholder's string in the helpdesk form <input name="hd_autocomplete" /> for the correct function of the helpdesk user change, which enables to select the particular user.
Workflow creation of implementing the helpdesk requirements is the following:
Creation of the requirement by helpdesk user (customer)
Assignment the task by the implementer
Communication from the implementer's side
Communication from the submitter's side
Implementing the requirement by the implementer and finishing the task
Possible acknowledgements by the submitter or returning the requirement to the implementer to revision
In the section Rules for e-mails sendings is possible to set, which actions will be used for sending the notifications to the helpdesk users. It is set by default, that any time the implementer will do an action (assignment of the task, commentary, finishing the task), the submitter is informed about this action by notifications. Moreover for requirement creation the user will receive the thanking for the requirement with an address to its history automatically. Thanks to the checkboxes in this section we can select manually an access of sending these notifications. For example, we will cancel all automatic notifications sendings. Setting the checkboxes then will be like this:
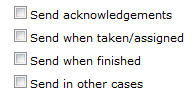
In this case the helpdesk customer will not be automatically informed about any actions, which a implementer does with the task, not even about the successful creation of the requirement (thanking). We have a possibility to inform the helpdesk submitter manually at arbitrary change of the helpdesk task. If at least one checkbox in the setting of e-mails sendings is not ticked, in the window of task change in TaskPool there will appear an option e-mail HD. If this field is ticked, than after saving the task the helpdesk user will be sent a notification about the task change. It is on the implementer, in which cases the submitter will be informed about the requirements.

Helpdesk task can be created directly in TaskPool's solution interface. Thus we can enter a task on behalf of a helpdesk user, ie a customer. In practice this means that when entering the task, we fill in the customer data and after saving the task, the user will be thanked for the request, similarly as if he entered the request himself on the Help Desk. If you want to use this option, at least one of the roles must have permissions in the pool. This will be done in the "Create TaskPool" section. Here we also set whether it is possible to enter classic internal tasks in the helpdesk pool.
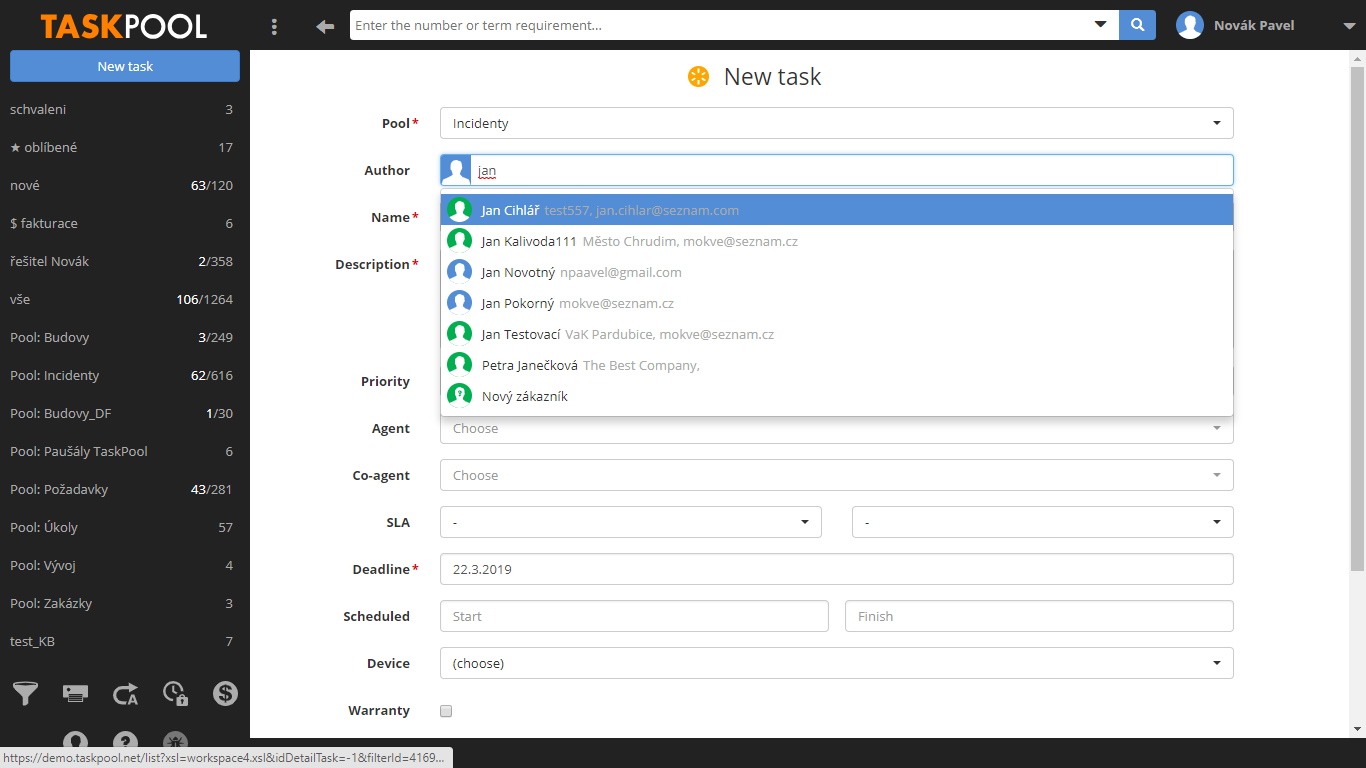
Note: Function Co-submitters is only available when using authentication. The principle is similar to that of co-investigators. The co-submitters sees the tasks in his list of helpdesk requests, has the opportunity to comment on it and receives notification.
Communication between the helpdesk user (customer) and the implementer of the requirement is possible only at the basis of e-mails. The customer need not access the web interface. It is enough to answer the sent notification by classical way (option "Answer" in e-mail client) and TaskPool will connect his/her answer to the requirement as a last commentary.
Note: For correct run of this feature it is necessary to have an e-mail interface activated for the particular pool. (see more in the chapter 16.16. E-mail interface at Helpdesk).
For identification of the requirement in TaskPool there is a special string <#hd_hash_id>, which we insert into the field "Subject" in the section "Setting of sent e-mail". The subject of sent notification will be e.g. "Helpdesk -id ##84735100166##". After the answer to the notification, subject of the notification will be assigned the commentary to the particular requirement thanks to ID.
Note: Quotation of the previous content of the notification is not assigned to the commentary.
The field subject can be e.g. this one:
Helpdesk - id: <#hd_hash_id>
Nearly every helpdesk page consists of common features (e.g. header and footer), TaskPool enables to template helpdesk. The common code, saved in a separate file, it is possible to upload into the section "Files" (see the chapter 11. Files). To this file than could be refered to any page this way:
<#template_include file="HDheader.html"> - if there is an uploaded file "HDheader.html" in the section "Files", the content of this file will be inserted into the given form.
Work with templates is possible to extend about parameters sendings. It enables e.g. easy change of logo at each Helpdesk. In the files' saved template must be this code:
<img src="<#template_attribute name="logoCompany">" />
Name of the parameter is in this case "logoCompany" and there can be used the string at any length without diacritics. It might be:
<#template_include file="HDheader.html">
<#template_param name="logoCompany"
   value="http://www.taskpool.net/img/ref_comarr.gif">
<#template_include_end>
As a parameter "logoCompany" will be sent URL "http://www.taskpool.net/img/ref_comarr.gif" into the template "HDHeader.html".
For displaying the particular elements it is possible to use the conditions. We can e.g. provide displaying the particular element only, when the task is finished, if the user is authenticated (more about authentication in the chapter 17. Authentication) etc. The most common conditions are these:
<#if "user_authenticated">
   <a href="<#hd_overview_url>">Your requirements</a>
<#endif>
This condition provides the display of the list of requirements to the authenticated users only.
<#if "roleId == 2">Text for the submitter<#endif>
<#if "roleId == 16">Text for the manager of submitters<#endif>
Thanks to this condition we can determin, which role will the text be displayed to.
<#if "stateId = 202">
   New conditions were submitted, do you agree? <#hd_customer_confirm>
<#endif>
Thanks to this condition it is possible to display the content of the requirements state. This particular case is for confirmation of the conditions at Helpdesk. If there are new conditions submitted by the implementer (price, deadline), task will change into state with id=202 and the Helpdesk user will be displayed the selectbox where these conditions can be accepted or declined.
HD form is the page, where the customer creates his/her requirements. The contact data (name, e-mail, telephone) are filled here, also the description of the problem and optionally other values (SLA, priority, co-submitters etc.).
For each entrance fields display there are placeholder's strings used, described in the chapter 16.1. Usage of placeholder's strings. Instead of each placeholder's string the entrance field for the text will be insterted automatically into the mailbox, (or also for attachment insert).
Elements <form> and </form> is not possible to write manually! These elements of TaskPool will be generated automatically and when writing manually, Helpdesk will not work!
The basic scheme of the form is available after clicking the link Show sample code. The principle of function of the placeholder's strings can be understood from the sample code. Their description can be found in the left part of the page of the form configuration. In this part of the page it is also possible to select, which values will be obligatorily required when filling the form. If the field is labelled as obligatory, TaskPool will automatically put the star to it. In case of the field will not be obligatorily filled and the form will be sent, the page with an error report will appear.
At this page it is also possible to set the size of the field for a description of the requirement and a text of a submit button.
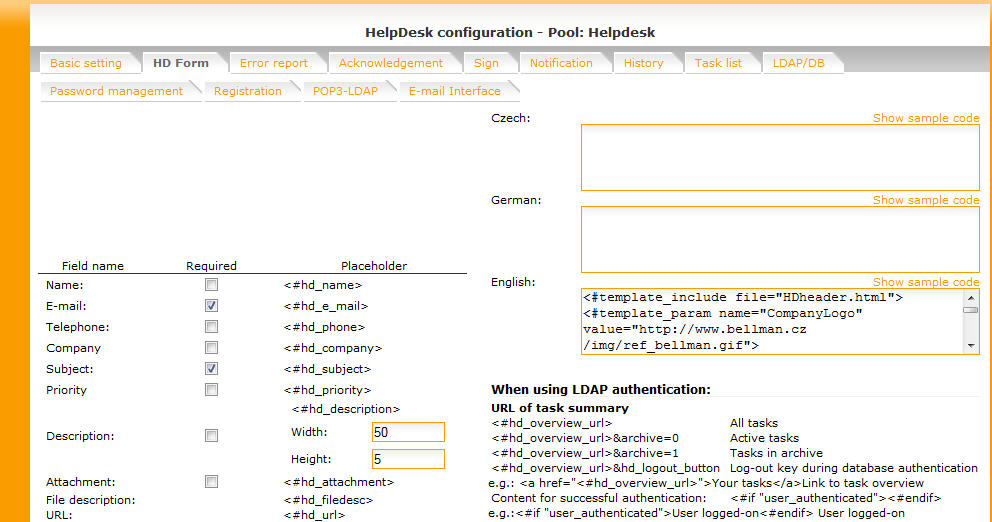
The resultant helpdesk form can be e.g. like this one:
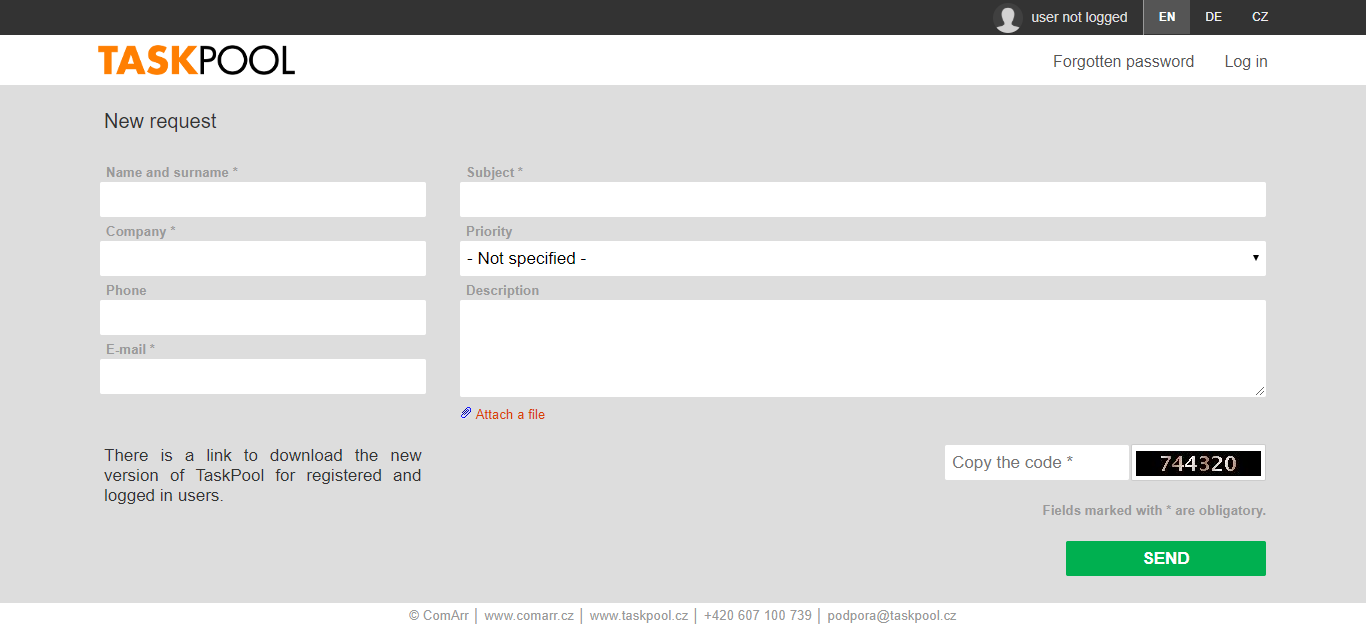
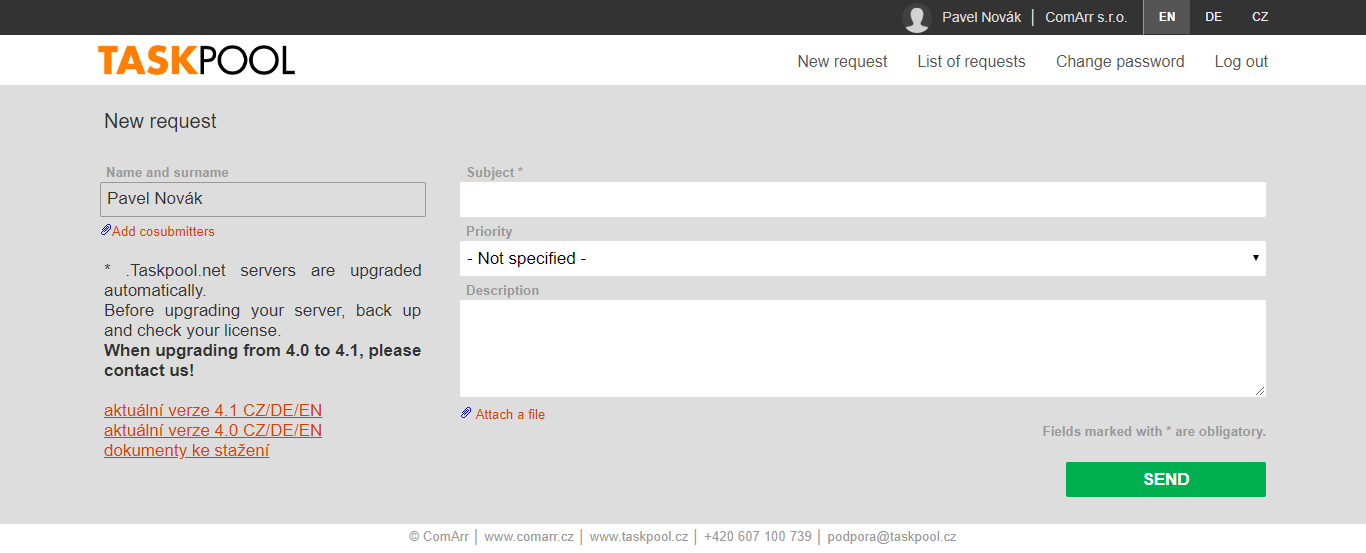
Note: When authentication usage, the user need not fill in his/her personal data. This data is loaded from the database during the user's authentication. At the same time at the form without authentication, the list of assigned requirements and a function co-submitters is not accessible. These functions are possible to use only with active authentication.
If the co-submitter will be selected, he/she will be able to see this requirement in the list of requirements. He/She can also add some commentaries and the notifications will be received. The embed code is as follows:
<#if "!user_authenticated">
  <tr><th><label for="captcha"></label></th><td><img src="../captcha.jpg"/></td></tr>
  <tr><th><label for="captcha2">Opište kód z obrázku*</label>
      </th><td><input type="text" name="captcha_key_name"/></td></tr>
<#endif>The page of error report will be displayed to the customer in case, he/she has not filled all obligatory fields. For return to the creation form we recommend using Javascript link (see the sample code), not to lose the filled data and necessity to fill them in again.
In the code of the helpdesk form it is possible to validate the form by Javascrip. The error report might not occur then. In the form of the previous picture there are all these cases validated by Javascript. This form can be sent if required by ComArr staff or using the function "Management of the forms thanks to archive" described in the chapter 16.2. Basic setting.
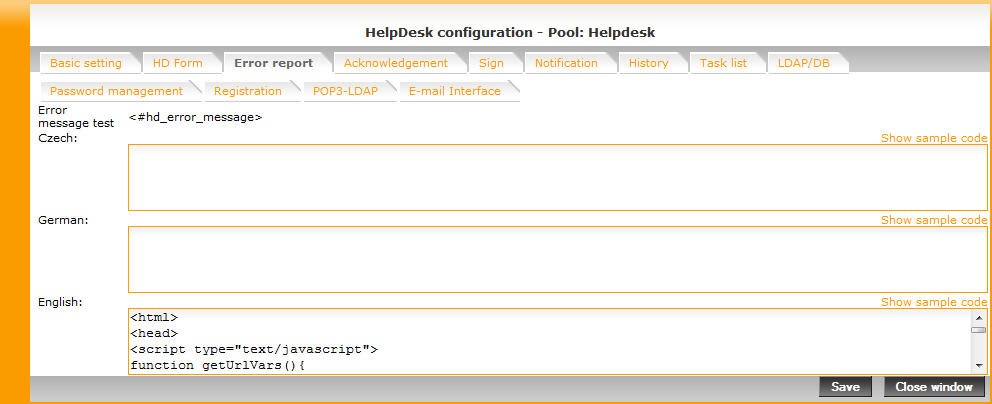
After the successful requirement there will be a thanking sent to the helpdesk user together with the link to the task history, or e-mail will be sent with this information (see the setting in the chapter 16.2. Basic setting).
On this card we define a layout of the web and an e-mail thanking. There is also a sample code available.
Web thanking can be e.g. like this:
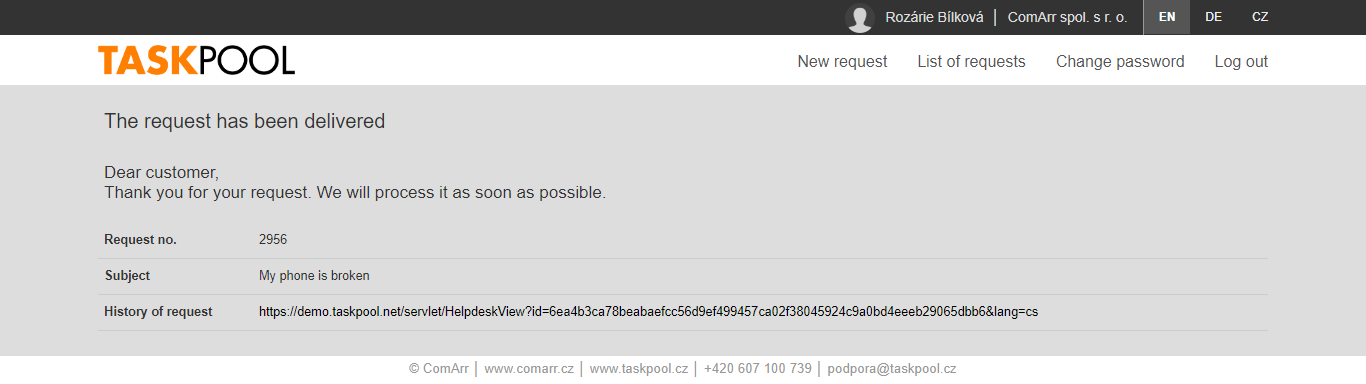
On this card we define the automatic signature, which we can use when answering helpdesk requirements directly in TaskPool. This function can be used only in TaskPool, not at Helpdesk. We can use all placeholder's strings mentioned on the left.
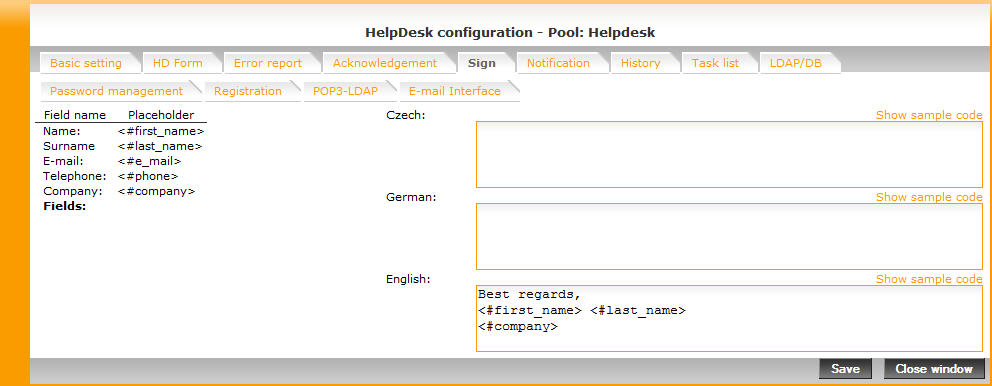
Signature can be insterted when the task modification and after clicking the button Signature. Automatic text will be inserted below the written commentary, independently to actual position of the cursor.
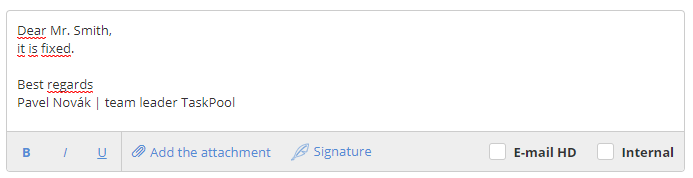
Notification is sent to the customer, if the implementer makes a change with his/her requirement (commentary, takeover, finishing etc.). In case of e.g. hidden commentaries or addition of the subtasks to the notification requirement, the customer is not sent anything. There should be a link to the web page in the notification, where the customer has a possibility to add a new commentary, at the requirement history. Notifications are configured the same way as e.g. layout of the e-mail thanking.
History of the requirement is helpdesk equivalent to detail of the task in TaskPool. Helpdesk user has a possibility to see the chronology of the requirement implementing and also he/she can add commentaries or attachments. There are also all actions with requirement list, of course except hidden commentaries at the implementer's side etc.
Header
Header is the top part of the web page of the requirement history. In the setting of the header it is possible to insert placeholder's strings for information about the requirement and for adding a commentary (form for the answer), we recommend placing this window to the lower part of the screen. Otherwise, the helpdesk user can add his/her commentary into the implementer's window.
In reality the header can be like this:
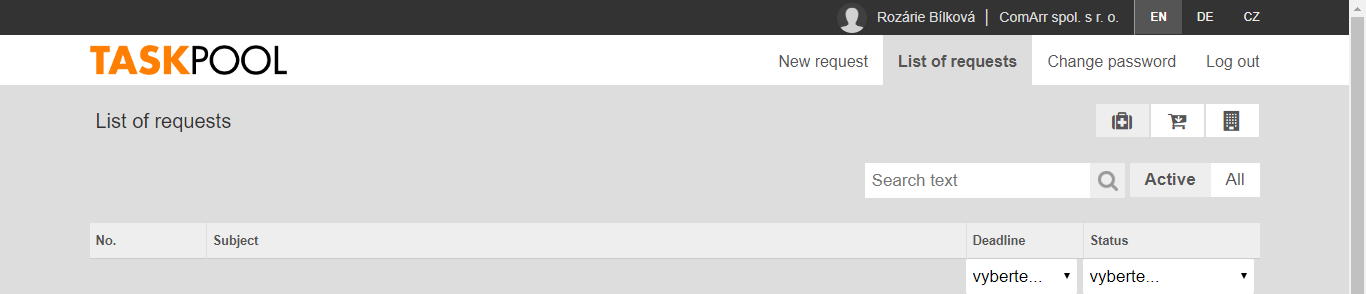
List of commentaries
Into this section we can insert a sample for each commentary display. TaskPool than uses this sample to each display.

Footer
Footer is the lower part of the web page of the requirement history. Into the footer there is possible to place the same placeholder's strings as into the header.
Note: Header and footer of the requirement history is not the same as the header and footer of the overall web interface of Helpdesk!

The list of the tasks works only for the authenticated users. Without authentication the list of their requirements cannot be displayed. If the user logs in Helpdesk, via LDAP or external DB (see the chapter 17. Authentication), it is possible to personalize him/her in the helpdesk system.
The card Tasks list shows the list of the requirements created by the particular users. The additional features are possible to be displayed to the requirements for better orientation. If the user does not log in to Helpdesk at any of the ways mentioned, the content of the forms is not available to him/her.
Header and task list
Header is an upper part of the web page in the requirements list.
Thanks to this part the list of the requirements of the given user is listed here. Similarly to the task history there is defined the sample for each requirement display and TaskPool will use this sample for displaying the other ones.
Right next to Search are located buttons Active and All. You can edit and expand them with other items:
<a href="<#hd_overview_url>">- all<a href="<#hd_overview_url>&archive=0">- active<a href="<#hd_overview_url>&archive=1">- archived<a href="<#hd_overview_url>&archive=2">- archived without disabled<a href="<#hd_overview_url>&archive=3">- all without disabled
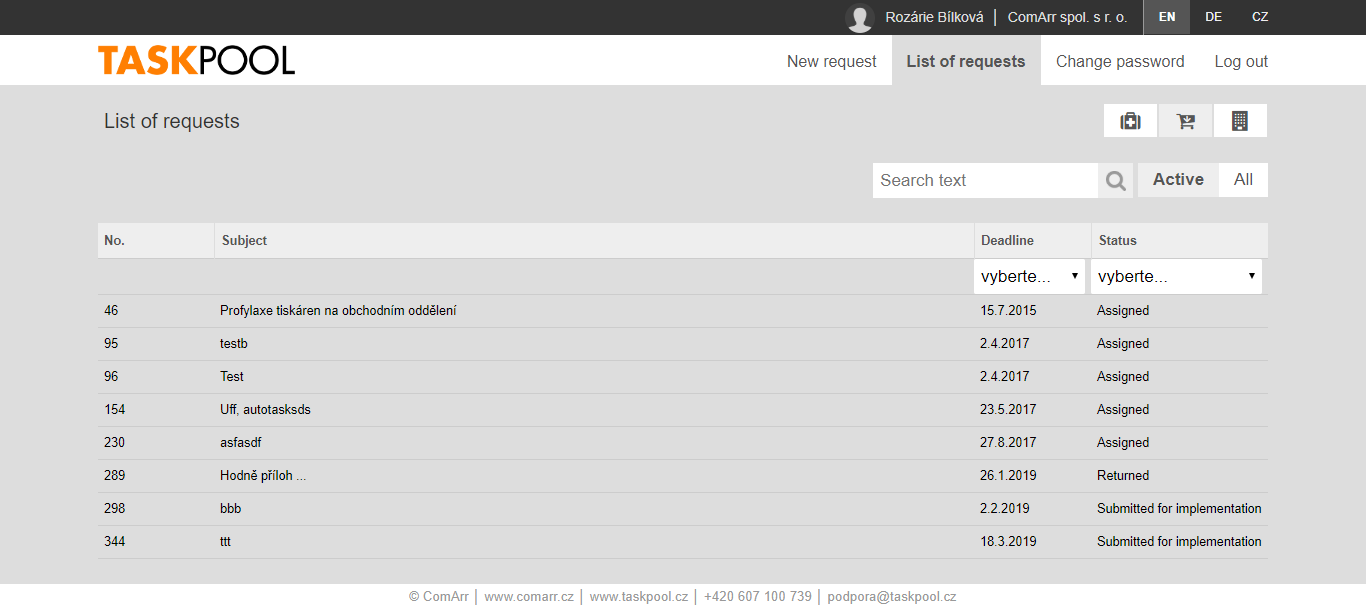
Footer
Footer is the below part of the web page in the requirements list of tasks. Again there is possible to use the placeholder's string <#hd_user_id_extern>. In the tasks list the footer is used mainly for closing the elements </table>, </body> etc.
TaskPool saves the data about logged in user into the cookies of the browser. Until the window of the browser is closed, the user will not be logged out and when he/she enters the next time, the name and the password will not be required in the form. The link to the manual log out may be possible to create via placeholder's string <#hd_overview_url>&hd_logout_button.
- Example
<a href="<#hd_overview_url>&hd_logout_button">Log out</a> - creates the log out button named "Log out".
On this card it is possible to set, if the users can access Helpdesk without log in (anonymously) or using log in (authenticated) or if both possibilities will be allowed. If we want to access Helpdesk, we must define the authentication first. It is the function which enables to access Helpdesk with log in and password (see the chapter 17. Authentication).
Access to Helpdesk thanks to authentication is advantegous. The first advantage is automatic personal values load (name, telephone or address of the user) when a new helpdesk requirement creation. The second advantage is a possibility of monitoring and implementing all the requirements, which were created by the user.
In the upper part of the screen we have a selection of each authentication and anonymous access. At the required authentication it is necessary to tick the applicable checkbox and fill in the order. We recommend a special authentication for each pool (company). Of course it is possible to have one authentication for all Helpdesks, but this implementation is not recommended.
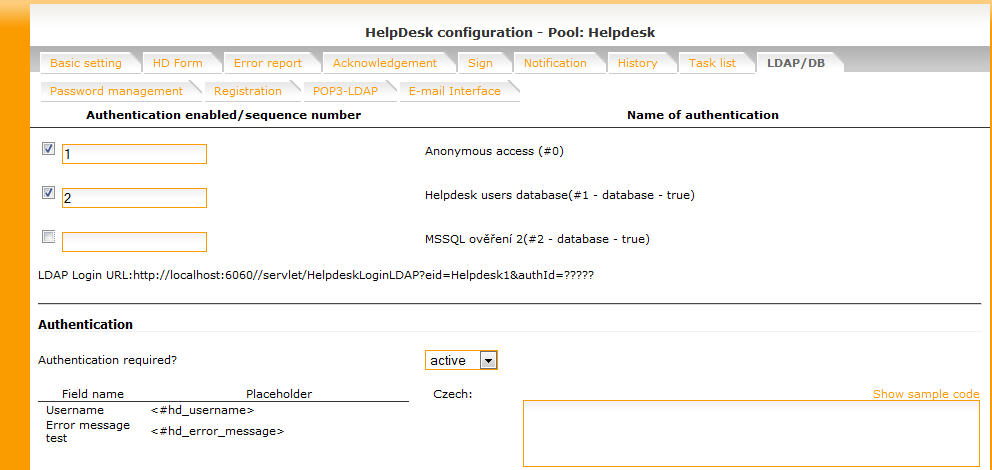
According to the setting in the picture it will be possible to acces Helpdesk anonymously as well as via authentication. Into the requirement created under the authentication it will be also possible to enter only after authentication. If we select the field Veficiation needed as non active, it will be possible to enter into all requirements of Helpdesk without authentication.
For the code to the log in page we can use the sample text. Please pay attention to this line:
<select name="hd_authentication"> <#hd_authentication_options> </select>
These are the placeholder's strings of selectbox for authentication selection. If we use only one authentication for a given Helpdesk, this selectbox is not necessary to display. It is an obligatory element, therefore we cannot delete it completely; authentication will not work then. We can hide it this way:
<select name="hd_authentication" style="display: none;">
<#hd_authentication_options></select>
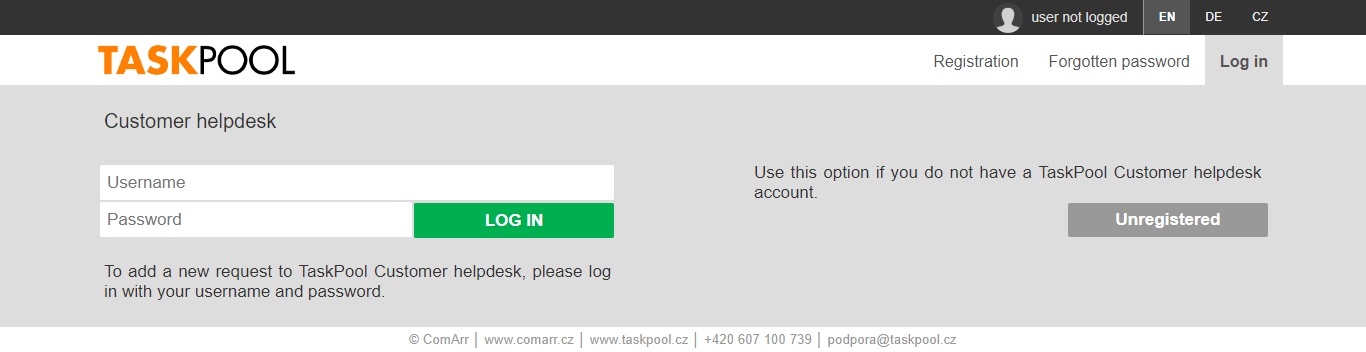
On this card we can configure the forms for the password change of the authenticated helpdesk users or for a renewal of forgotten passwords.
Password change is via usual scheme - insterting the current password, by insterting a new and renewal the password. Again it is a sample code here.
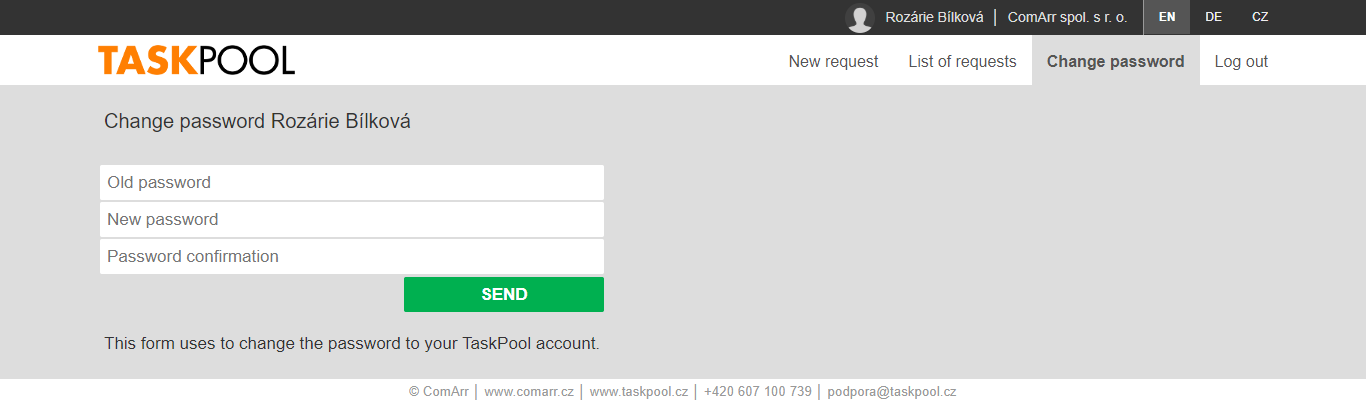
Renewal of Forgotten password is for the users, who have the account, but have forgotten the password to it. For the correct function it is necessary to configure a web form and an indicative e-mail, but also the form without a password change! The renewal of the forgotten password does not work on the principle of the password change. After insterting the user name and e-mail address from the profile the indicative e-mail will be received to the given address. This e-mail must consist of a string <#hd_changePassword_url>, which represents URL form for the password change to the user's account.
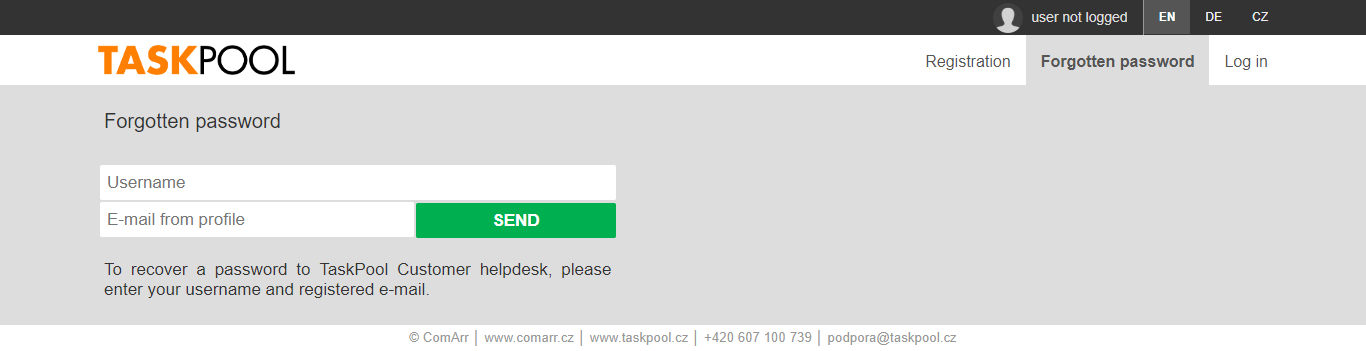
On this card it is possible to configure the form for registration of the new helpdesk user. Thanks to this form the users will be possible to register their own log ins. There are possible both variations at once. If we want to access the Helpdesk openly, we need to define validation first, see more in the chapter 16. Authentication.
Lets repeat, that the acces to Helpdesk using the authentication brings several advantages. First advantage is automatic loading of personal data (name, e-mail, telephone number etc.) when entering a new one helpdesk task. The second biggest advantage is the possibility of clear tracking and handling all tasks, which the given customer entered into the system.
At the top of the screen we have a choice of individual verifications and also the so-called anonymous access, which serves for entry without login. For the required verifications you need to check the relevant checkbox and fill in the order. We recommend to have for ervy pool (firm) special verification. Of course it is possible to have one verification for all Helpdesks, but we do not recommend this solution.
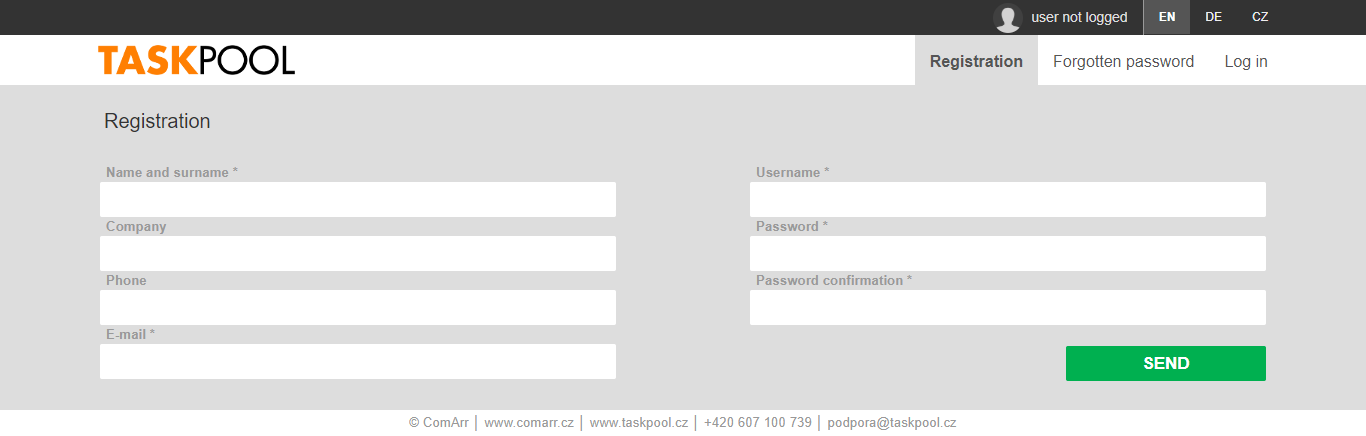
According to the setting on the picture it will be possible to access the Helpdesk both without logging in (anonymously) and with authentication. To the tasks written under verification will be possible to access again only after the verification. If we choose the field Verification required as inactive, without verification it will be possible to get into all of the tasks of the given Helpdesk, including the ones that are assigned under the verification.
Link to this page with registration will be used in the form:
<a href="<#hd_createUser_url>">registration</a>
This link can be found in Help of the placeholder's strings on the left side of the screen.
For the login page code we can follow the sample text again. However, lets pay more attention tho this line:
<select name="hd_authentication"> <#hd_authentication_options> </select>
If we use more verification in the given Helpdesk, using this selectbox when loggin in, we choose specific of them. If we use for the given Helpdesk only one verification, this selectbox does not need to be shown. However, it is a mandatory element, that is why we can not fully remove it, the verification would become unfunctional. We can hide it this way:
<select name="hd_authentication" style="display: none;">
		<#hd_authentication_options></select>
We recommend reading the chapter 14. POP3 assignement first. Each e-mail address is possible to assign to the particular Helpdesk users. These users must log in via one of the authenticated mechanisms (see the chapter 17. Authentication). If the particular e-mail address is assigned to the particular user, then e.g. at receiving requirement via e-mail from this address the system from POP3 mailbox will select and transfer it to the helpdesk task. It behaves as it was created by this particular user. The information about the user are also put to the task. Previous e-mail address from which the requirement was received is than saved into the dynamic field of the task.
The users can be assigned not only to the particular address (e.g. adam.novak@taskpool.cz), but also to the group of addresses (e.g. only @taskpool.cz). The language version can be also assigned.
The procedure for creation and assingment is the following:
For creating users' LDAP/DB autenthication, described in the chapter 17. Authentication.
As soon as we have a user, who we can assign the address to, on the card POP3-LDAP we can select a possiblity Add assignment. The button will be selected in this section, which we want to assign.
In the offer we select ID of the helpdesk user and the address for mapping. The address can be the particular address as well as the whole domain. We can select the language version.
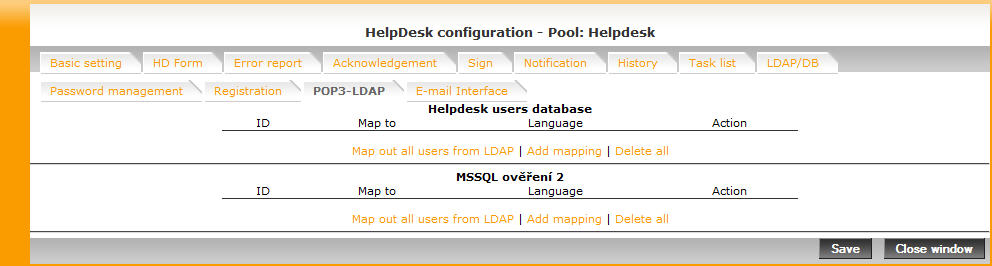
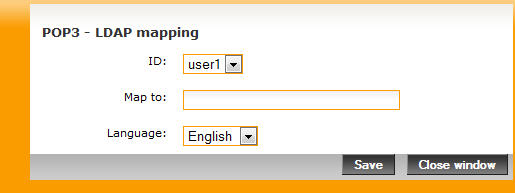
With the Map all users button, TaskPool will automatically map all users from the given database to an email, which they have saved in the database.
Checkbox Map all users automatically ensure, that every newly added user to the database will be automatically mapped.
We recommend reading the chapter 3.10. E-mail Interface first. Another option is to structure the incoming e-mail into more information.
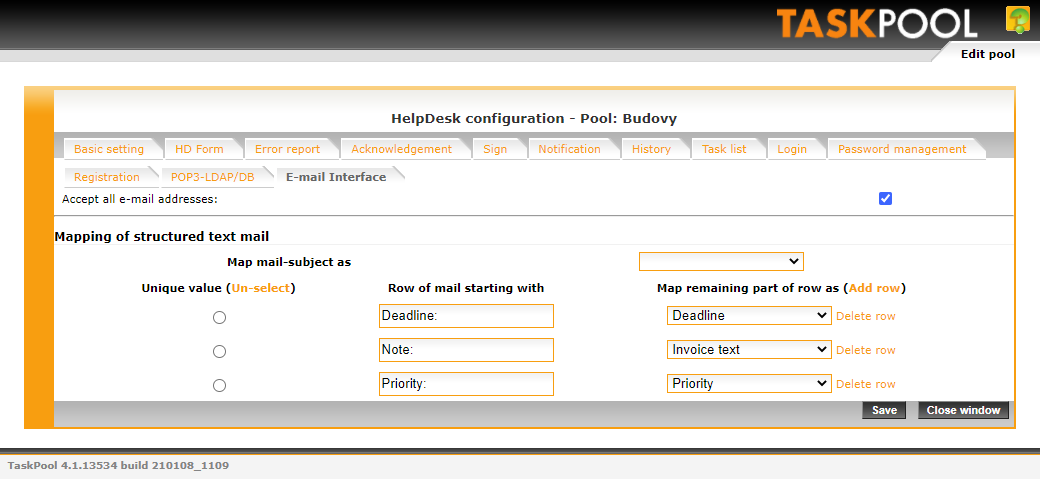
Structuring the e-mails is shown in the picture. In this case the line begins with the string "Text:" it will be transfered to the task description, the line beginning "Expire:" will be transfered to the task deadlilne etc.
According to Unique values the existing helpdesk task in the given pool is searched (fox example Text: action001). In case of unity, the text of the incoming e-mail will be connected as a commentary to this task (be careful not to overwrite the Task Name with the name of the new e-mail). Otherwise TaskPool will create a new helpdesk task. Unique value is not obligatory data.
If the field Accept all e-mail addresses is ticked, all e-mail addresses will be considered as a sender, to which a given e-mail was received, and it is including the addresses, the copies were also received to. In case the field will not be ticked, the sender will be considered only the address of the real e-mail sender.
Option Ignore by expression can be used to discard incoming emails, which meet the specific parameters, for example:
mail.from == email1@domena.cz or mail.from == email2@domena.cz (ignores emails from the listed addresses)
mail.subject == text1 (ignores emails with an expression "text1" in the subject
mail.body == text2 (ignores emails with an expression "text2" in the body)
More information about syntax can be found on the manufacturers website: http://commons.apache.org/proper/commons-jexl/reference/syntax.html
In case we want to Use TLS verifying, it is neccessary, besides checking this field, to import into Java a tool "Keytool" according to the instructions at this address: https://docs.oracle.com/javase/8/docs/technotes/tools/#security
Overall configuration of arbitrary Helpdesk can be copied among the pools. In the list of pools it is enough to click the button "Copy the Helpdesk", at that pool, which configuration of Helpdesk we want to copy. After clicking, the window will appear, where we will select only a target pool, into which the configuration should be copied.

If the target pool already consists of active Helpdesk, the query about rewriting the existing configuration will appear.
Function SLA (Service level agreement) extends the options of TaskPool about the work with more time, not only with classical deadline. It is possible via defined weekdays, hours and public holidays. Three time are counted normally: ReactionTime and FixTime. We can e.g. plan implementing the helpdesk requirements in details. The customer will create the helpdesk requirement and thanks to SLA we can control exactly, when the implementer has to react to the requirement, what time periods the communication should be and when the requirement should be implemented. For a higher urgency it is possible to set e.g. escalations connected to the given time etc.
SLA time is defined in SLA schemes. They are defined either in days or in hours.
RT (Reaction Time)
Reaction time is the time, until the task should be taken over. Taking over the task is also the only one action, which stops the counting the time.
FT (Fix Time)
Time, until the task should be finished.
For SLA run it is necessary to create SLA scheme and assign it to the pool, which we want to work in. Creation is done in the administration (bookmark SLA modules -> New), assignment to the pool is done on the card "SLA scheme" in editation of the pool (see the chapter 3.7. SLA schemes).
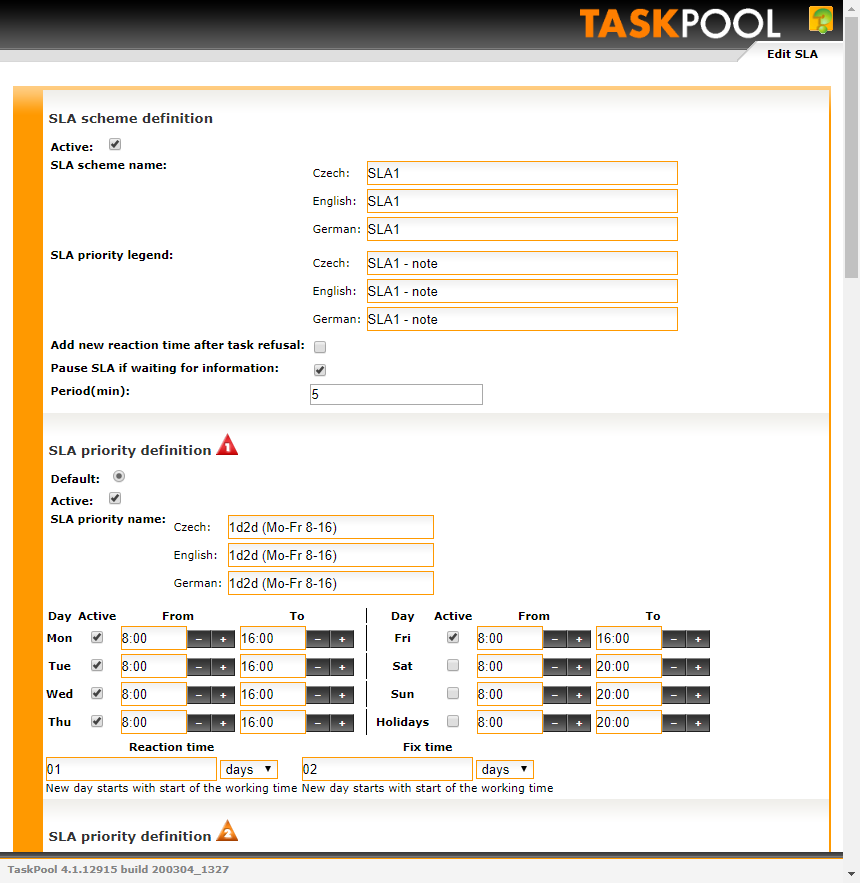
In SLA configuration the time mean "from" and "to", when the given SLA time is counted. It is actually working time, when the tasks are implemented. For every priority it is possible to set its own time. Then it is possible to define public holiday, which are included into not working days for all priorities. If we follow the setting from the picture, then e.g. task with priority 1 will be implemented always Monday-Friday from 8:00 to 20:00, RT will be 4 hours and FT will be 8 hours. It means that the task must be taken over up to 4 hour and up to 8 hours the task must be implemented. All in working time.
If the task is created in the working time, nothing is changed. E.g. if we set the task with priority 1 on Monday at 8:00, then the task must be taken over at 12:00 and at 16:00 the task must be implemented. If the task is created before the working time or on not working day, the time when SLA starts to count, the beginning of the working time will be set to the closest (current) weekday. If we create the priority 1 e.g. on Sunday at 22:00, then the beginning will be set to Monday 8:00 and every time will be the same as if we set the task on Monday 8:00. All of it in case Monday is not defined as public holiday. If it is a public holiday, then the start will be set to Tuesday 8:00. Except the set working time the time is not subtracted.
For each schema, you can set whether or not to Add new reaction time after task refusal which re-enables the SLA calculation and in in states Waiting for information and New conditions stops SLA counting.
SLA calculation can be a computationally demanding operation, so it can be set to optimize server performance Period of calculation (from 1 minute up - default value is 5 minutes)
Note.: For each priority at least one weekday must be set.
Parameter to specify the time window (in days), for which is SLA calculated: sla.calendar.start=-4000
sla.calendar.length=10000. This will reduce recalculation in SLA and speed up the server.
Activated SLA is a different display of the column "Deadline" at workplace. Classical deadline is displayed only as a number of days until expiration and the expiration date, SLA displays two mentioned times.


Where "R" means Reaction Time and "F" means FixTime.
The following rules are counted:
For the limit excess the time will become red.
RT is written in black colour when the task creation, when it is taken over it will become grey and will stop deducting.
FT stops deducting at the moment the task is finished.
We distinguish two types of FT:
Automatic – that one which is set according to the defined SLA scheme by default, when the task creation.
Manual – when task editing we can create our own FT, e.g. when the task develops adversely. Firstly edit task and then we can edit deadline.
This manual FT is possible to change back to the automatic one. Again you have to accept the dialog, that you want to modify FT. In the field "New conditions" will be displayed the button "Count according to SLA", which sets FT to its original value.
If already created tasks exist, and the SLA scheme is decided to be changed, then we have several possibilities. When saving the used SLA scheme to TaskPool, you will be asked the following procedure:
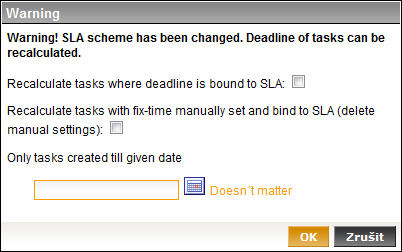
We have a possibility to set, if we want to recalculate those tasks which have set the automatic FT (deadline) according to a new scheme. There are three options:
Recalculate nothing
Set automatic FT according to a new SLA scheme to all of them
We can set the date for a task creation and FT will be recalculated only at tasks created after this date.
Knowledge base is the place where we can store the finished requirements, or FAQ, manuals etc. One contribution is one task in the knowledge base. The content of the knowledge base can be created by the implementer's side of TaskPool. The knowledge base itself is then accesible from outside (similarly as Helpdesk) and inside. At the implementer's side it is possible to use some of the tasks in the knowledge base as an answer to the submitter's requirements.
The subject of the task and its description is saved into the knowledge base from the task. The subject is used as a name of the query and its description as its implementation. Other values of the task are also possible to be created, but they are not displayed in the knowledge base. History of the given task is also not displayed. Configuration of the knowledge base is done in administration on the card "Knowledge base".
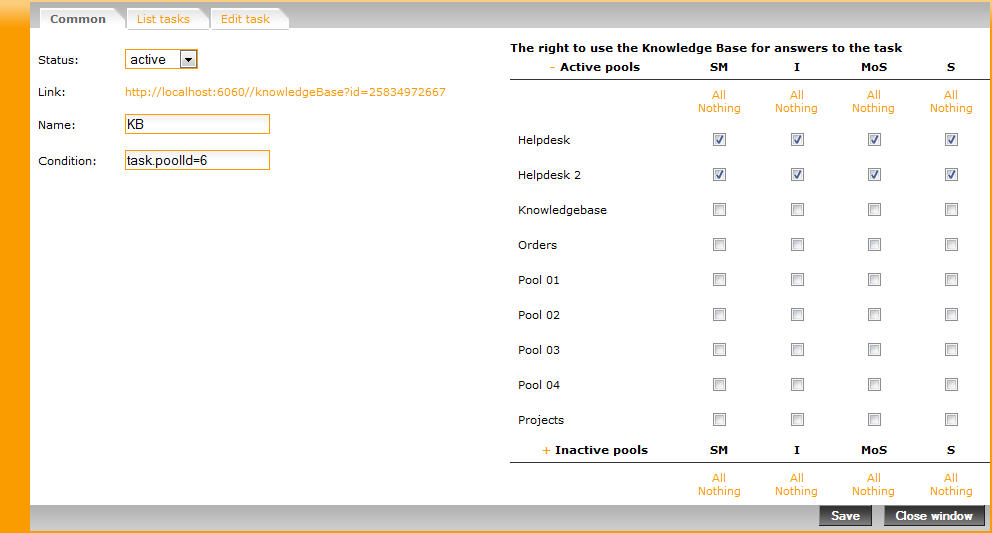
The field condition functions similarly as at filters and is for a definition, which tasks to cover into the knowledge base. Typical conditions are e.g. these:
task.poolId=5 - knowledge base will consist of all tasks from pool with id=5
task.dynamicFields.publish='on' - all tasks, which have active dynamic field of the type checkbox with identificator 'publish'
Condition can be arbitrary one, similarly as in the filters/notifications/escalations. For a dynamic field in a condition, you need to set permissions to view for submitter.
Matrix of chekboxes determines the right of each role for predefined answers from the knowledge base usage. Authenticated roles will see the commentary button "KB" above the field. After clicking on it the list of all queries will be displayed there and using one click it is possible to insert one of them as an answer.
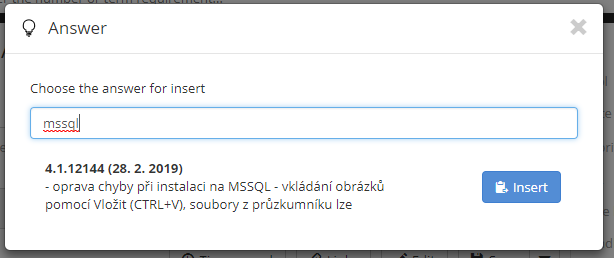
The link to the knowledge base accessible from outside will be displayed after configuration saving. Configuration in the language XSL is fully skinnable, similarly as at Helpdesk interface. The link to the knowledge base is possible to place e.g. to the header of the Helpdesk page. Into the bookmarks "List of tasks" and "Task edit" are inserted each XSL codes for the given page display.
Like the Helpdesk, sample codes are available for the Knowledge Base. We can find them here:
..\ROOT\WEB-INF\tools\KB\prehled.xsl
..\ROOT\WEB-INF\tools\KB\detail.xsl
We can find here sample codes for overview of requirements and for detailed view.
This display is accessible without log in to TaskPool, it can be used separately or as helpdesk interface supplement.
Table of Contents
Module External Database Manager (EDM) is for comfortable administration of the external databases. The installation package together with the installation manul is needed for its installation, which will be sent to you by ComArr staff if required. The authenticated users will be displayed this icon after successful installation:

After clicking it the user will enter into EDM directly. In our case we use the table with the customers, but it is possible to use several tables at once, e.g. whole companies, used equipment, subsidiaries etc. At the same time multiple .xml files can be used for multiple EDMs. Basic EDM might look like this:

In our example, we use two tables, one for companies and another for individual contacts. Each contact belongs to one of the companies.
In the list we can see all records in the given table. A new record is possible to create by clicking the button "+ Company" or "+ User", edition of the created record is possible to open via clicking any item of the given record. Button names can be defined in the EDM configuration.
From EDM version 1.145, it is possible to monitor accesses and changes in the EDM database using a log. It is stored in ./WEB-INF/logs/.
First you need to unzip the EDM source code into the Tomcat directory "next to" the TaskPool.
If the TaskPool files are for example in the directory ..\Tomcat
8.0\webapps\ROOT , EDM files unzip into the directory ..\Tomcat
8.0\webapps\ExternalDatabaseManager\ .
Next into the folder ..\ROOT\logos\customer_1\ create
the subfolder ..\ROOT\logos\customer_1\externalDatabaseManager\ , where we will
place the EDM configuration file called applicationXml.xml.
Similar to the authentication configuration and Helpdesk, and even there, the possibility of quick commissioning of EDM using a sample configuration is offered. Can be used in case, that we used a sample database for verification (more in the chapter 16.3. Using a sample database. In that case, just copy the configuration file:
..\ROOT\WEB-INF\tools\edm\applicationXml.xml
into this directory:
..\ROOT\logos\customer_1\externalDatabaseManager\
In configuration file set only access to the databsse and verification for individual users. Complete configuration of this file is dedicated in the upcoming subsection.
One or more applicationXml.xml files can be configured.
You can choose between these files in the EDM afterwards.
For the correct function of the EDM you need to correctly configured the file
applicationXml.xml.
<Application>
    <!-- name displayed in the header of the page -->
    <Name>EDM</Name>
    <!-- write version, at every change in the file, the version needs to increase by one,
         so that the Taskpool knows that the file has changed -->
    <Version>1</Version>
    <!-- users login, which has access to the EDM -->
    <Access>
        <User>
            <Username>admin</Username>
        </User>
        <!-- access to the EDM can optionally be enabled for more users this way -->
        <User>
            <Username>login2</Username>
        </User>
    </Access>
    <!-- URL for connecting to the EDM database, not to the TaskPool db!
         Example for MySQL -->
    <Database>
        <URL>jdbc:mysql://localhost:3306/databaseName?
             characterEncoding=utf8</URL>
        <Username>login</Username>
        <Password>password</Password>
    </Database>
    <ManagerUrl>
        <!-- URL location EDM for communication between EDM and TaskPool -->
        <CommunicationUrl>http://www.taskpool.net/ExternalDatabaseManager/
          </CommunicationUrl>
        <!-- URL location EDM for web browser -->
        <BrowserUrl>http://www.taskpool.net/ExternalDatabaseManager/
          </BrowserUrl>
        <!-- TaskPool URL -->
        <TaskPoolUrl>http://www.taskpool.net/</TaskPoolUrl>
		<!--  id verification (if filled, no need to more define the Database -->
	    <TaskPoolAuthId>2</TaskPoolAuthId>
    </ManagerUrl>

    <!-- If we used a sample database, it is possible to end the configuration here.
	In this upcoming part we configurate the specific tabs and columns in the database. -->

    <Objects>
        <Object>
            <!-- name of the table in the database -->
            <Name>company</Name>
            <Legends>
                <!-- name, which will be displayed in the tables overview  -->
                <Overview>Companies</Overview>
                <!-- name, which will be displayed in the detail view of one record -->
                <Detail>Company</Detail>
            </Legends>
            <!-- description, which will be displayed as backreference
                 and reference,more below -->
            <Label>{id} - {name}</Label>
            <!-- definitionof each property corresponds to one column in the table -->
            <Properties>
                <Property>
                    <!-- Name of the column in the database -->
                    <Name>id</Name>
                    <!-- name, which will be displayed in the EDM -->
                    <Legend>ID</Legend>
                    <!-- if it is true, the value will be displayed in the item list of the table,
						if it is false, it will be displayed only in the detailed view of individual items -->
                    <ShowInOverview>true</ShowInOverview>
                    <!-- true if the value is automatically generated and it is impossible to change it,
						this element is optional -->
                    <Generated>true</Generated>
                </Property>
                <Property>
                    <Name>name</Name>
                    <Legend>Name</Legend>
                    <ShowInOverview>true</ShowInOverview>
                </Property>
            </Properties>
            <BackReferences>
                <BackReference>
                    <Name>contact</Name>
                    <Property>companyId</Property>
                    <Legend>Contacts</Legend>
                </BackReference>
            </BackReferences>
        </Object>

        <Object>
            <Name>contact</Name>
            <Legends>
                <Overview>Contacts</Overview>
                <Detail>Contact</Detail>
            </Legends>
            <Label>{id} - {firstname} {lastname}</Label>
            <Properties>
                <Property>
                    <Name>id</Name>
                    <Legend>ID</Legend>
                    <ShowInOverview>true</ShowInOverview>
                    <Generated>true</Generated>
                </Property>
                <Property>
                    <Name>username</Name>
                    <Legend>Username</Legend>
                    <ShowInOverview>true</ShowInOverview>
                </Property>
                <Property>
                    <Name>password</Name>
                    <Legend>Password</Legend>
                    <ShowInOverview>false</ShowInOverview>
                </Property>
                <Property>
                    <Name>firstname</Name>
                    <Legend>Firstname</Legend>
                    <ShowInOverview>true</ShowInOverview>
                </Property>
                <Property>
                    <Name>lastname</Name>
                    <Legend>Lastname</Legend>
                    <ShowInOverview>true</ShowInOverview>
                </Property>
                <Reference>
                    <Name>companyId</Name>
                    <Legend>Company</Legend>
                    <ShowInOverview>true</ShowInOverview>
                </Reference>
                <Property>
                    <Name>email</Name>
                    <Legend>Email</Legend>
                    <ShowInOverview>true</ShowInOverview>
                </Property>
                <Property>
                    <Name>phone</Name>
                    <Legend>Phone</Legend>
                    <ShowInOverview>true</ShowInOverview>
                </Property>
                <Property>
                    <Name>note</Name>
                    <Legend>Note</Legend>
                    <ShowInOverview>false</ShowInOverview>
                </Property>
                <Property>
                    <Name>isManager</Name>
                    <Legend>Manager</Legend>
                    <ShowInOverview>true</ShowInOverview>
                    <Html type="1">
                        <Options>
                            <Option value="1">Yes</Option>
                            <Option value="0">No</Option>
                        </Options>
                    </Html>
                </Property>
                <Property>
                    <Name>isActive</Name>
                    <Legend>Active</Legend>
                    <ShowInOverview>true</ShowInOverview>
                    <Html type="1">
                        <Options>
                            <Option value="1">Yes</Option>
                            <Option value="0">No</Option>
                        </Options>
                    </Html>
                </Property>
            </Properties>
            <BackReferences/>
        </Object>
    </Objects>
</Application>
A table column often shows a foreign key of another table. If we want to display the value
from this table and not just the value ID, we use instead of <Property> element
<Reference>.
<Object>
	<Name>lokalita</Name>
	<Legends>
		<Overview>Lokality</Overview>
		<Detail>Lokality</Detail>
	</Legends>
	<Label>{id}- {name}</Label>
    <Properties>
        <Property>
            <Name>id</Name>
            <Legend>Lokality</Legeng>
            <ShowInOverview>true</ShowInOverview>
        </Property>
</Object>
In case we want to refer to the previous record, we use the element
<Reference> then:
<Reference>
    <Name>lokality</Name>
    <Legend>Lokality</Legend>
</Reference>
After that instead of the value "ID" will be displayed "ID - name". When editing a record, a selectbox will be displayed instead of a text field in the detailed view , which displays the values from the table "Lokality". But the foreign keys must be defined, thus created a link between the tables.
Next imagine a table "contact" containing foreign keys from the table "company".
One firm can have several assigned users. If we want to in the firms value detail
show all users records, which contains foreign key (id_contact),we use the element
<Backreference>. The content of the element <Name>
specifies the name of the object, <Property> property name from the object,
which is already contained in the EDM and <Legend> name displayed in the EDM.
The element <Backreference> is added after the element
<Properties>.
<Backreferences>
    <Backreference>
        <Name>contact</Name>
        <Property>id_contact</Property>
        <Legend>User</Legend>
    </Backreference>
    <Backreference>
        <!-- next record -->
    </Backreference>
</Backreferences>
If we want to display a different value in the report, than it is stored in the database,
we use the property <Options>.
<Property>
	<Name>id</Name>
	<Legend>ID</Legend>
	<ShowInOverview>true</ShowInOverview>
	<Html type="1">
        <Options>
            <Option value="1">Value 1</Option>
            <Option value="2">Value 2</Option>
            <Option value="3">Value 3</Option>
        </Options>
    </Html>
</Property>
Normally the table entry would show the "ID" value, now will be displayed Value 1, Value 2, Value 3. The selectbox will be displayed in the record detail, instead of the text field.
From version EDM 1.145 it is possible to track accesses and changes in the EDM database using a log. It is stored in ./WEB-INF/logs/.
Table of Contents
Cost evidence is the module for watching the work out time of each user. It enables to define each activity and a group of activities, which the users will relate to after that. Configuration of this module can be found in administration on the card "Cost evidence".
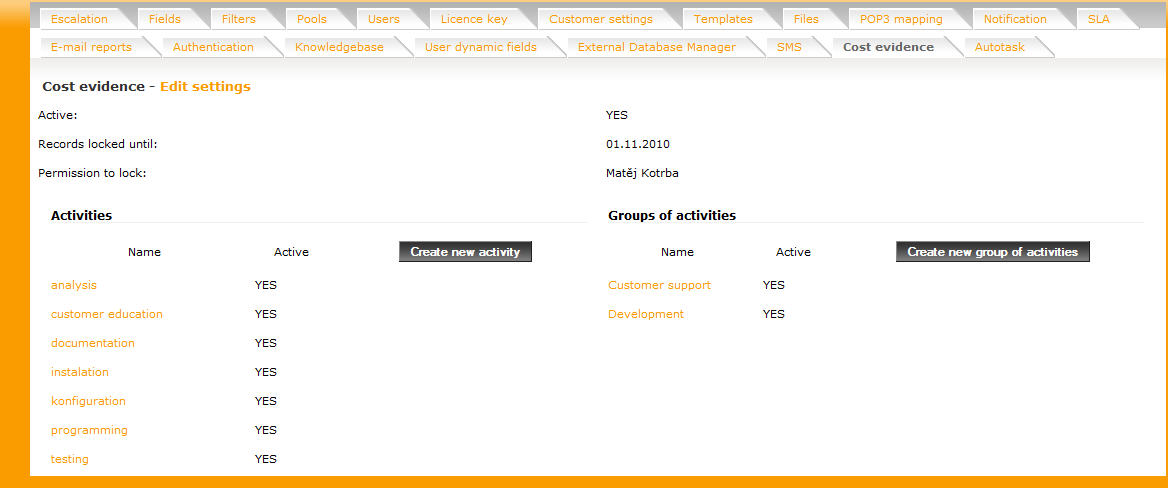
It is possible to create any number of activities and assign them to the group of activities. Rights settings for writing into the particular group of activities is done for each role separately and each role has the right for maximum one group of activities. Rights settings is described in the chapter 3.11. Cost evidence. E.g. servise managers can relate the time only to the particular group of activities and the implementers in the different one. There are no restrictions for all activities, so the particular activity can be a part of several groups of activities at once. In our case we have two groups of activities (Customer support and Development). The group Customer support consists of installation activities, configuration and customer's training; the group Development consists of activities like analysis, development, testing and documentation. Assignment of activities into groups is similar as e.g. at users assignment to pool. After clicking the created group of activities, this form will appear:
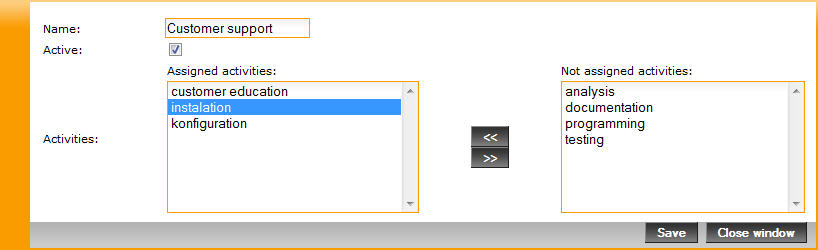
Thanks to the arrows we can move the labelled activities between the assigned and not assigned activities of the given group of activities.
Locked record cannot be edited by any user. The right to lock the record belongs only to the administrator by default. But he/she can assign it to the other users via the button Edit settings on the card "Cost evidence". This form will appear:
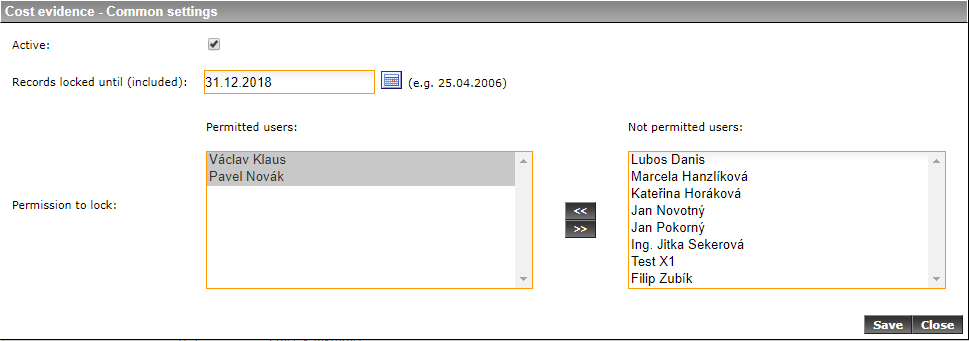
If the records are locked until 31/12/2018, as we can see in the picture, those records created after this date can be edited, but not the older ones. If the right to lock the records is assigned to the other users, they will be offered "Other actions" option "Timesheets locking and reporting" at their workplace. After clicking on it this form will appear:
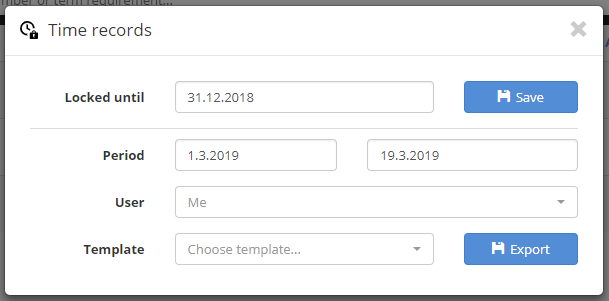
Only date is needed to be set until the records are locked and save the settings.
In TaskPool, each user has the option to export his / her time records, as described in the user manual in chapter 3.6. Export of timesheets.
Billing provides a quick and easy way to select specific time records and export them to an external file or prepare for printing, eg as a basis for an invoice. The function is not primarily designed for billing, we recommend using it for export time records to other systems, respectively. for creating delivery notes. The advantage of this feature is possibility of posting time records from unfinished tasks.
Note: Every user who has a right to create bills has the right the right to lock time records.
Click the button Billing in the "Other actions" menu on the workplace we get to the screen for creating and editing individual bills. We recommend creating a separate bill for each project.
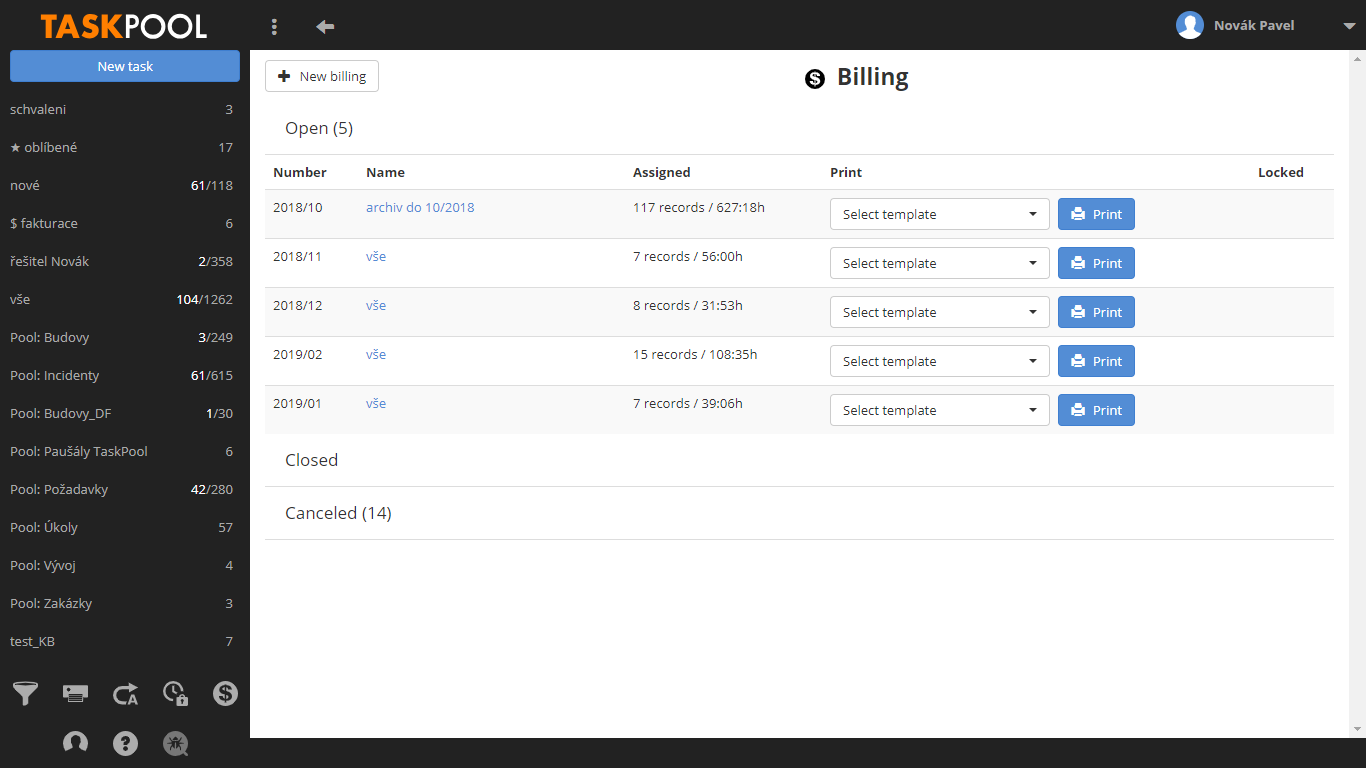
To create a new billing form use the button New in the menu on the left of the screen. Anytime billing any of the users edits, at that moment the other billing is locked and currently edited by other users the user is displayed in the "User Locked" column. After editing by the user this information will disappear. The cross is used for manual cancellation if the user is editing for some reason he didn't finish editing.
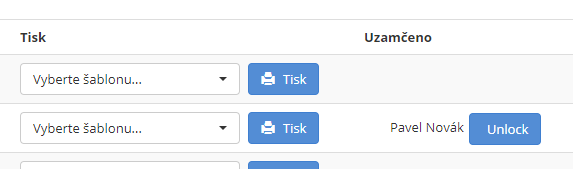
The billing process itself is as follows:
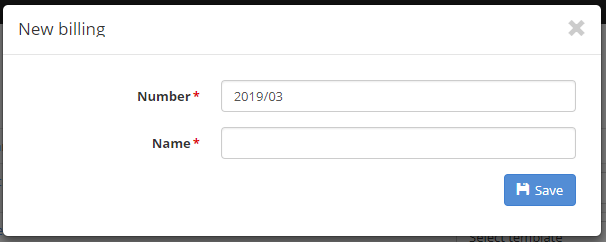
On the first screen, fill in the Number and Name (both can be changed later). Once you open your billing, we will begin to select specific records of the time that will be included in your billing.
By default, all time records from the entire database are offered in the list user right to see. Use filters at the top of the screen to refine their selection. Then just check the records to be included in the bill. We confirm the selection button Save.
Note: As a rule, every time record can belong only into one bill. For this reason, we recommend creating at least one bill for internal performances that are not charged to the customer. This will not interfere with the list of records when creating another bill for the customer.

As long as we keep the billing open, we can continue to make changes to it. After closure is no longer editable. There is also a third "Canceled" status. The we will use where the billing has lost its meaning for some reason. The advantage of switching to this is the fact that all the time records contained in it become free for other billing.
ATTENTION! Canceling a bill is an irreversible action!
We can export each bill using the button Print in list of billings. There is a standard "Billing" template to prepare records for printing. It is also possible to use other templates, eg for the mentioned export to other systems etc., the issue of export templates is described in the administration manual in chapter 12. Templates. When using the standard template we get roughly this result:
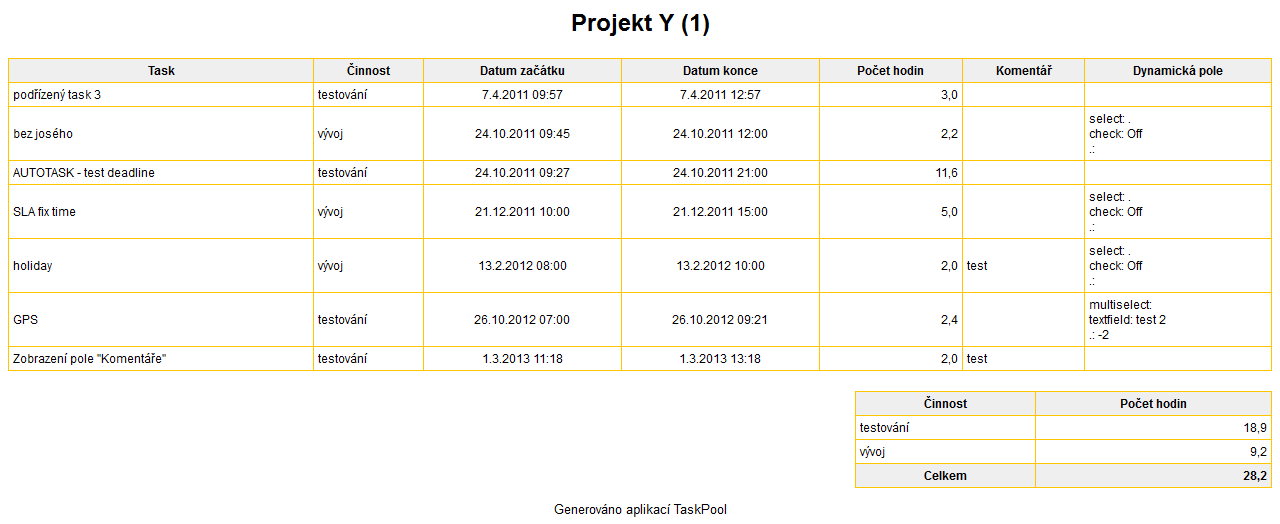
If more than one template is displayed in the print list, ask for your training administrator.
SMS module is an extension of TaskPool system, which enables sending SMS notifications.
You need to create an account and charge the credit with the service https://smsbrana.cz/. Then on this account Account Settings / SMS Connect activate.
It is also necessary to import the library and configuration file (both files are part of installation package located in WEB-INF\tools\sms ).
Module Library PluginSmsBrana.jar put in the folder .. \ROOT\WEB-INF\lib\
Configuration file PluginSmsBrana.properties in to the folder ..\ROOT\WEB-INF\ and edit login and password from SMS Connect.
After restarting Tomcat (to activate the SMS module) it is necessary to create a dynamic field of the "Textfield" type, which user in the bookmark User dynamic fields click on Use .
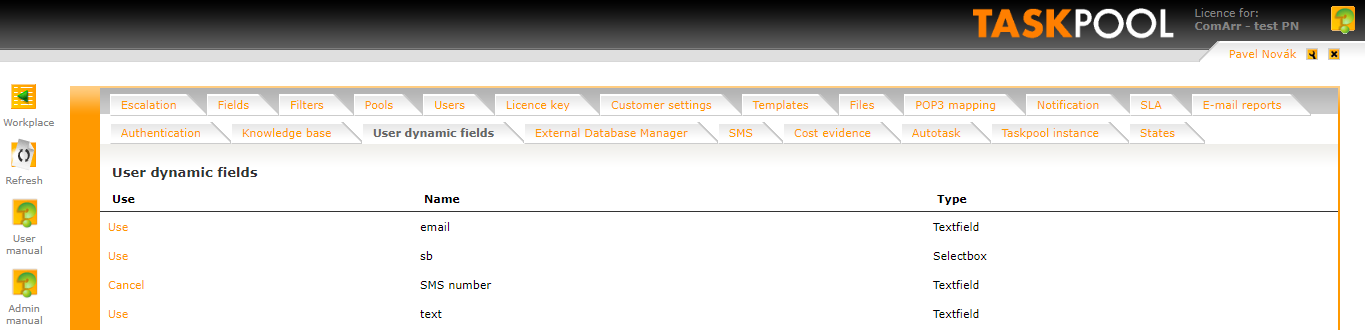
For this field, each user in their own profile can fill in the phone number for sending SMS, in this case, the field SMS number.
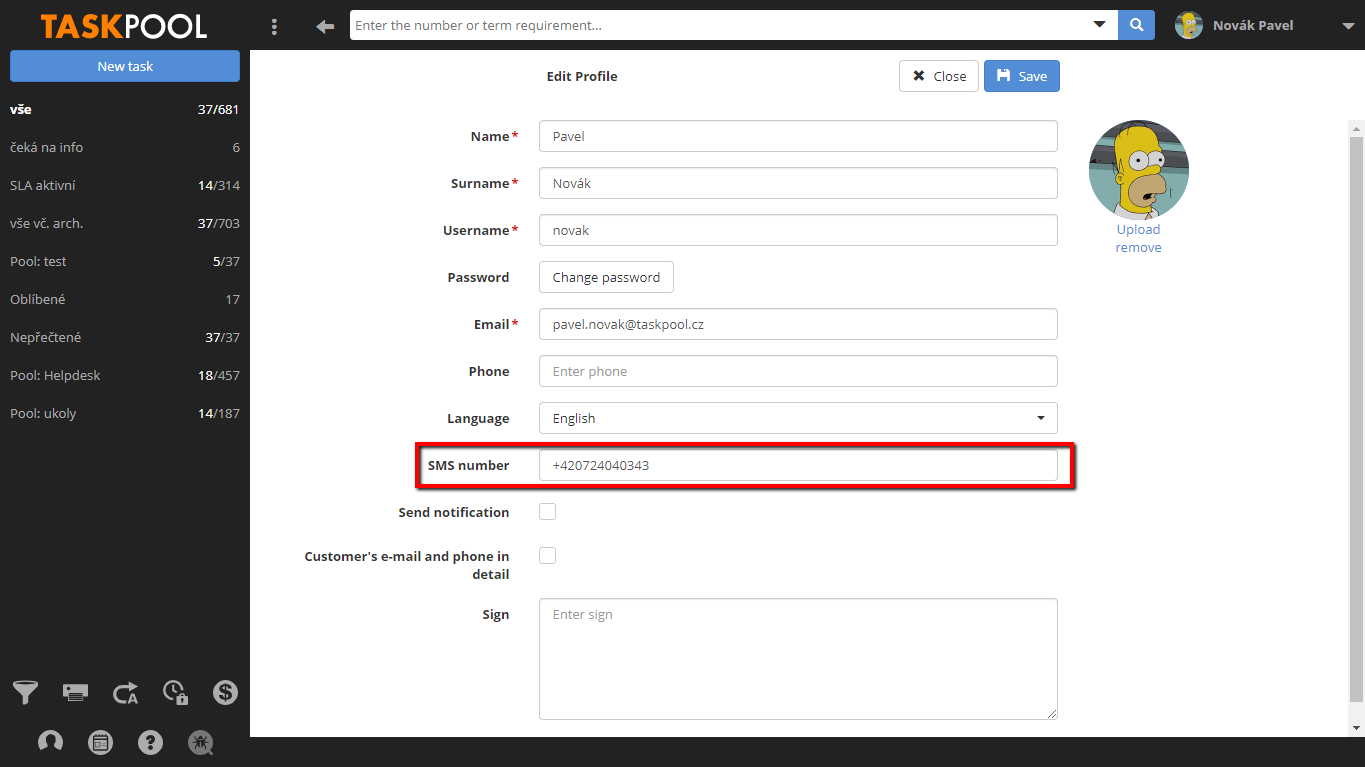
It is also necessary to activate the SMS module in the Administration/SMS tab and enable the dynamic field for SMS sending.
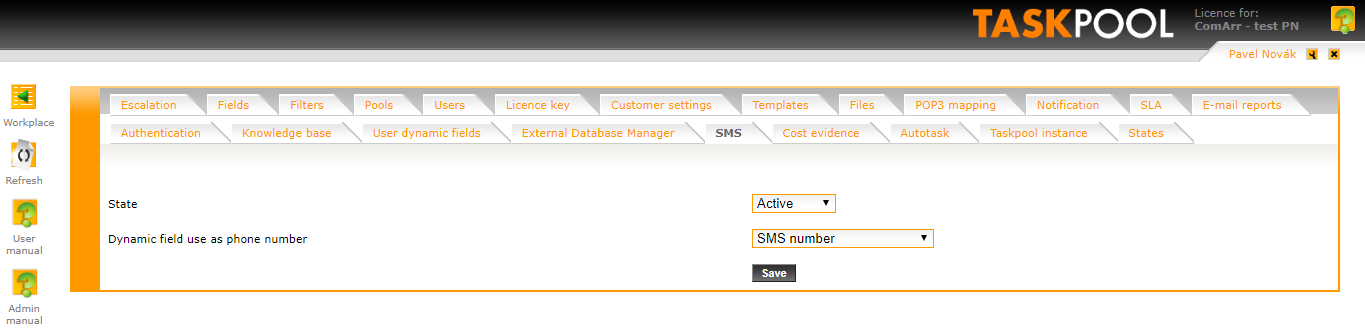
Finally, it is necessary to create a notification, which will send sms according to specified conditions.
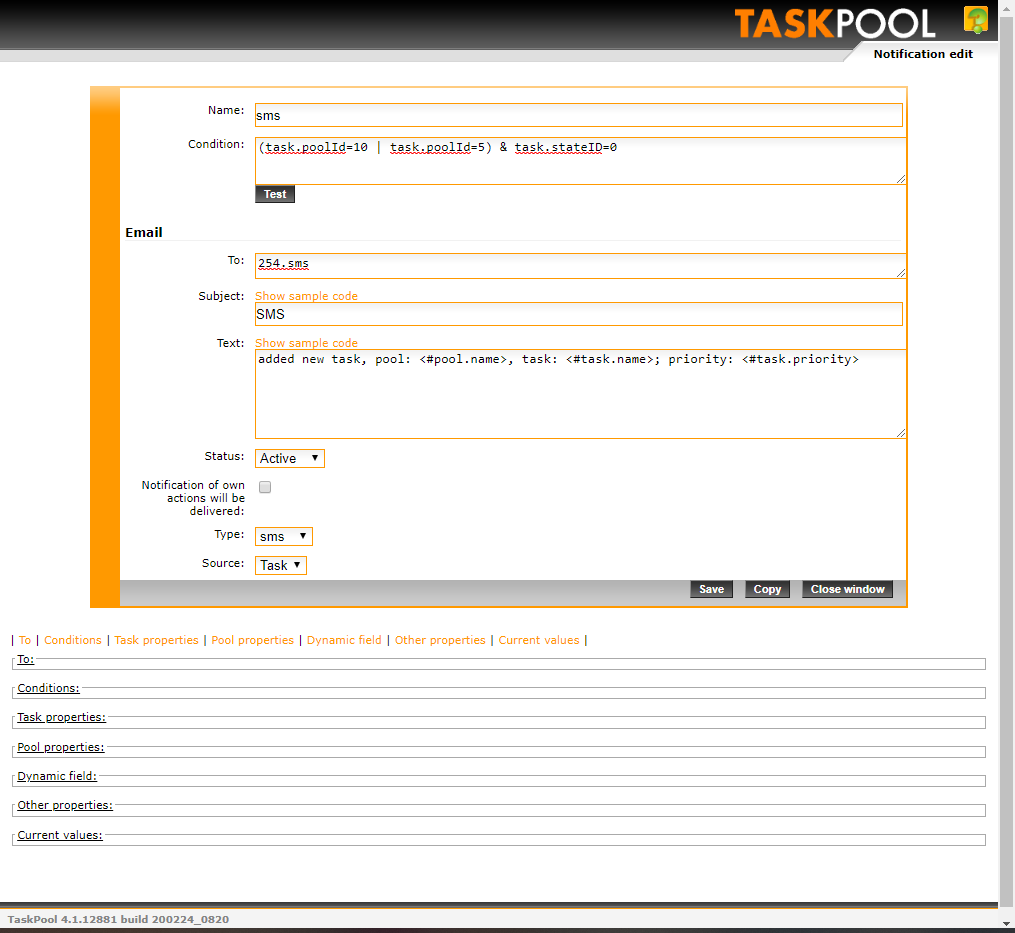
Field To: contains ID of the implementer with symptom .sms,
for example 254.sms. All roles can also be used implementers.sms for sending sms to all implementers.
Select the message type sms.
---------------------------------------
(c) Copyright 2020 ComArr, spol. s r.o.
Bookmark TaskPool instances serves to link the system to other instances. For example, if you and your customer have a separate one an instance of TaskPool, you can link them to enable them export basks between thesetwo or more instances.
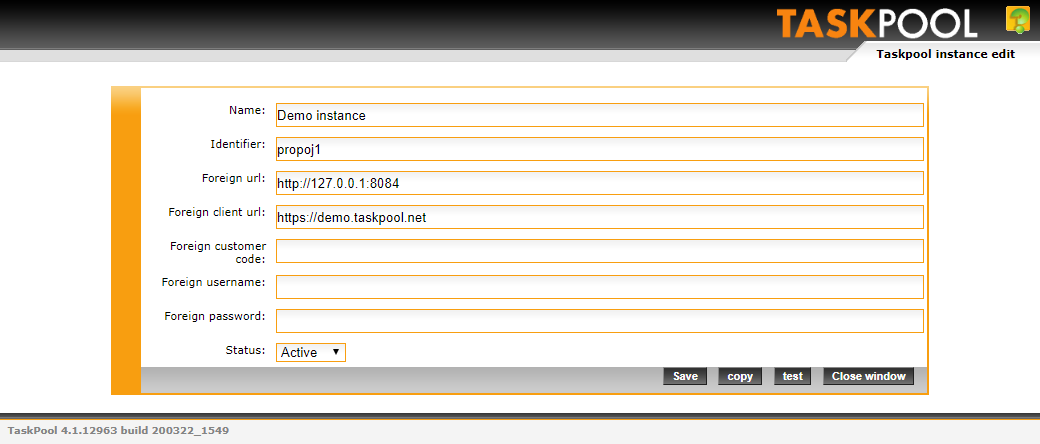
These parameters must be specified for each connection:
Name - name of connection
Identifer: unique mark of connection (e.g: prop01)
Foreign URL: is the address under which the server running TaskPool accesses the target instance (e.g: https://demo.taskpool.net or 127.0.0.1:8084 etc.)
Foreign client URL: is the address under which the remote instance is accessed by clients from the browser (in most cases same as URL above)
Foreign customer code, user and password: login of admin of foreign instance
Making export and import accessible for individual pools is controlled by workflow settings, see 3.2 Card Workflow.
The right to export have all implementers and service managers according to the workflow settings of the pool.
Default tiled states (New, Taken, Finished ...) can be changed within this tab.
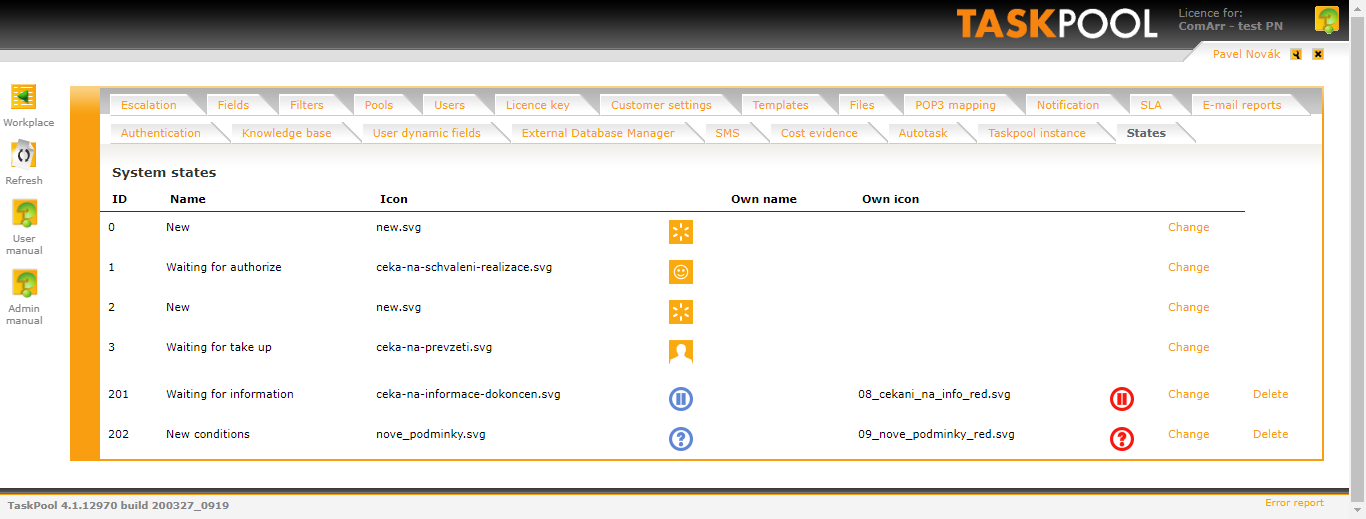
Choosing Change you can enter your own status name and enter the exact icon name that you must first upload between files (Administration / Files). Newly you can edit your own name in multiple languages and you can insert any picture as a status icon.
The change is reflected on both Workplace, and too in Customer interface.
---------------------------------------
(c) Copyright 2021 ComArr, spol. s r.o.