Table of Contents
List of Figures
Dear customer,
if you just purchased TaskPool, thank you for your decision. We are pleased with your order and we will be glad to help you install the software.
This manual is used as a system administrator's manual to handle server management and TaskPool running, backups, system files and database, and last but not least, install and upgrade the system. This is not a manual for configuring system and user environment features, use the Admin and User Manual to do this.
If you decide to install TaskPool yourself, this manual will serve as a comprehensive installation guide. If you do not know the advice or want to install by our team, use any of our contacts (see chapter 8. Contacts).
TaskPool runs exclusively in Java and can be run on stations with different operating systems. Already tested is a correct run on MS Windows (WinServer or Windows) and Linux operating systems (we recommend CentOS).
TaskPool is a web-based tool and its users are not addicted to the platform; they are just a regular internet browser in the current version with JavaScript support enabled, such as Chrome, Firefox, Edge, Opera, MS IE or Safari for iOS.
For the correct run of TaskPool, you need an application server and a database server. See more in the next chapter.
Table of Contents
TaskPool has minimal and optimal operational requirements. While the minimum requirements are used to determine the lower limit of usability of the system, the optimal ones are individual based on the requirements of the particular customer on the system. The key is the number of concurrent investigators. Nevertheless, you can set a recommended configuration that should be compliant for most common customers. However, we recommend that you book a reserve for future expansion. At the same time, we recommend not running other applications on the server that could affect TaskPool performance.
CPU: at least Intel Core i3 or equivalent in Intel Xeon and higher or 2x virtual CPU, optimally Core i5 or Intel Xeon equivalent
RAM: at least 4GB, optimally 8GB or more as needed
HDD: at least 80GB, more depending on the number of attachments (optimally SSDs for faster archive search)
Additionally, it is necessary to have the following components ready, their more detailed settings and installation will be described in the following sections of this manual. The recommended component versions refer to the version 4.1.13631.
Java (recomended version OpenJDK15U | version 16U and up not supported)
Application server (recomended Tomcat version 9.0.46 | version 10 not supported)
Database server (recomended MySQL 8.0.19, MSSQL 2017 inc. Express, MariaDB 10.5)
SMTP server - without it, TaskPool will not be able to send e-mail notifications
Optionally, other components may be used:
LDAP / Active Directory - if used to log on to that network (more in the admin manual in chapter 10. LDAP/AD).
POP3 - if we want to use e-mail communication (more in the admin manual in chapter 14. POP3 connection).
Java 8 is required to run TaskPool correctly. We recommend using the OpenJDK version, which is licensed under the GNU General Public License. Download page is here:
Oracle version can also be used:
Apache Tomcat can be used as the application server. The homepage is here:
During installation, the port on which Tomcat will run will be set. We recommend using port 80. In general, Tomcat can be installed on any unoccupied port. This port will then affect the address on which TaskPool will be accessible, in case of port 80, the port number does not need to be entered in the address.
In Unix systems, we recommend placing the application server in the standard
location/usr/local/tomcat/. In the case of Windows, Tomcat is installed by default
as a directory location service to
C:\Program Files\Apache Software Foundation\Tomcat 9.0\
.
Note: In the Tomcat configurator on the "Java" tab, you can manually set the amount of memory used. We recommend that you set the memory to at least 1024MB / 2048MB.
If we want to change the installation memory on Linux, we edit the file
catalina.sh
, this is a line
JAVA_OPTS="-Xms1024m -Xmx2048m"
, the first value representing the minimum memory value and the second line the
maximum value.
The following database servers are supported: MySQL 6.x. and higher, MariaDB, MS SQL 2000 and higher including MS SQL Express.
This chapter will describe the situation where MySQL is used as a database server on the Windows platform. MySQL home page is here:
To set up a database server, users, and access rights, we can recommend tool MySQL Administrator, which provides a graphical interface and is freely available on MySQL.
For MySQL version 8.x in Windows, the configuration wizard starts after installing the database server. There are a few steps in this guide that require the following options:
High Availability – Standalone MySQL Server Replication
Type and Networking - Server Computer (note port number)
Authentication Method - Use Strong Password Encryption
Accounts and Roles - Set Strong Password
Select other options according to your specific situation. Be sure to also note the "root" password that you will enter during installation.
This configured database server is ready to use with TaskPool.
If the MS SQL database server is installed, the default installation is compliant. It is only necessary not to use advanced password options (change after login, etc.) Again, remember to note the administrator password (in this case the user "sa") that you will enter during installation.
The SMTP server is used by TaskPool to send e-mail notifications of changes or notices. Notifications are one of the main features of the system and allow fast and effective tracking of all changes. At the same time, they are fully configurable, so each user can only receive those notifications that relate directly to him etc.
TaskPool can access the SMTP server with and without logins and passwords. Encryption can be done using SSL or TSL. The access is set in the configuration file, more in the chapter 3.4. Soubor Taskpool.properties.
Table of Contents
We assume that the application server and the database server are already successfully installed. We describe in detail how to install on a Windows platform using the MySQL database server.
Open a MySQL database, for example taskpool with collation utf8mb4_czech_ci
Create a user who will own the database, for example: taskpooluser
These tasks can conveniently be done using MySQL Administrator, HeidiSQL or with the MySQL command line. At the MySQL
command line, it typically logs from the Windows command prompt: mysql -uroot -p.
Parameter -uroot means that you are logged in under the "root" user and the
parameter -p means that the password that you chose when installing the MySQL
server will be required for access. The procedure for creating a database on the command line is
as follows:
Creating a database:
CREATE DATABASE taskpool;
Create a user:
CREATE USER taskpooluser IDENTIFIED BY 'password';
Setting user rights to access the database:
GRANT ALL PRIVILEGES ON taskpool.* TO taskpooluser IDENTIFIED BY 'password';
GRANT SUPER ON *.* TO taskpooluser@host IDENTIFIED BY 'password';
exit;
Note 1: taskpool, taskpooluser and password are just examples, the script can be customized to suit your needs.
Note 2: Example "GRANT SUPER ON *.* TO taskpooluser@host IDENTIFIED BY 'password';" will give SUPER rights to user. This is required if you have binary logging enabled in MySQL. Value taskpooluser@host is the user's address according to the SQL server setting, so it can be, for example, taskpooluser@localhost, taskpooluser@127.0.0.1 etc. The "root" user has the right SUPER implicitly assigned, so it is possible to set this user as database owner in the case of rights issues.
Practically the same procedure can also be used for the MariaDB database.
For Microsoft database servers, the procedure is as follows:
Create database with collation CZECH CI AI
Create a user and assign OWNER rights to the database
On all platforms, there is a subdirectory in the root of Tomcat
..\webapps\ROOT\. This is the most appropriate directory
for TaskPool file locations. The name of the file directory will affect the
URL on which TaskPool will be accessible. For the ROOT directory, the address
can look like, for example,
http://localhost/. You can also place files in another directory,
např. ..\webapps\taskpool\. The address would then be
http://localhost/taskpool/. If you opt for ROOT, delete all the
contents of this directory and unpack the TaskPool files that you received when
you made the order.
ATTENTION! The application server must have read and
write access rights to the directory ..\webapps\ROOT\logos\. In this
directory, TaskPool stores all attachments and user files.
The configuration file is called Taskpool.properties and is located
in directory ..\webapps\ROOT\WEB-INF. In the distribution package, you
will find this file as Taskpool.properties.empty, this is because of
the upgrades of the system (more in chapter 5. Upgrade of the TaskPool). You must rename
this file before you use it for the first time to
Taskpool.properties .
Whenever the configuration file changes, it is necessary to restart the Tomcat service or change the settings. at least the TaskPool instance.
Thanks to the choice Taskpool.properties: logos.path = the directory
of logos data can change the location.
taskpool.properties= is a starting tomcat parameter to move Taskpool.properties
elsewhere, but provided, that TOMCAT will be able to read the file and writing to it.
Example:
-Dtaskpool.properties="/etc/Taskpool.properties"
Parameter locale.defaultLang = 2 will set the default language on czech.
More languages:
1=English- english3=Deutsch- german5=Română- romanian6=Slovensky- slovak8=Polskie- polish
The possibility to change maximum lenght of the comment in:
Taskpool.properties job.comment.maxSize=30000(maximum size
					of workplace attachment in bytes) hd.comment.maxSize=30000 # maximum size
					of helpdesk attachment in bytes
.
Parameter to determine the time window (in days), for which the SLA is calculated:
sla.calendar.start=-4000 sla.calendar.length=10000 . This will reduce
recalculation in SLA and speed up the server.
The configuration file contains the following items:
SMTP server
Using the SMTP server, TaskPool sends emails. If SMTP is not set up, notifications, escalations, e-mail reports, etc. can not be run from TaskPool.
mail.smtp = URL of SMTP server
mail.smtp.login = user name for login to SMTP server
mail.smtp.password = password fot user for login to SMTP server
ATTENTION! For a functioning SMTP server, it must
not be in the directory ..\Tomcat\common\lib\ libraries
Javamail-1.3.jar and activation-1.0.1.jar
!
Now every pool can have their own SMTP for sending an email. More about it in the Administrator's manual.
URL of TaskPool
This is the URL on which TaskPool is accessible. The URL is used in the notifications as the prefix of the task address to which the notification refers. In the event of a bad link setting, it will not be possible to get the notification from the task. This URL setting can be overridden in the License Settings directly in TaskPoole, more in the Administrator's Manual in Chapter 9. Licence.
url.login = for example http://taskpool.yourcompany.com
Sender of emails
This is the default sender of notifications. The settings can be specified for each pool separately in TaskPoole, more in the administration manual in the chapter 3. Pools .
email.from = for example taskpool@yourcompany.com
The address for sending error emails
In the event of an error (such as a stuck thread, IMAP malfunction, etc.), this value is used as another recipient of the informative e-mail. If it is not completed, it is sent to "helpdesk@taskpool.net".
helpdesk.mail = for example error@yourcompany.com
Activate IMAP interface
For more information on this feature, please refer to the Administrator's Manual 3.10. E-mail Interface.
hd.checkmail = this item can have two values (1 - picking emails from clipboard is on, 0 - emails are off)
Set up a database connection
This setting is key to communicating TaskPool with the database.
db.url = a connection string to the database is written to this location
MySQL:
db.url=jdbc:mysql://localhost:3306/taskpool?useUnicode=true&characterEncoding=utf8
In this string, the "taskpool" represents the name of the database used, and "localhost: 3306" represents the URL for the connection to the database server. These values need to be changed according to the installation.
MSSQL:
jdbc:jtds:sqlserver://localhost:1433/taskpool
Here is a similar situation - "taskpool" represents again the name of the database used and "localhost: 1433" represents the URL for connection to the database server.
db.user = a user who owns a database, for example a taskpooluser
db.password = owner database password
Customer code
This is an optional item. Used when using LDAP to log in to TaskPol, more in the Administrator's Manual in Chapter 10. LDAP / AD.
Access rights to update the installation
This data is required when updating the TaskPool database or filling a blank database and is defined by the administrator in this configuration file.
update.username = user name for updating the database
update.password = the user's password
Timeout for export
Export is used to store information about individual tasks in an external file. The timeout value specifies the maximum time that can be used for export in milliseconds. In the case of a very large database, it is possible that the export timeout is exceeded and the export will not take place correctly. In these cases, the value can be increased.
Set up WS Trust Authentication
If you use WS Trust authentication, this part of the configuration file is just for setting it up.
LDAP timeout
Here is the LDAP logout timeout. If for some reason you can not log in using LDAP, you can try to increase the timeout.
After you finish editing the configuration file, run or restart the Tomcat server.
For TaskPool to work properly with the database, it must be filled with tables in which it will store the data. TaskPool automatically checks the database structure according to the current version of the system. If it finds any difference, it will ask the user to update the database.
First, enter the address on which the TaskPool is accessible in the browser window. The address is
based on the port on which Tomcat is running (see chapter 2.3. Application
server) and the directory in which the TaskPool files are located (see
chapter 3.3. Location of TaskPool files).
If Tomcat runs on port 80, the TaskPoole files are copied to the directory ..\webapps\ROOT\ ,
and you are right on the server, the required address will be
http://localhost/ .
After entering the correct address, TaskPool finds an empty database and asks for an update. The following window will appear:
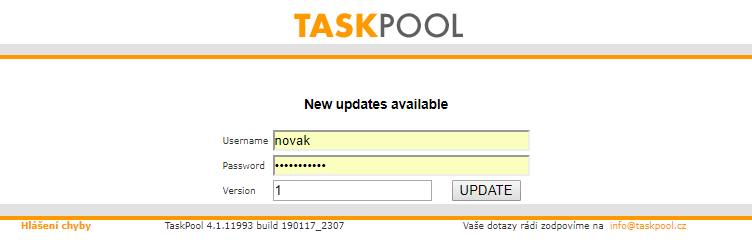
As "Username" and "Password", the set values are entered from the file "Taskpool.properties" (see chapter 3.4. TaskPool properties file). The "Version" field specifies which procedures will be performed during the update. Use a value to complete the database update or update1. Other values are used for partial updates and are used in non-standard situations.
Press the "UPDATE" button to update the database. You will see a list of actions taken on the screen. Upon completion, "UPDATE DONE SUCCESSFUL" and "ACCEPT" appear. Click this button and then restart Tomcat.
Note: If you use MySQL MariaDB, it is necessary to import a clean database (to download on www.taskpool.cz in section Podpora / Ceník a další dokumenty).
TaskPool enables full-text search. All written texts are indexed to the task, always at any time.
Reindexing can also be triggered explicitly. Enter the TaskPoole address in the browser's address bar
followed by /fulltext.do, for example http://localhost/fulltext.do .
A page similar to the database update (chapter 3.5. Filling database. The
login information is the same as for the database update,
the Customer ID field is used to reindex only one customer in a multi-license environment. No value is
required in this field. Clicking the "REFULLTEXT" button will start the reindex of all data.
During redeployment, TaskPoole can be used by default, only full-text search is not possible. When the redecoration is finished, the result will appear on the screen and the "ACCEPT" button. After pressing the button, the full-text search in TaskPoole will be available.
Note: Fulltext re-indexing is not routinely done when updating the database because of the high time requirements. We recommend doing it only if there are problems with full-text search. However, due to a possible slowdown in the system, it is recommended to do it when no one is working with TaskPool, eg overnight.
If you've set everything up correctly, you should see the login screen after entering the TaskPoole URL:
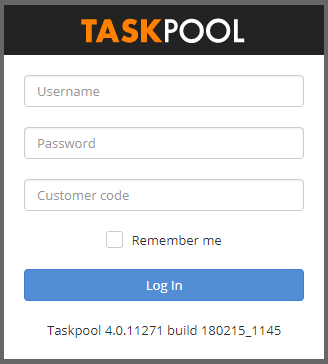
The TaskPoint installation includes a pre-configured Administrator account whose access data is
admin/noileta3. We strongly recommend changing the password!
We recommend that you back up your entire application at least once a week. You must back up the following components:
configuration file
..\ROOT\WEB-INF\Taskpool.properties, where access to the database and other important information is storedwhole directory
..\ROOT\logos\, where all user files and attachments are storedTaskPool database, use this command in the case of MySQL:
mysqldump [name of database] > [path\file.sql] –R –e –c
       –u[database user] –p[password]
for example:
mysqldump taskpool > c:\Backup\db_2010_03_01.sql –R –e –c
       –utaskpooluser -ptppass
external databases (if used)
ATTENTION! If the SMS connector is configured, we also need to back up these files:
SMS connector library
..\ROOT\WEB-INF\lib\smsBranaConnector.jarSMS connector configuration file
..\ROOT\WEB-INF\smsBranaConnector.properties
ATTENTION! If tailor-made plug-ins are configured, we also need to back up these files:
plugin libraries
..\ROOT\WEB-INF\lib\Plugin*.jarplugin configuration files
..\ROOT\WEB-INF\Plugin*.properties
Attachments (files of any type) can be attached to all tasks. Attachment size limits (for Workplace and Helpdesk) can be set in Taskpool.properties.
Attachments are stored in this directory structure:
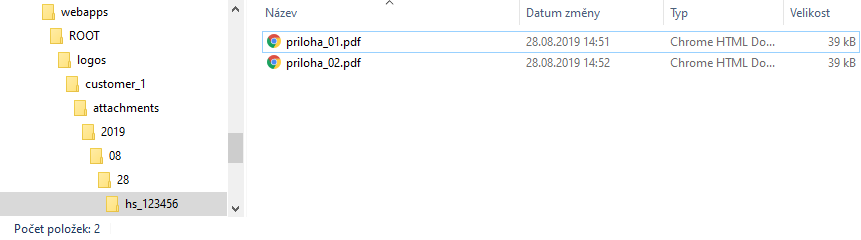
In the subfolder attachments there are subfolders pointing to year, month, and day of attachment (the same date as in the history of the task). The hs_123456 folder is a hash that points to a specific task.
Thanks to this structure, files that are no longer used can be easily archived (moved to another location) and can be copied back to their original location if necessary. You can easily free space by sliding the attachment over 5 years, etc.
When you try to open an archived (moved) file, "file does not exist" is displayed.
Upgrading to TaskPoole is intended to move from the current version to a higher version (eg from 4.0 to 4.1). However, the transition can take place within the same version, only for a newer build (from 4.1 to later 4.1). The upgrade procedure is the same for both variants.
Upgrades from older versions must always go through version 2.5, which includes several major changes to the data storage in the database. For example, if we upgrade TaskPool version 2.3 to version 4.1, we first need to upgrade to version 2.5 and then upgrade to version 4.1.
Note: If you have a purchased maintenance, you are entitled to all versions that come out during your maintenance period. If you do not own the maintenance and wish to upgrade TaskPool to a higher version, maintenance must be purchased. The annual maintenance fee is 15% of your license price and buy it continuously.
Note: If this is a generational upgrade (for example, from 2.9 to 4.0), you always have to contact support for compatibility testing!
The procedure for upgrading TaskPool is as follows:
Turn off the Tomcat server, or only the TaskPool instance.
Back up all parts of the system described in this chapter 4. Backup.
Delete directory
..\ROOT\WEB-INF\lib\, EXCEPT parts described in chapter 4. Backup, that possible filessmsBranaConnector.jarandcobsconnector.jar(of course if they exist). Next delete directory..\ROOT\WEB-INF\classes\.Rewrite all the files in the directory
..\ROOT\with a new files from the installation package.Delete the contents of the "work" directory located here:
..\Apache Software Foundation\Tomcat 9.0\work\.Run Tomcat Server (TaskPool instance).
If the new version requires a database update, it will prompt for access information to run the update. The update procedure is described in the chapter 3.5. Filling the database. After the update restarts Tomcat (instance).
If the new version of TaskPool does not require a database update, TaskPool is ready to use after running Tomcat (instance).
We recommend using software for comfortable backups SQL Backup And FTP, which is also available in the freeware version and allows you to conveniently back up your databases and files at once with one click. Controlling this software is also very intuitive. The home page of the project is http://sqlbackupandftp.com/ .
Running TaskPoole can rarely occur. In this case, an error screen is displayed with the support team error specification submission form
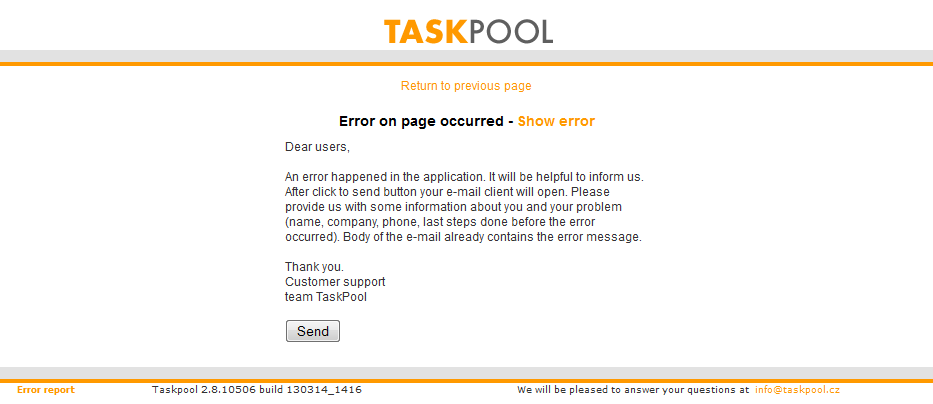
Click the button Show error we can see a specific error. Button Return to previous page we will return to the previous screen.
For efficient bug reporting there is the button Send, which starts the default e-mail client and writes a message with the preset address. It is essential to describe in detail which activities preceded the error.
It is also very important to send log applications. We have a specific error, but more information is logged in the log, and it is possible to track a longer period of time before the error. These are the following files:
Linux - this is a file
catalina.out, which may be located at any location according to the installation.
This file stores logs throughout the TaskPolot run, so it is usually very bulky, for reporting it is
enough to send part of the log from the time when the error occurred.
Windows - logs are usually found in the directory with the application
server, that is ..\Tomcat\logs\stdout_[date]. In Windows, a new log is created every time
that Tomcat is restarted, the log files are marked with a date, it is enough to send the log only from the
time when the error occurred.
At the same time, it is possible to use our helpdesk interface at any time http://www.taskpool.cz/ in section Podpora -> Helpdesk pro zákazníky.
In case of installation problems, please contact us using our helpdesk form located at this address:
Further contact details can be found on this page:
(c) Copyright 2021 ComArr, spol. s r.o.