Table of Contents
List of Figures
- 2.1. Log in to TaskPool workplace
- 2.2. Google Authenticator
- 2.3. Code and QR code
- 2.4. MFA code
- 2.5. Workplace of system TaskPool
- 2.6. Filters and tools
- 2.7. EDM - database of customers
- 2.8. Workplace - Search bar
- 2.9. Searching by number
- 2.10. Searching by string
- 2.11. Workplace - middle part
- 2.12. Mass operations with tasks
- 2.13. Task tags
- 2.14. Detail of the task
- 2.15. Picture in text
- 2.16. Choose the answer
- 2.17. Added answer
- 2.18. Chosen answer
- 2.19. Program code inside comment before and after saving
- 3.1. Editing a agent profile
- 3.2. TaskPool TRAY
- 3.3. TRAY: startup icon
- 3.4. TRAY: login screen
- 3.5. TRAY: filter selection
- 3.6. TRAY: icons in system tray
- 3.7. TRAY: filters setting
- 3.8. TRAY: general settings
- 3.9. TRAY: pop-up notification
- 4.1. Creating a new task
- 4.2. Registration of new author
- 4.3. Blue icons Takeover and Forward of task
- 4.4. Editing a task
- 4.5. Comment editing (link to task)
- 4.6. Comment editing (remove attachements)
- 4.7. Co-agents
- 4.8. Completion of the task
- 4.9. Completion of the task (icon of the status)
- 5.1. Workflow diagram
- 5.2. Allow solution task
- 5.3. The agent confirms the assignment
- 5.4. The service manager checks the solution
- 5.5. The submitter confirms the solution
- 5.6. Billing loop
- 6.1. Buttons for links between tasks
- 6.2. View links in the details of the original task
- 7.1. Textfield
- 7.2. Selectbox
- 7.3. Selectbox with whisper
- 7.4. Multi Selectbox
- 7.5. Radiobutton
- 7.6. Checkbox
- 7.7. DateTime
- 7.8. Dynamic field Protocol (file)
- 7.9. Dynamic field (image in text)
- 7.10. Attachments
- 7.11. Switching the images
- 7.12. Escalation
- 7.13. Information about the co-submitter
- 7.14. New Field Signature
- 7.15. Check the field Signature
- 7.16. Finnished signature
- 8.1. Graphical view of SLA count (hours and days)
- 8.2. Classic deadline (finish in 3 days)
- 8.3. SLA deadline (complete berofe 8 days)
- 8.4. Setting manual FT
- 9.1. Recording time in task
- 9.2. A form for entering a time record
- 9.3. View time entry in task history
- 9.4. The total number of hours worked on a given task
- 9.5. Locking time records
- 9.6. List of billings
- 9.7. Editing billing
- 9.8. Billing template
- 10.1. List of filters
- 10.2. Definition of filter
- 10.3. Advanced search: enter values
- 10.4. Advanced search: search values
- 10.5. Advanced search: parameter definition
- 11.1. Planning in task editing
- 11.2. Scheduler
- 12.1. List of autotasks
- 12.2. Autotask - top part
- 12.3. Autotask - button Run
- 13.1. Reports
- 13.2. CSV file in Excel
- 14.1. Login
- 14.2. Example helpdesk form using login
- 14.3. An example of a web thank you
- 14.4. An example of a request history
- 14.5. An example of a tasks list
- 14.6. Editing information about helpdesk users
- 14.7. Example Knowledge Base
- 15.1. EDM icon in tool menu (down on the left)
- 15.2. Companies in EDM
- 15.3. Contacts in EDM
List of Tables
- 1.1. Rights of individual roles
- 2.1. Icon status
Table of Contents
System TaskPool is a modern web-based system for managing requests and tasks. The system can monitor a wide range of business processes and help modulate specific requirements that come from e-mail, web form, or delegated on behalf of a single module.
Task
ticket, job, demand, requirement, claim ...
Workflow
The process of the request process from insertion to processing and archiving, ie the life cycle of the request.
Pool
A separate area for managing requests of the same type or with the same parameters for which it is possible:
Define your own processing rules
Define your own request data structure
Define a separate team to work with the tasks in a given pool
Filter
Defined rule to display tasks that meet a particular condition or file conditions.
Dynamic field
The new request data item (flag, value ...) defined by the administrator for a particular pool.
Workplace
A system interface where a list of tasks for a particular pool or filter is displayed, as well as other information (reports, statistics and other tools).
Submitter / Author
Person submitting a request (the request for the submitter may also be entered by another user who submits the request on behalf of).
Agent
The user who logs in to the TaskPool workspace and solves requests. It has a role in each pool. The number of these users is limited by licence.
Administration section
Only TaskPool Administrator can access this section and configure the whole system.
System Administrator
When a license is established, the administrator account is already defined. Managing TaskPool can only play this role. However, the TaskPool Administrator can also hold any role within each pool while having access to the Admin section.
Notifications
Mostly an e-mail message informing about the action that was performed by a TaskPool user with a specific request.
Helpdesk module and helpdesk user (customer)
The Helpdesk module serves customers or other users for the ability to create TaskPool requests without having access to the Workplace. These users have the role of advertisers and access the individual requirements via an external web interface that is simple and intuitive to control. Every user sees only their requirements, or if the user has the role of a contracting manager, he / she can see the requirements of his subordinates within the company. The number of these users is not limited. Changes in their requirements are for users to be informed primarily by notification emails.
TaskPool TRAY
Application to notify the user directly in the Windows system tray. It allows you to turn off standard email notifications and let you know via the icons in the system tray that indicate changes to individual filters.
There are several role types in TaskPool. According to the assigned role, the user has the right to individual activities. At the same time, each party (submitters and agents) may share certain information only within its own side, ie a comment may be visible only to the agent.
| Submitters | Agents |
|---|---|
| Manager of Submitters - role on the part of submitters, which has the task of overseeing the implementation of the submitters. At the same time it can enter individual requirements. | Service manager - role on the part of the agent, which has the task of overseeing the realization of the requirements for the agent's side. At the same time it can participate in solving individual requirements. If the configuration allows it, it can also build the requirements. |
| Submitter - a role on the part of submitters that can enter individual requirements. | Agent - role on the part of solvers, which has the task of solving individual requirements. If the configuration allows it, it can also build the requirements. |
| Observer of submitters - role that is only entitled to view requests and information shared by submitters. | Observer of agents - role that is only entitled to view requests and information shared by agents. |
There are too roles Co-agent and Co-submitter. Co-agents and co-submitters have the ability to contribute comments and receive notifications from them. In some settings, co-agents can complete the request. The co-agents are described in the chapter 4.3 Edit of task and co-submitters in chapter 14. Helpdesk.
The complete rights for individual roles are described in the following table:
MS = Manager of submitters
S = submitter
OS = Observer of submitters
SM = Service manager
A = Agent
OA = Observer of agents
and further:
- the given role has the right to the given activity
- the given role is not entitled to the activity
- the given role may have the right to the activity, depending on the field pool settings in the "Workflow" tab (more in the Administrator's Manual in Chapter 3.2 Workflow)
Table 1.1. Rights of individual roles
| MS | S | OS | SM | A | OA | |||||||
|---|---|---|---|---|---|---|---|---|---|---|---|---|
| viewing tasks |
|
|
|
|
|
| ||||||
| task entry |
|
|
|
|
|
| ||||||
| acceptance of the task |
|
|
|
|
|
| ||||||
| assigning the task to the agent |
|
|
|
|
|
| ||||||
| comment on the task |
|
|
|
|
|
| ||||||
| completing the task |
|
|
|
|
|
| ||||||
| task control |
|
|
|
|
|
| ||||||
| task confirmation |
|
|
|
|
|
| ||||||
| task deactivation |
|
|
|
|
|
|
Table of Contents
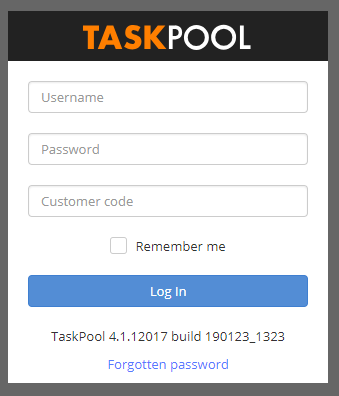
Only a web browser such as Google Chrome, Mozilla Firefox, MS Internet Explorer / MS Edge, Safari for iOS, etc. can be used to use TaskPool. After you enter the TaskPool address (the address will be sent to you by the system provider), the sign-in screen will appear. After entering your username and password, you will be logged into TaskPool. If you forget your name or password, contact your service provider.
ATTENTION! The system distinguishes between large and small characters.
In case you want to activate permanent login on TaskPool on your computer, check the box Remember me. Permanent login means you will not have to re-enter the login dialog even when you leave the TaskPool system (for example, when you close the browser window or go to another page or shut down your computer).
If a user has forgotten a password, he can send a change password request to the registered email.
In case that e-mail is registered with multiple users, an appropriate number of password changes requests will be sent.
You can have Two-factor login thanks to which you will be more secure.
Install authenticator to your smartphone device and login. We recommend Google Authenticator or Microsoft Authenticator.

Login back to TaskPool and a window with code and QR code will display. Thanks to the authenticator you installed, scan the QR code.
ATTENTION! Write down the code safely and save it in case of loss of the telephone device!

After scanning QR code,in the authenticator will display code, which is constantly changing. After login, a window will pop up, where you enter in the box MFA code. It will display during each login.

Once you log in to the system, Workplace is displayed.
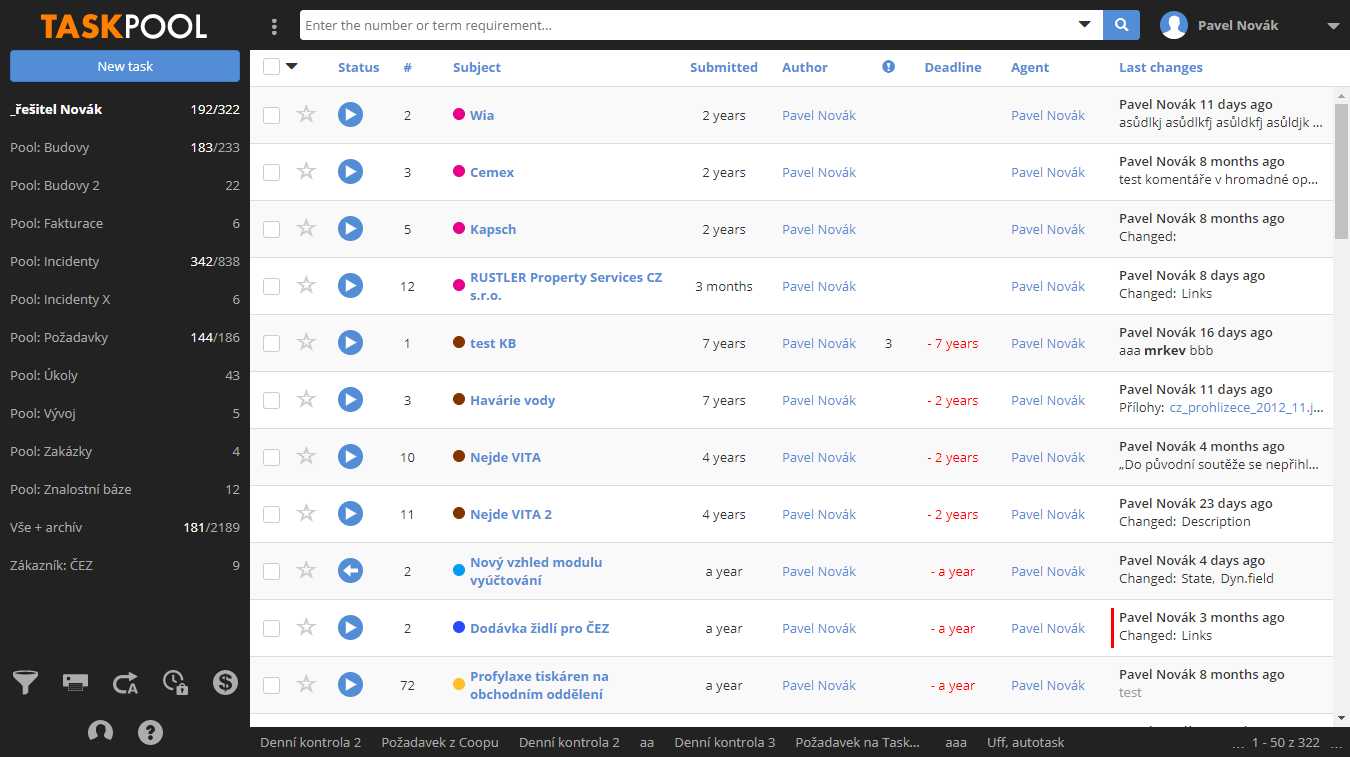
Display details differ depending on which filter we have displayed, what filter requirements it contains, and what role we play in the role pool. Learn more in the following chapters.
In the left part of the workplace, you can enter a new request, select from redefined filters, and access tools (reports, autotasks etc.). Here is a search box with information about the logged-on user, in the middle part a list of tasks for the selected filter. At the bottom there are links to the latest open requests along with 50-page pagination.
NOTE: You can update your data by pressing the browser key to refresh - default F5 key.
WARNING: For lower resolution monitors, some additional values, such as the total number of times recorded, may not appear in the task list.
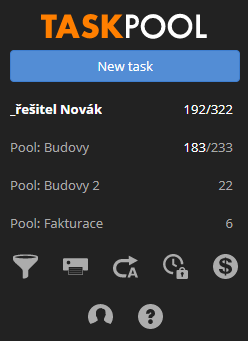
Under the logo, you can enter new request by pressing the button New task In other parts of the system, this button may have a different function, for example, in the administration it is used to enter a new pool, etc. In that case, the button has a proper description.
Below the button are filters that limit the list of requests in the middle of the screen.
Below the filters there are tool icons.
Dashboard displays a page that tells the user about the most important activities in each area (dates match the selected template).
Iterm Filters allow you to edit user filters (see chapter 10. Filters).
Reports Reports are used to export data from currently filtered requests (see chapter 13. Reports).
Autotasks will provide access to the section for editing autotasks (viz kapitola 12. Autotask).
Time lock allow you to report time records for individual users. The banned user can lock the time records at a certain date to prevent them from being debited in the billing process. For more information, see the chapter 9. Time sheets.
Modul Billing serves for the final adjustment of reported operations before closing and reporting in reports.
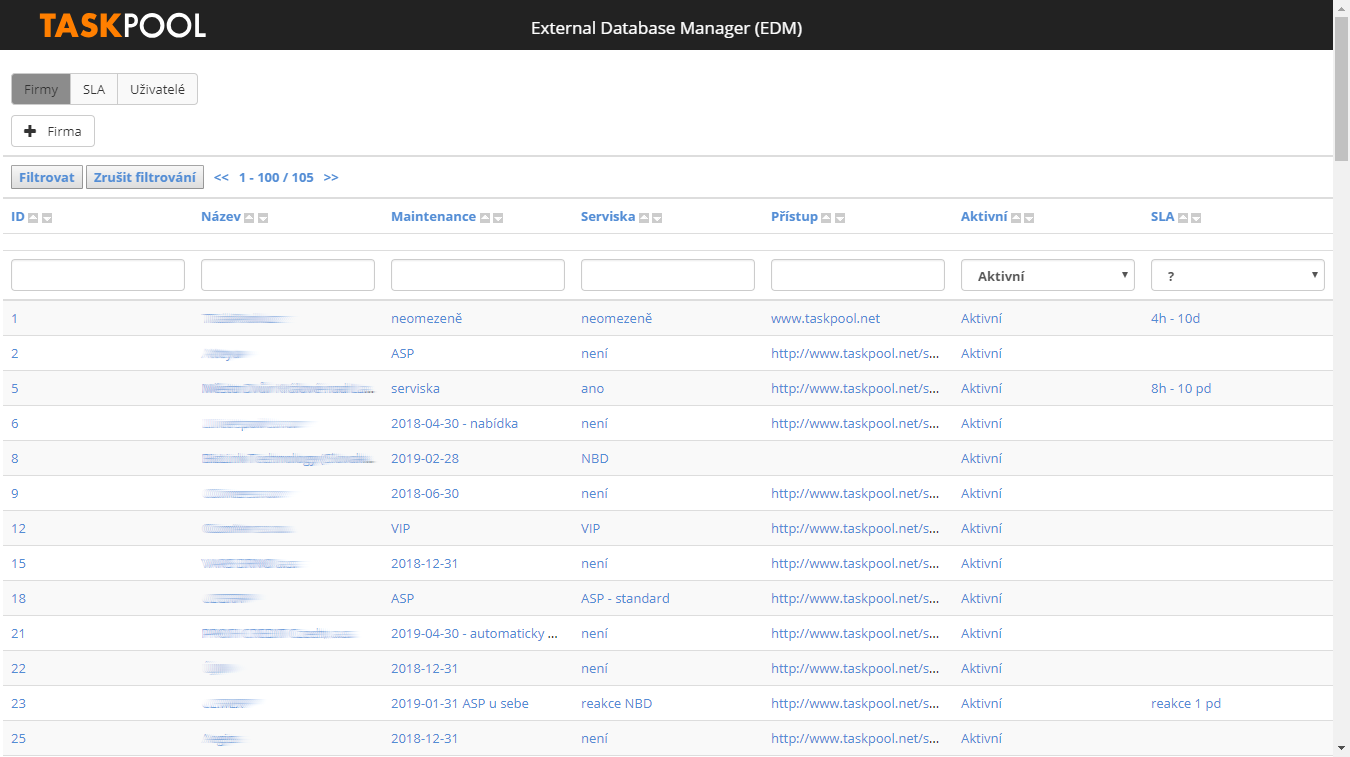
Button EDM displays a list of registered customers and companies or other spreadsheets.
Help will display this help.
Workplace tasks are displayed according to the currently selected filter. Selecting the filter determines which requirements will be displayed on the workplace. You can find the filters of each pool by having a Pool: "Pool: Helpdesk" written in front of their name. These filters are by default visible to all users who have a role in a given field. At the same time, other filters can be defined either by the administrator or by a specific user, such as the requirements where I am the agent, any requests that have not been accepted yet, requirements with a failed term and so on.
The multifunctional search box and the logged-in user data are available in the top bar.

To the left of the search bar is an element that allows you to hide and uncover the filters together with the tools. This will be appreciated by users who work on a monitor with a lower horizontal alignment.
If we know the exact task number (ID or sequential number), we can enter it into an empty search window. Suggest to the number will offer results from the entire database (regardless of the filter selected) in the form of a list of tasks including their status and the pool they are in. So it is possible to select a specific task from the menu, then move it directly to its detail, or confirm the search string with the ENTER key (or click on the magnifying glass) and classic full-text search will occur in selected filter

ID of the task
ID serves to uniquely identify the task throughout the database. This number is shown in detail in brackets, eg 12 (1286).
Sequential number
Each task in pool has its sequential identification number that is valid only for the pool, and the same number may have a different task in a different pool. In the listing of requests, this number is shown to the left of the task name.
TaskPool allows fulltext search for string in down described fields (string is one or more words). This string can be only one, and the next one replaces the original one.
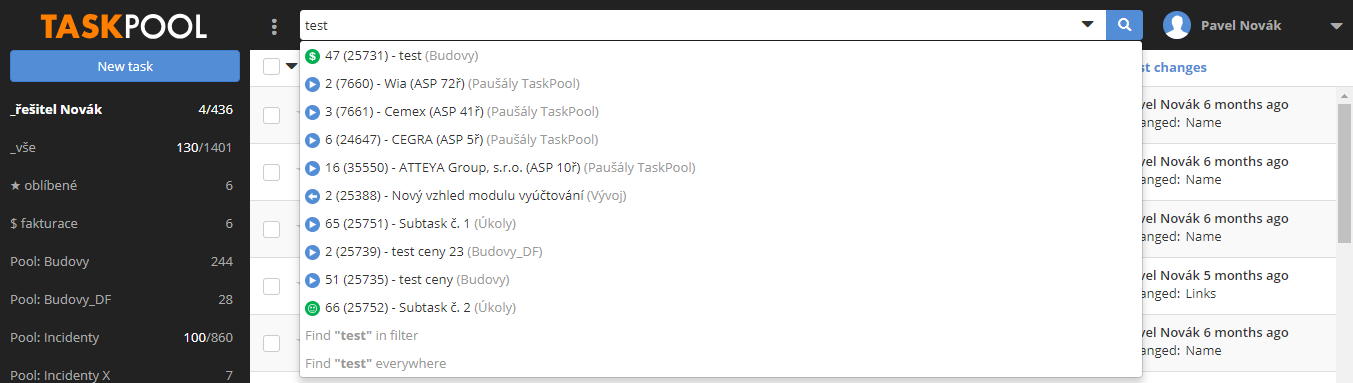
The whispers will except of 10 results also offer the options to "Find string in filter" and "Find string everywhere". Selecting this option will search for a string in filter or throughout the database (without the difference of the pool or the status of the task).
Fulltext searches for these data:
- ID and sequential number of the task
- name of the task
- description of the task
- commnets
- customer´s name, e-mail, login, phone
- agent and co-agents
- comments in timesheets
- dynamic field like "textfield" or "text area"
- invoice number
- attachment names
- file names
Examples of full-text search:
| INPUT | RESULT |
|---|---|
| mind | finds words where words starting with the mind, words like mindset, mindful, mindfulness etc. |
| "mind" | a quote in quotation marks finds where the exact word occurs mind, Mind or MIND separated by spaces |
| *mind | finds tasks where words containing the mind, for example remind, reminder, reminds etc. |
| my task | finds tasks that contain parts of this phrase, for example My new tasks |
If you want to search for more parameters, you can use additional fields in Advanced search (below in this paragraph). Confirm the entered parameter by pressing the ENTER key or by clicking on the magnifying glass.
Next to the search icon (magnifying glass) is the icon Advanced search (down arrow), which allows advanced filtering of tasks based on individual parameters and their combinations. For more information, see chapter 10.2. Advanced search
TIP: To cancel multiple search parameters, click on the cross of each parameter (the selection is updated automatically).
The middle part of the workplace lists the tasks of the active filter. Each task is displayed in a contiguous block and graphically separated from each other. At the first glance, all essential information about the task, including the latest change, is visible. Tags are now displayed, which are clear thanks to the color resolution. Click the subject of the task to see details (see chapter 2.5 Details of the task).

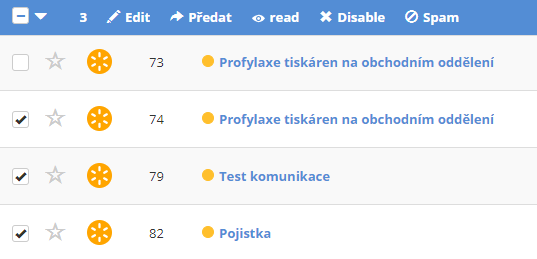
Mass operations can be activated by specifying individual tasks (or groups). Place the sort headers will display a bar with mass editing, forward, read, deactivation and spam.
Edit - add comments or attachments to selected tasks.
Forward - delegates the tasks to a specific solver. In case of failure (for example due to rights), the pre-defined tasks will be tagged.
Read - removes the New Comment flag (red bar) for selected tasks.
Deactivation - deactivates customer tasks with notification.
SPAM - deactivates customer tasks without notification.
Note to the mass operations: If tasks are in the "Waiting for information" state or "New Terms" and the "Agent Confirms Solution" option is turned on in the appropriate pool, in this case there is an automatic allocation.
Star can add a task to favorites (filter can be created with the parameter "task.isStarred = 1"). This filter owns only user who calls the task as a favorite.
Status shows the round icon to the left. Tasks may be found in different states, eg assigned to a solution, taken over, completed, checked, archived, etc.
The basic distinction status by color:
For a better visual orientation in the tasks list, each condition has a different color.
Orange - task is newly entered, has no assigned agent, it does not work on it. Can wait for the allocation or approval to implement.
Blue - task is in progress and is awaiting for completion. Tasks in state 201 and 202 awaiting reaction from the author, therefore are visually different.
Green - task is complete and awaiting for confirmation, if any archiving.
Gray - task is archived, deactivated or moved.
The following table describes the individual icons status.
Table 2.1. Icon status
| Icon | StateId | Status | Expected action |
|---|---|---|---|
 | 0,4 | New | takeover or assignment |
 | 1 | Designed to address | approval or refusal of implementation |
 | 3 | Designed for allocation | acceptance or rejection by the agent |
 | 10, 16 | Taken | completion |
 | 13 | Returned for reworking | completion |
 | 201 | Waiting for information | delivery of information |
 | 202 | New conditions | confirmation of conditions |
 | 23 | Returned to check | check |
 | 25 | Waiting for check | check |
 | 30 | Waiting for confirmation | confirmation |
 | 35 | Waiting for billing | billing |
 | 20 | Finished | archiving |
 | 50 | Archived | - - - |
 | 40 | Deactivated | - - - |
 | 70 | Moved / Exported | - - - |
Pool number is a sequential number. Every task has two identification numbers, one global one (ID) that is unique across the database and one sequential, which is shown here at the workplace and is unique within a single pool, not however, throughout the database.
Subject of the task is not determined by us when we create it. We can also change it later when editing the task. Click on the subject of the task for its details, more in the chapter 2.5 Detail of the task.
Field Author informs about the submitter of the task and the date and time of its assignment. Click on the name of the Author to see more information.
Value Deadline determines the number of days until expiration. If the task is not completed in deadline, this value goes into negative, and the font color changes to red on the task.
Priority requirement is the importance of its solution. Priority 1 is usually the most important, 5 least important. Priority is an optional item.
Tags serves for color-coding of the task importance. You can added by clicking on the profile and choosing "Administration". Then open card Tags, add "New", create and save it. By clicking on the card Pools and opening a task, you can check it on the card Tags and save it again. in the detail of the task click on "Edit". On the right column you choose from the list or write a first letter of the tags name, which will filter them and you will be able to choosen them. Then save it. Saved they will be displayed in the right column of the task,in the comment as a change and also in the task overview.

Value Agent informs about the agent, clicking on his / her name can provide additional information for the user. If the task is not taken, this value is empty. In this case, the "Take Over" button is displayed in this box for all users who may become the agent.
In a column Comments an abridged last comment is displayed with a possible unread comment (vertical red line).
TIP: Retrieving and updating the list of tasks is performed by the function key defined in the browser, most often the F5 key.

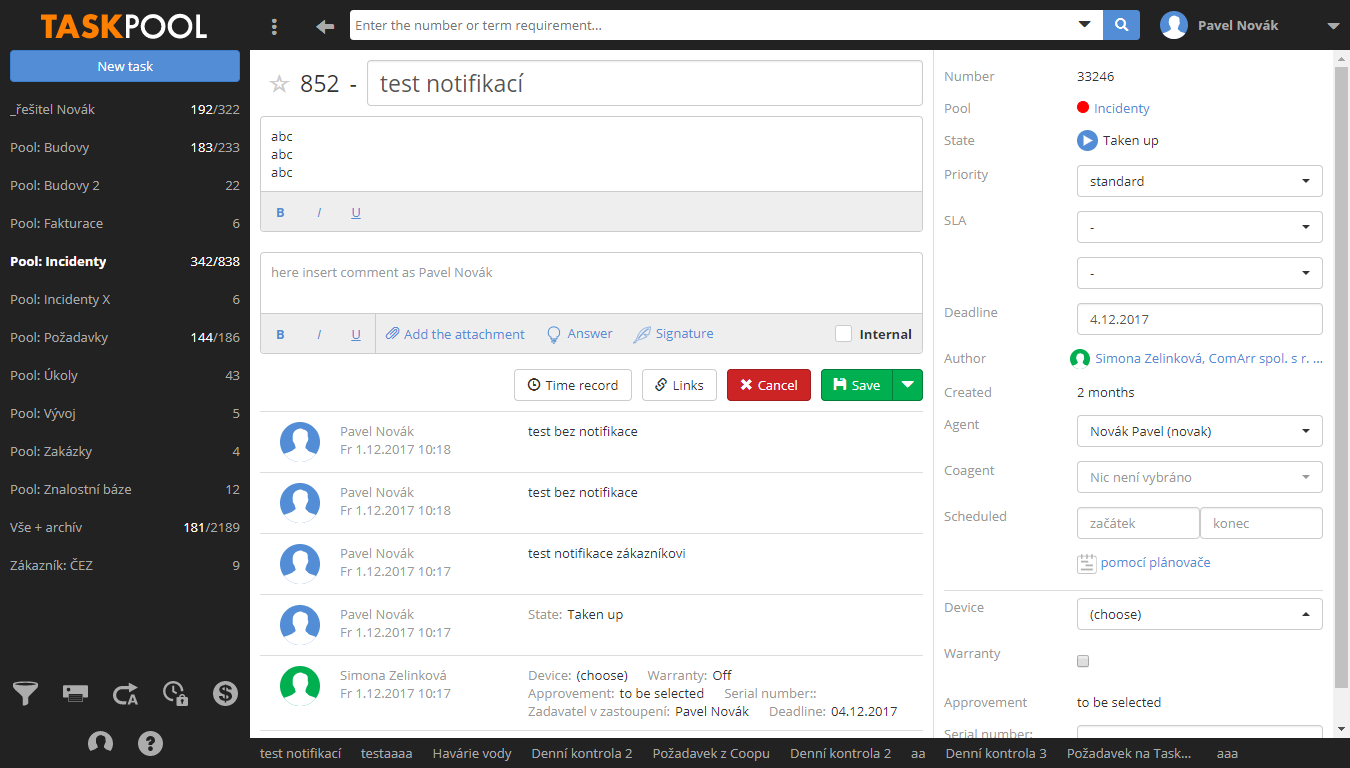
You can also enter a new task in the left-hand section above the filters. To edit the task, click the Edit button. You can get back to the task report by clicking any filter or by clicking the Back button in the browser. With the Reports button, you can also print individual requests directly from the details of the task.
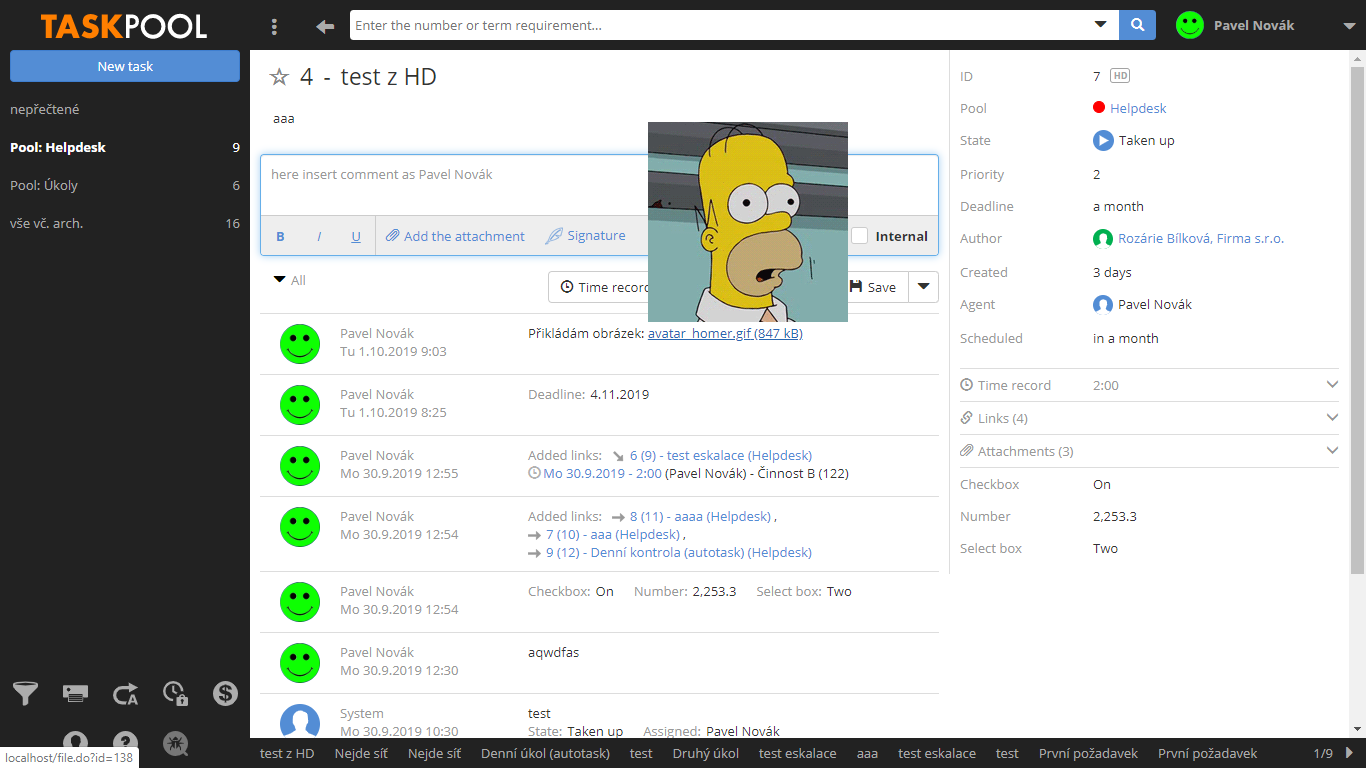
In the right column, we see summary information about the task, ie the pool, its number, source (Workplace, HD, Autotask), priority, date, price, sponsor, task status, and agent. By clicking on the names of the submitter or agent you will see detailed information about the given user.
At the top of the window is a subject and a description of the task.
In detail without editing, it is possible to perform the most used actions, ie to add comments (font cand be formated Bold, Italic or Undeline) and change the status of the task. To change status use action button (the default is Save, the current status can be changed to Finish, Deactivate, etc.)
Under the action button, a complete request history is listed. You can filter its content using the button All / User displayed above history. You can choose from Notes and Attachments, Timesheets, Links, Task description change or Others. The setting is valid for logged user for next change.
If the configuration allows, you can edit your own comments (even repeatedly) using the blue pencil icon next to the comment. The customer is informed about the change by means of a standard notification and an indicator of the last change in the task detail in the customer interface.
In thze task history, you can click right to Link to history and copy the link. Then you will add it to the task comment to which you want it, click "Enter" and "Save". After entering the link a task will open, from which task then link was and will scroll down right to the given line in the history.
You can join to each comments attachements. Their number and size are not limited by default (system administrator is able to set limits). The method can also be used drag & drop, when you drag an attachment from the explorer, for example.
Another way to insert an attachment is to migrate the picture using drag & drop into the description text or Comments. Images appear in these parts of the workplace as the image name that can be displayed either in the preview by overflow or by clicking with the mouse.
The favorite way to insert is also using Insert (CTRL+V). However, the image must be passed to the clipboard as a shape, not as a file.
The list of attachments is listed above the dynamic fields on the right. The most recently inserted attachments are listed above. In the list, you can download individual attachments, delete them from the list (they will remain in the history and on the server) or delete them (the attachments will be physically deleted). Only the Pool Service Manager has the right to delete the attachement.
In task detail you can add answer, which is connected with a knowledge base. When clicking on "Answer", which is located under the comment, a window will appear, where you can choose from list or write letters or numbers, where the tasks will be filtered. Click "Save" and the given answer will add to the comment.


By clicking on the name you will get to the task, where you will find the chosen answer.

In detail you can add links to other tasks and record timesheets in (Time recording).
At the bottom are individual comments with all additional information (changes of deadlines, etc.) in time. Each comment is given to his comment author and timesheet.
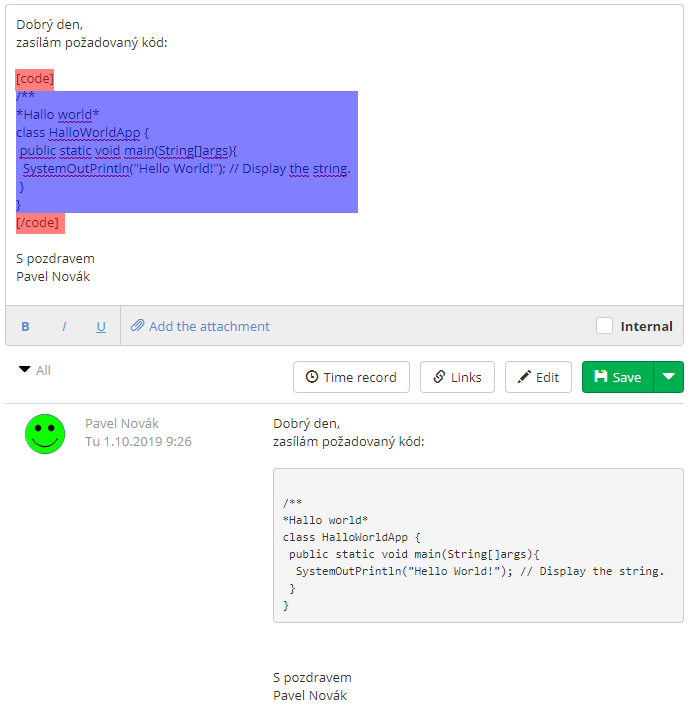
If you want to separate the program code in a comment, use a special label to highlight it code in square brackets, marked in red in the following figure.
TIP: If you want to add a comment that will only be seen by the investigators, check "Internal". Such a comment will not be seen by the submiters on the helpdesk nor will the notification be made.
TaskPool provides three options for ordering workplace tasks.
In standard sorting, the tasks are stacked in four levels so that the user can see above the tasks on the work surface when they arrive at the workspace, so they should start working.
First degree - who's in the line
The above are the tasks with which the logged-in user should take action. E.g. if a registered ervice manager is registered, the tasks waiting to be checked will be completed at the top. Then they follow tasks that do not require the activity of the logged-on user, but any other user on his / her side (agents / submitters). Below are the requirements for which the user is on the opposite side.
Second degree - according to priority requirement
The tasks groups created by the first sorting order are further sorted by priority. Higher priority requirements are located above.
Third degree - deadline
The groups formed by the second degree are further sorted by deadline.
Fourth degree - by ID
The groups formed by the third degree are further sorted by the tasks ID.
Each user has the ability to define their own sorting using filters, more in the chapter 10. Filters.
TaskPool allows for a quick overview of the quick ordering of workplace tasks by the values in the individual columns. This sort replaces all of the above. Sort by columns, ascending and descending. When you click on a column, the tasks are sorted in descending order according to the specified criteria. E.g. the highest number will be listed above. After re-clicking the list is sorted in ascending order. If we choose custom sorting, we'll get to the default by clicking on the cross in the header.
The "Comments" column can be sorted by the date and time of the last comment. This sort of sorting can be conveniently used in filters. For example, you can choose just your tasks and sort them in one step according to the last comment date for convenient tracking of changes, more in Chapter10. Filters.
Table of Contents
At the workplace is the logged user displayed at the top right. Clicking on his name will show a menu where you can select "Edit Profile". Here it is possible to change the personal data of the agent together with several other functions. The popup window after editing the user looks like this:
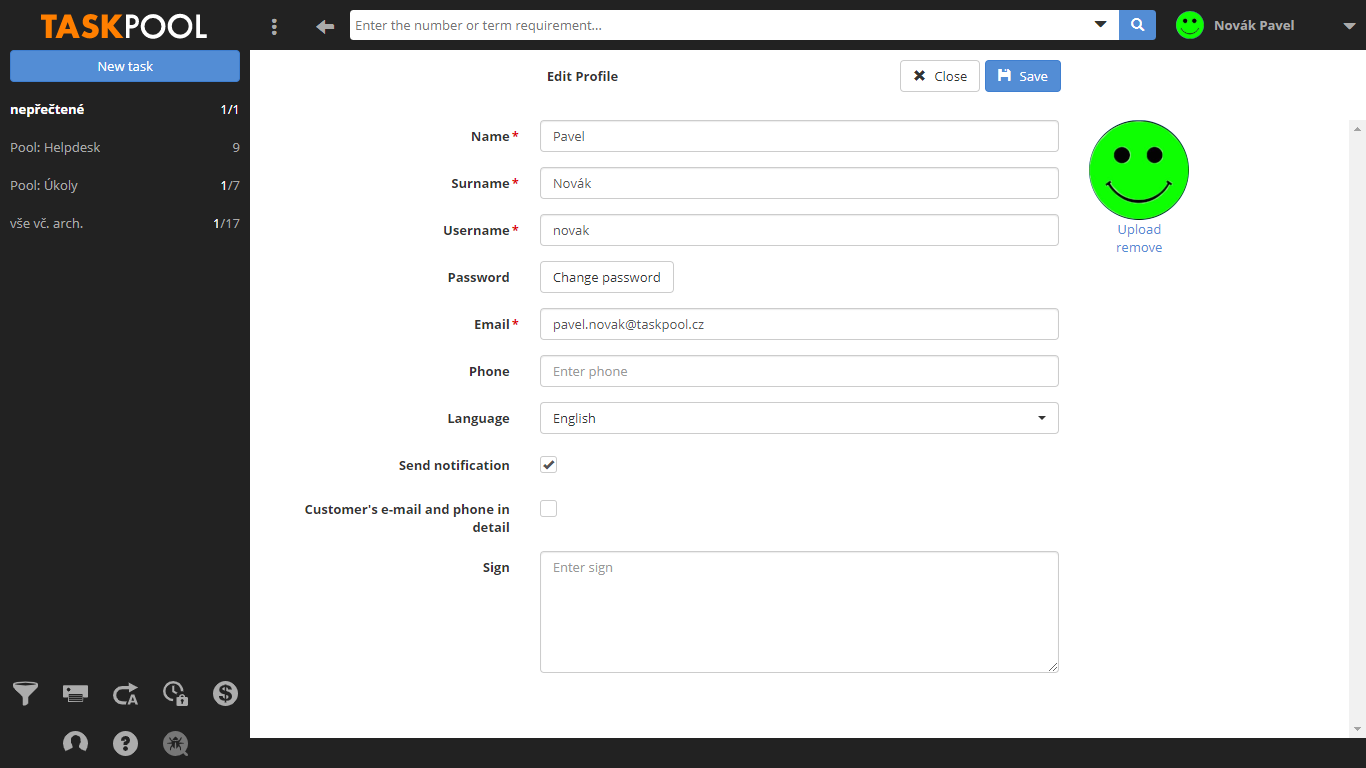
Note: Depending on the administrative settings, the form may contain additional fields for additional user information.
When editing the profile, you can change all personal information - password, first name, last name, e-mail, phone (optional) and the language used. The only thing that remains unchanged is the username that the user logs into the system because of links to existing tasks. To make changes, use the "Save" button, click "Close" to go back without saving the changes.
TaskPool TRAY facilitates the orientation between requests and can fully replace email notifications. This is a Windows application that displays the number of unread comments in the tasks of the selected filters in the operating system tray (systray). For each filter, you can create an icon that has its color characteristics.

The installation file can be downloaded from www.taskpool.cz in the Downloads section. Installation is easy, after you run the installation package, just confirm the certificate and then click the "Next>" button several times to install the application automatically. After installation, the boot file appears in the Start menu of the operating system.

The following screen appears when it is started:
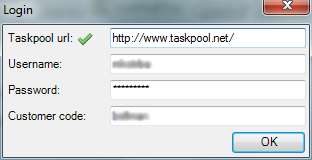
TaskPool TRAY works directly with TaskPool database data, so fill in the address through which you access the TaskPool and the associated login information. Once the data has been verified, the TaskPool icon appears in the system tray.
It is now possible to choose which filters will be displayed in the system tray for notifications of new events. For each filter, one icon will be added to the bar. The fastest way is to double-click the TaskPool TRAY icon right-click and select the filter from the "Filters".
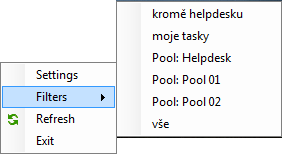
We select, for example, the default filter helpdesk pool "Pool: Helpdesk". A new icon with a number appears in the system tray. This number determines how many user's last visits to that filter, such as two new tasks, added comments to two existing requirements, or a combination of both. The color of the icon is taken from the color code by default, but you can also choose your own color, more in the next section of this chapter.
Double-clicking on the filter icon opens the browser window with the workspace of the filter. The value is automatically restored after the set time, and the user is also notified of the pop-ups with the listing of changes. Pop-up windows will also be described later in this chapter.
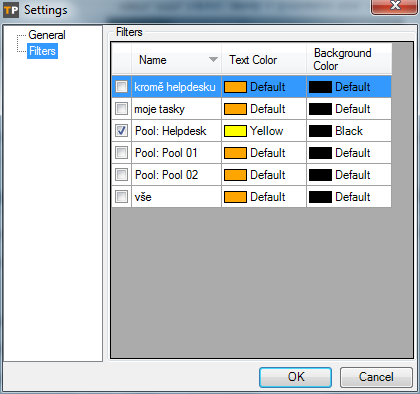
If we want more customizable TaskPool TRAY, right-click the "TP" icon and select "Settings" or settings.
On the "Filters" tab, we will find more detailed settings for the displayed filters. At this point it is possible to set which filters will have their icon and their colors in the system tray. The control is quite intuitive.
On the "General" tab we can find general application options.
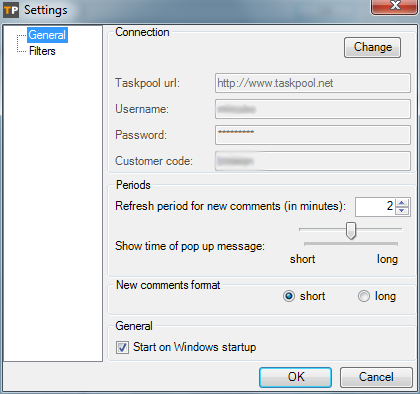
If you have changed the login to TaskPoole itself, the TaskPool TRAY application should also be notified. This is done by tapping the button Change on the top.
At the bottom, we set whether to run the application at Windows startup. We recommend having this option active.
Value Refresh period for new comments specifies the time interval in which the new TaskPool events will be checked, the number indicates the number of minutes.
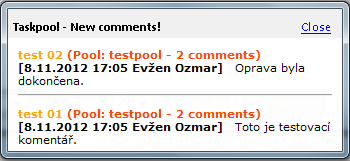
The rest of the options are related to pop-up notifications already mentioned. If TaskPool has changed since the last scan, the following changes will appear along with the change in the icon in the system tray in the lower right corner of the notification window, which looks roughly as follows:
Choice Show time of pop up message determines how long this window will remain displayed. If necessary, we can close it at any time by clicking the Close button.
The last choice New comments format we set the format of the displayed values. The "Short" version displays up to three unread comments in the pop-up window, the "Long" version displays all unread comments.
Table of Contents
This chapter describes the basic flow solutions in TaskPool requirement, it is called: workflow.
The standard workflow of task contains:
New task
Takeover by the agent
Solution and finish by the agent
Archiving
TaskPool allows standard workflow to extend multiple loops. Expanding options are devoted to the chapter 5. Advanced workflow in TaskPool.
In principle, the contracting authority, the contractor manager and the service manager can set up the task. In some configurations, this option can also be solved. The task is created using the button New task on the left side of the Workplace. Click to open a simple form after filling and saving the task into the system. TaskPool will then provide a notification (e-mail notification) about entering a new task for resolution for all users affected by the change.
Depending on the field's administrative settings, the form may contain additional items, or may not contain some of the ones in the image. Required fields are marked with an asterisk.
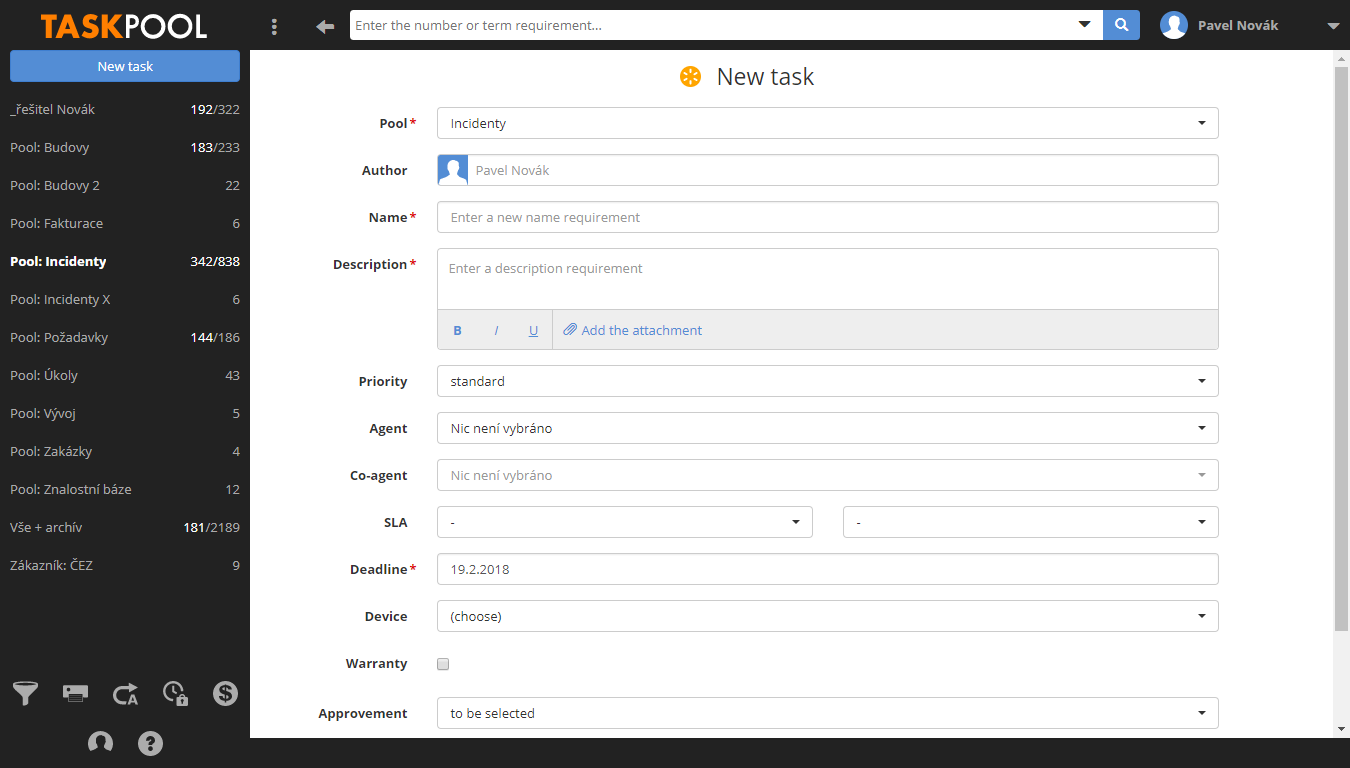
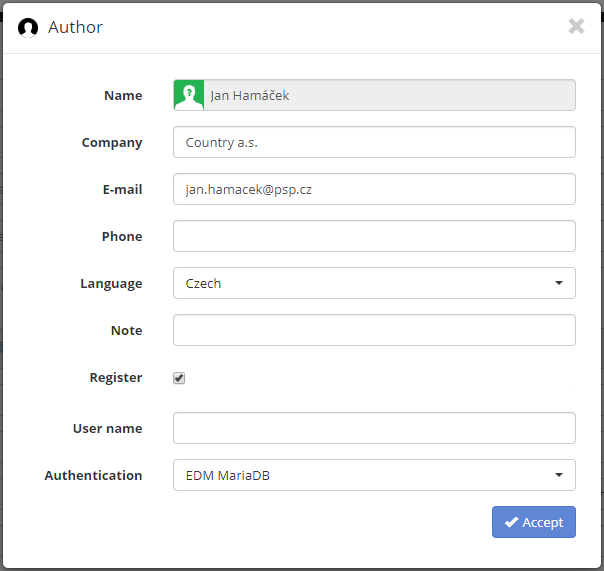
First, the pool to which the task belongs and where the contracting authority has the right to add new requirements is selected. Each time a field is selected, the window will automatically be restored, because the form for the new task may vary in different fields (depending on the role in the pool, configuration, dynamic fields, etc.). Then fill in Author. If the user himself is the user, he will leave the default value. If he / she enters another user, he selects it by his / her whisper by name or by other information (Company, e-mail, phone ...). You can also request a new, unregistered customer. Just type a whole name of New customer and complete all the necessary elements in the form (company, e-mail ...). If you also want to register your customer, just check the box Register, enter login name, select Authentication (EDM or other) and Accept. New customer/author is created after saving the task. If you enter an existing company (whispered by it) during registration, a contact will be created for this company, otherwise a new company will be created.
After saving the task, information about the new account will be sent to the registered user with access data including a password that was automatically generated.
The name of the task is written into the Subject. Description uses to enter description of the task.
In the field Agent we can select a specific agent to either assign or propose to assign (depending on the workflow configuration).
Value Deadline determines the date, or the expiration date of the task. This item may not be displayed on the form depending on the configuration.
You can attach any number of attachments to the task, a new window for selecting an attachment will be displayed when you click on Add the attachment or you can drag attachments from drag & drop from explorer.
The new task is indicated by an orange icon. In the tasks list, the Takeover button (blue character) is also displayed in the "Agent" column. This button can be task accessed as a agent.
Beside the Take button, there is another blue Pass (arrow) button that forward the task to another agent, if the logged-in user is the Service Manager or is allowed to pass their own tasks to other agents. Otherwise, you will see the message "You do not have permission to change the agent".

By accepting the task, the relevant investigator will notify all users of the pool that they have begun work on the task and assume responsibility for its implementation. The task for change will change the icon and the name of the agent appears in the appropriate column.
Takeover and Forward of a task can be made not only at the workplace but also in task edit.
If the task is accepted, the agent continues with further editing using the "Edit" button.
Note: The task can be edited without taking over the agent. In this case, however, there is a limited list of options that can be made with the task (for example finish etc.).
The window for editing task is as follows:
At the top of the window, you can change the Subject and Description.
Below, comments, attachments, time and bindings can be added to the task (as well as in detail). The links are devoted to the chapter6. Links between tasks.
In new version we can add emoji to comment. Above the comment field on the right side is a heart icon. After clicking, we can choose the emoji we want. Beside is the button "Link to task", where you can choose a task, which will be displayed as link. It serves for easier searching, when the tasks are related. Or add # symbol to the comment and the task number, that you need.

If you have attachements in the comment, that you wanna remove, then in the new version, you can just click on the button "Remove attachements" and they will remove from the comment.

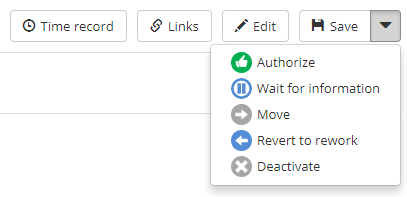
The right side of the screen serves for changing individual functions of the task and the status. When choosing Save, the parameter changes are made, not the tasks status. Choice Internal At the comment ensures, so that only users on the same page as the user editing the task can see the comment. In case this user is an agent, the comment will see all of the agents and service managers from the given pool. If it is author, the comment will see all authors and managers of the authors from the given pool.
In field Priority you can select the priority of the task. This priority affects the job order display order and, depending on the configuration, may also affect the sending of notification emails. The "Priority" field may not be available to the user depending on the configuration.
If a counterparty's response is required, whether solving or contracting, the task can be switched to status Waiting for the information. The task will be distinguished by the color of the icon, and users can filter only those tasks that are waiting for information from them.
You can also set this task to state New conditions,either a price or deadline. Price fields are filled in with integers, the currency is set automatically according to the language used, but can be changed freely. Defining new conditions may not be available depending on the configuration.
If the user's rights allow, the task is possible to Forward to other agent.
Co-agent is a role that allows the user to track the events in the task and contribute to it at the same level as the agent. The co-agent receives the notification as well as the agent and may comment on it. If the configuration allows it in the administration, it can also finish the task. Clicking on "Co-agents" will display the following window:
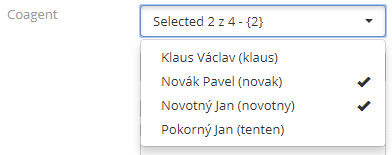
Here, simply mark the user from whom we want to make the co-agent. The co-agent of a given task can be determined by a agent or by any service manager.
Choice Move allows you to move the task to another pool. Clicking this option will display a form for entering a new task, except that it has already filled most of the values according to the original task. In the form, you need to select the pool to be moved to and click the "Save" button. However, the move is not complete - this will happen after the original task has been saved. At the moment the task is moved, it switches to the original pool archive in the special "Moved" state. The new task is created in the selected pool with the original object and description in the "New" state and contains all the history of the original task.
ATTENTION! If the original task contains dynamic fields and values that are not configured in the target pool, this information in the new task will not be displayed!
Choice Deactivate to deactivate the task. Deactivation will move task to the archive in the "Deactivated" state. After that, its status can not be changed, it can only be added to it.
Note: A task that contains one or more child tasks can not be deactivated, more in chapter 6. Links.
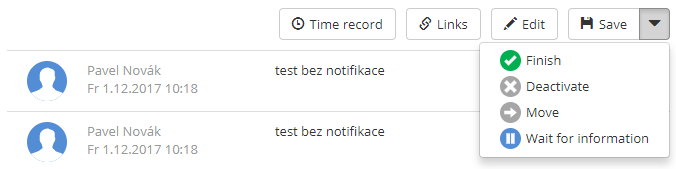
Once the agent completes the task, he switches the status to "Finished" by selecting the action button. This option is not displayed when the completion conditions are not met. In the basic workflow, a green icon appears when the task is ready for approval (viz Kapitola 5. Advanced workflow in TaskPol) or archiving.
It is allowed to finish the task to the agent (or co-agent), if it allows configuration. Every task can also be completed by a service manager, even if someone else is the agent of the task. The status change is again notified to all TaskPoole users affected.
In the task history, an icon is displayed next to the status. It is color-coded by the fact, in which the status is right now.

If the task is complete, it is automatically moved to the archive after 24 hours by the system. However, this option can be canceled or extended in administration, and archiving can take place manually, further by modifying with status change. If the task was archived once, the status can not be changed, only comments can be added to it. We know the requirement for archiving by the green icon. This is a state where the task does not expect any further action.
Table of Contents
Advanced TaskPoole workflow options can be activated for a particular Pool. It means that different rules for working with requirements and their workflow can be defined in each pool. The ability to define a pool of advanced workflow options is exclusively the administrator and the method of setting is described in the Administrator's manual in chapter 3.2. Workflow .
The advanced workflow can consist of the following loops:
A service manager or a manager of submitters authorizes a solution
The agent confirms the assignment
The service manager checks the tasks
The submitter confirms the tasks
Billing loop
On the upcoming diagram is described the entire process of processing the task. Expanding loops are marked in color.
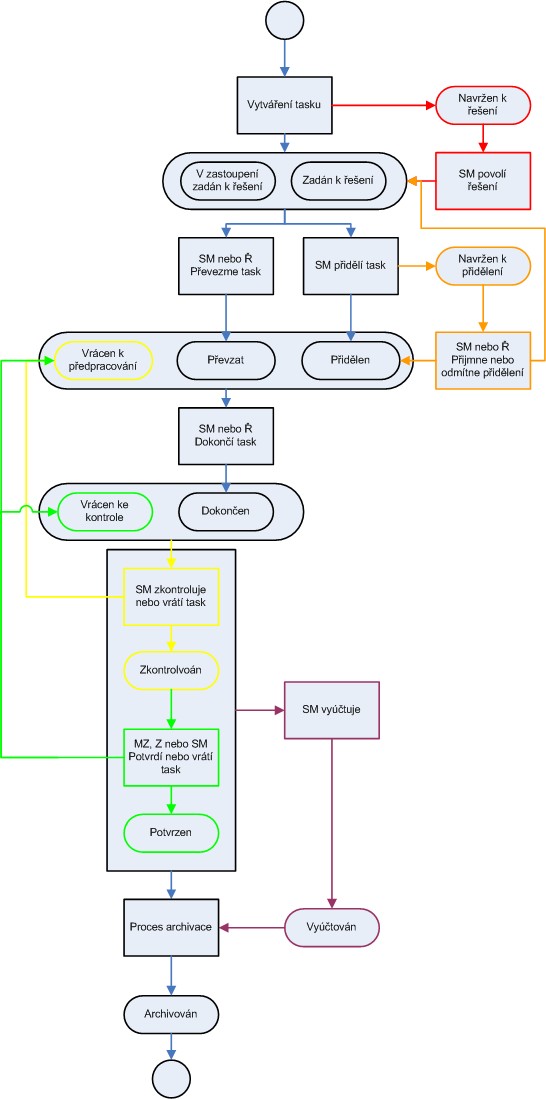
If the "Service Manager approves the implementation" loop is enabled, the newly entered tasks are based on "Waiting for approval of implementation". In this state, the task waits for a service manager step to allow the task to be resolved, and then it is possible to allocate the task to the agent. This loop finds use, for example, where filtering assignments are required by the agent party. It can be used, for example, when negotiating the conditions for the solution before the solution starts.
If the "Manager of submitters allows Solution" loop is enabled, the newly entered task is also in the "Awaiting Approval" state and this time awaiting permission from the contracting Manager of submitters.
If both loops are enabled, any manager may allow the task to be resolved. Enabling the solution task requires only one of these actions.
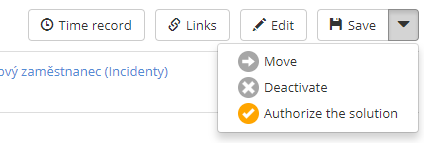
If the task waits for a permit to be executed, this state is marked in the details of the task, and the "Approve to Solution" option is displayed in detail or in the adjustment of the task with service managers and contracting managers.
In the workflow diagram above, this loop is marked with an orange color.
If the "Agent confirms the assignment" loop is enabled, and the service manager assigns the task to the agent, the task goes to "Designed for Allocation". The agent can either accept or reject the task. If the task is declined, the task returns to the "New" status and the service manager can reassign it to anyone else.
In the workflow scheme, this loop is marked with an orange color.

In some cases, it is advisable for the task after completion by the agent to be checked by the service manager. The service manager can thus check the correctness of the solution. In this case, it is necessary to activate the loop "Service Manager checks the solution".
The service manager checks the task in the "Finished" status and has the option to return it to the agent for reconsideration. In case of a correct solution, the service manager has the option to set the status to "Checked". In the event of an inappropriate solution, the service manager may return the task to the agent for reworking by using the "Return task" option. If the task waits for a service manager review, it has a specific green icon indicating the status "Waiting for check".
In the workflow scheme, this loop is marked in yellow.
This loop works similarly as "Service Manager checks requirements". Upon completion of the task by the agent, the task to the submitter passes and he / she confirms or rejects the solution. This loop is the loop "Service Manager checks the task" of the parent. If both loops are activated, the task completed by the investigator is first checked by the service manager and then confirmed by the submitter.
The submitter may return the task either to the service manager for re-inspection or to the reclamant for reworking. Whom the task will be returned depends on the settings in the administration. If the task returns to the agent, the status of the task changes to "Taken / Assigned", and if the service manager changes the task to the "Finished" status and awaits a new inspection by the service manager. If the task is awaiting acknowledgment by the submitter, it has a green color icon and the status "Waiting for confirm" visible in the task detail or at Workplace.
In the workflow scheme, this loop is marked in green.

Note: When the loop is on The submitter confirms the solution and a task is made by one of the agents parties, it can be confirmed either by himself or by any service manager and manager of submitters.
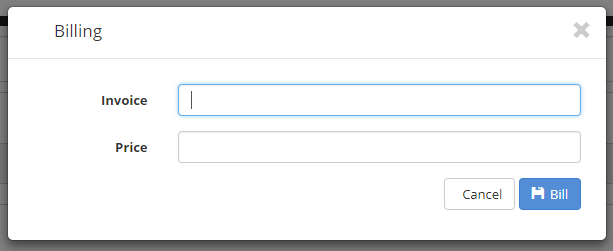
The billing loop is the most sophisticated of all loops. In the event that all available loops are activated, the billing loop appears after all other loops have been met. The task remains as long as it is complete (or a check or confirmation) for as long as the service manager does not tick the "Account" field. After checking this field, the task will go to the "Account" state and then it may be archived. When you edit a task, you can also enter the invoice number or tax document and the price at the same time. If the task waits for billing, it has a green icon and the status shown in the details of the task.
In the workflow schema, the billing loop is marked with a purple color.
Tasks may also include term, solution, and price. If a validation loop is turned on, any change to the solution or price must be approved by the authorized user. This may be a service manager, a manager of submitters or a submitter, depending on the configuration. The approval of the conditions takes place as well as the approval of the solution, when the task is modified.
The price can be proposed, confirmed or invoiced and can be filtered by all.
The ability to change conditions or to suggest changing conditions can be any user, depending on the configuration.
Individual tasks can be tied together, even across individual pools. Types of bindings can be two:
Subtask - A task that is subject to another task. The number of layers in the tree is not restricted. Each task can be a subordinate task for several tasks at one time. For this type of binding between the tasks, the subtask is bound to must not be finished before the subtask is completed. In practice, this means that a customer task can not be completed until we complete an internal task that is directly related to the task.
In the configuration it is possible to set the copy of the comment to the parent task when the subtask is finished (All subtasks have been ended, etc.).
Superior task - The opposite of a subtask. The task cannot be completed until all subtasks have been completed.
Simple link - Tasks are tied only by reference, workflow or one of the tasks is not limited. The links serve a rather informative purpose.
Merged task - Tasks whose status and comments allow you to change to them defined in the binding Main task. In practice, there may be multiple requirements on the same topic that can be done with the Main task at the same time.
Main task - The opposite of Merged task. This is a task, the change of which will cause the change of merged requirements (status or comment).
Bindings between tasks can be created when editing an existing task. To do so, use the "Links" button under the comment box.
An administrator can also define hard keys to create bound tasks, leaving out the need to select the type of binding and the target pool.
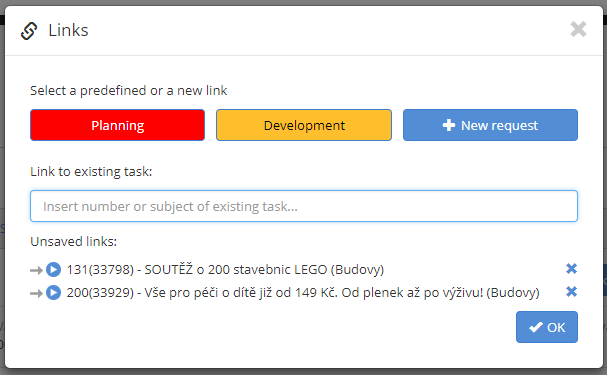
When you click on one of the buttons, a form appears to create the link type directly into a specific pool or a new one. You can also search for an existing task to create a new link.
As a subtask it is possible to create either a completely new task or to choose from already existing ones. Clicking on button New task will display the form to create a new task. A subtask can be created in any field to which the logged-in user has access and has the right to create tasks. The task form is the same as when you enter a new non-binding task.
All attachments to the original task appear in the subtask form. Using the checkboxes, we can specify which attachments are actually transferred to the subtask.
If we want to bind the existing task with an other existing task, click on the link form in the full text search box and type the number or text of the description to find the binding task. Then you can modify the type of binding by clicking on the arrow (equal arrow means simple link, arrow pointing right down is subtask).
After you create a new subtask and save it, or after choosing an existing task, we'll get back to the original task form. The subtask is marked on the Links button by a number. The task from which the subtask is created automatically becomessuperior requirement.
ATTENTION! We do not complete the binding until you save the original task!
In the details of the original task, the links that you created are displayed as follows:
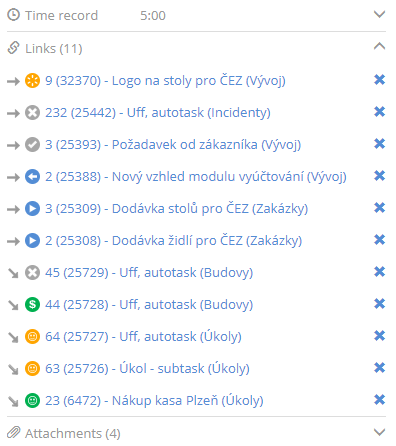
In this way, an unlimited number of subtasks and links can be assigned to one task.
Using a bulk operation, we can merge selected tasks into one, which will become the Main task. Using the main task we can then add comments and change the status of merged tasks that are related to the main task.
The merge flag is visible in the task detail by the name of the task.
Table of Contents
In most forms in TaskPool we can encounter dynamic fields. These are administrator-expanded data structures that can store different types of data. Dynamic fields exist for text, numeric, time, selection, etc.
Due to dynamic fields, the values stored for individual tasks are freely definable. The most common occurrence of dynamic fields is just the entry / edit task form. However, we can also see them on a user profile, etc. The field name can be arbitrary, it is always given in front of the given field.
The first field is Textfield, or a text dynamic field. It looks like most other TaskPool fields and accepts any text values. The maximum number of characters that can be entered in the field is specified by the administrator for each field separately. In practice, the text box looks like this:

The Textarea field is similar to a Textfield field, with the exception that text can be entered on multiple lines. This is, for example, a description or comment comment window.
The Select box can have any number of options and it is possible to select one. For example, a classic Selectbox field looks like this:
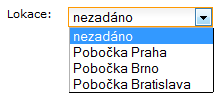
A so-called whisper may also work in the selection field. This is especially useful if Selectbox contains many options. In this field, we write down the name of the searched option, and automatically sort through the written text during writing.

TIP: The Selectbox field can also affect the task workflow, for example by changing the value of the field it is possible to complete the task. For more on this issue, see the Administrator's Manual in Chapter 5. Extending Dynamic Fields.
The content looks similar to the classic Selectbox, only the source of this data is not defined directly in TaskPool but in external SQL, or in another type of database. Setting up this field requires advanced knowledge of database issues.
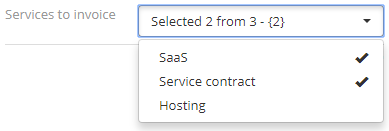
The Multi Selectbox dynamic field works much like the classic Selectbox, but allows you to select multiple options at once.
ATTENTION!!! To save a task, at least one option must be selected!!!
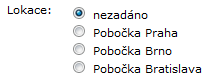
The Radiobutton field is a selection field, which basically matches the Selectbox field, only the appearance is different. Its advantage is the need for just one click to select the option, unlike Selectbox where you need two clips.
The checkbox is a checkbox. Its allowed values are "on" or "off".

We can, for example, determine whether the goods have already been dispatched or whether the defect has already been reported to the headquarters, etc.
The Number field is similar to the Textfield, except that it holds only a numeric value. TaskPool monitors field input values and does not allow numeric entries. To write decimal numbers, a decimal point is used (10.564 for example, 10.064 for the whole number).
This type represents the counter. The value entered in this field does not replace the original value when editing the task, but adds it. So, if you type 5 in the Counter field with a value of 20 when you edit the task, the value will be 25 in the field after the save. Each field change is written in the task history. You can also enter negative values.
The value of this field can be decimal (eg 15.27), while TaskPool uses the decimal point as in the Number field.
As the name suggests, the values of the date, time, or date with time can be stored in these fields. Then you can use advanced sorting options, for example in filters we can search for certain time slots. These values can be used by standard arithmetic operators (<, >, =).
Inputs are entered in the format:
Field Date - day.month.year
Field Time - hour:minute
Field DateTime - day.month.year hour:minute
You can use the associated calendars to enter data.

Blue field in the calendar indicates the current value, and the marked day indicates the current date.
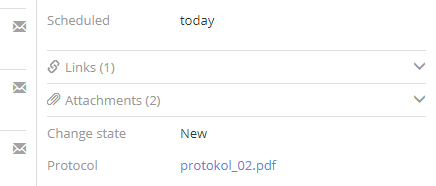
In addition to attachments that can be added to comments, you can create and display a specific attachment type and display it directly between dynamic poly. Examples are Offer, Contract, Invoice, Protocol and other types of attachments. This attachment can be overwritten new file and keep it up to date. The history of changes is recorded in the history in the task detail.
After pasting the link of the image into the comment, the given image will appear.

For faster searching and changing between images in the task, find image in the attachement on the right side or click on it. The image preview in the attachment list is the same as in the attachements in the task history.

You can use the arrows to switch to other images and back again like in the gallery. For closing the gallery click on the cross which you will find in the bottom right.

In the task detail on the right side is a list of the escalations, which took place above the given task. It is possible to remove it by clicking on the cross next to it.

For more detailed information about the co-submitter, click on the co-submitters profile on the right side of the task detail and a window with information about the co-submitter will appear.

A text field whose content is visually hidden from the author and other users (replaces * with characters).
A text field with a link to URL, FTP, mail-to, etc. protocols can be displayed. URL link opens in new browser tab.
Signature field, where can be entered a signature by mouse or by touching on the touch screen. Click on the administration on the profile and choose card Field. Add "New" and fill in the data, then save it.

Click on card Pools and search for a task, open it. In the card Pools we find a signature, check it and by "Edit access restrictions" set more parameters, then save it.

In the task detail get "Edit" and in the bottom right corner to the signature field write your signature, that can be removed by the cross. Save it and the changes will be displayed in the task history and the signature will be displayed in the bottom right column.

Table of Contents
The Service Level Agreement (SLA) extends the TaskPoole options to work with more times than just a classic deadline, over defined working days, hours and holidays. For example, we can plan detailed solutions for helpdesk tasks. The customer enters a helpdesk request and with SLA we can control exactly how long the agent needs to respond to the task and when the task must be finished.
We distinguish these SLA times. They can be defined either in days or hours.
RT (Reaction Time)
The response time is the time at which the agent must take over the task.
FT (Fix Time)
The time at which the task must be finished.
These SLA times are defined in the SLA schema, which can be more than one and can only be edited by the administrator. In each SLA schema, several SLA priorities are set. Each priority has RT and FT. SLA priorities are similar to classical priority, with the exception that they set the SLA times. For each priority, the individual times usually vary. For a better idea, consider the following SLA settings, for example.
SLA schema "First level", times for priority 1:
RT - 1 hour
FT - 8 hours
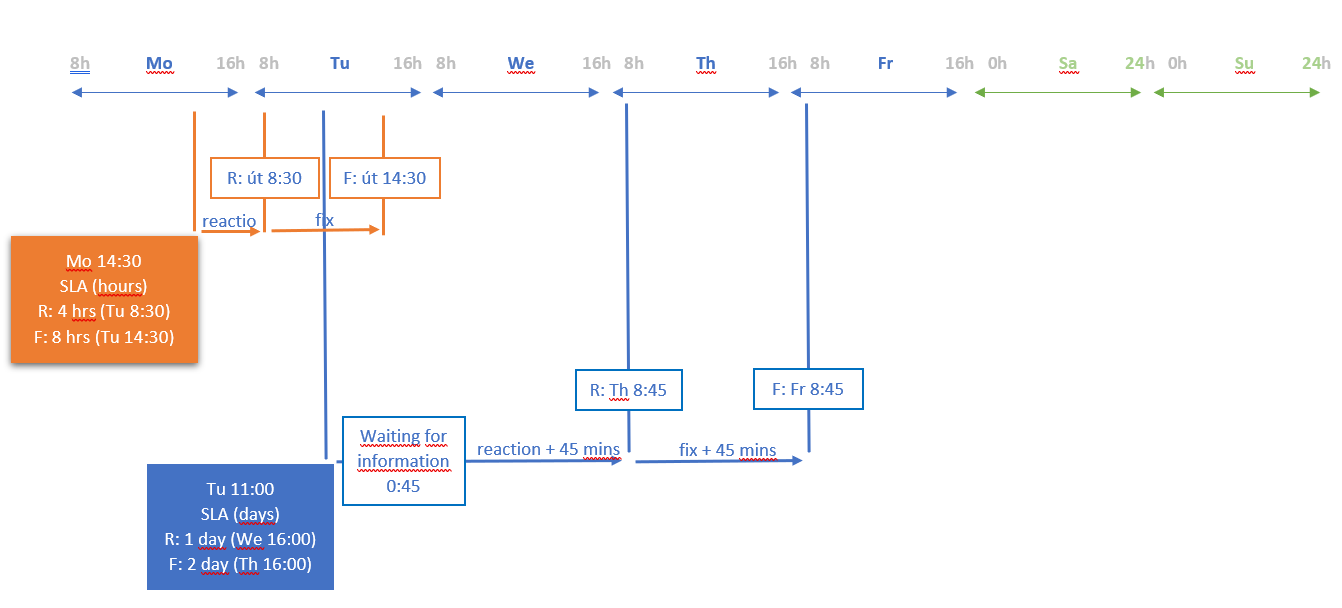
In addition, each SLA priority sets the working days over which SLA times are counted. These days are also set in the administration. Outsourced SLA times are not deducted. Consider working hours setting from Monday to Friday, every day from 8:00 to 20:00.
If the task is entered in working hours, nothing changes. E.g. if we place a task with priority 1 on Monday at 8:00, the response condition must be satisfied at 9:00 and at 16:00 the task must be resolved. If the task is entered before a business or non-working day, the start time for the next next (current) business day is set as the starting time from which SLA times are counted. So if you enter a task, for example on Sunday at 22:00, the start will be set Monday 8:00, and the individual times will be the same as if you entered the request on Monday at 8:00.
Note: SLA priority can be combined with classical priority, to use both values in the given field depends on the settings in the administration. In this way, it is possible to distinguish, for example, the internal priority for the research team and the priority for the external agent etc.
Note: In the case of SLA enabled wtih checked "Pause SLA if waiting for information or new conditions" and status change on Waiting for information or New conditions, the calculation stops and waits for switching to the Accept state.
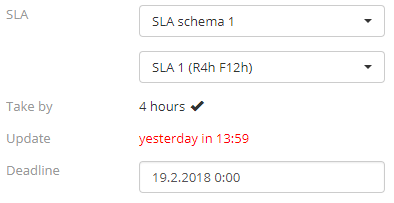
If SLA enabled, you see a different view of the Workplace deadline column. While the classic deadline only displays time to expiration and expiration date, SLA displays the hours and minutes of the end of the closest unfulfilled event with its mark (R or F) and icon, that indicates if SLA is running or waiting for reaction of the customer (state Waiting for information or New conditions).


With "R" being ReactionTime and "F" means FixTime.
The entry in the Deadline column displays the closest unfulfilled condition (R or F). All times are automatically subtracted according to the set schema, so they are not deducted in non working hours.
The following rules for displaying time apply:
Once the limit is exceeded, the time goes into negative and becomes red.
RT is written in black when adding the task, and the reaction for condition is grayed out, and it stops.
FT stops reading at the time the task completes.
We distinguish two types of FT:
Automatic - one that is determined by the defined SLA schema when creating a task.
Manual - while the Agreement to conditions (deadline) is on, we can enter own FT, eg in case of unfavorable development of the task. First you need to click the "Edit" button, then FT can be changed.
After this procedure, it is now possible to change the FT to the manual task. At the workplace, a manual FT recognizes an asterisk before a given time.
The rights to change FT to manual value are set in the administration. Rights are assigned to individual roles (service manager, agent, etc.) and individual statuses (assigned to the solution, taken over, etc.). So it's not always possible to change FT.
This manual FT can be changed back to automatic. Just change the SLA to another and back to the original, so the FT will be recalculated.
Table of Contents
In TaskPool you can use time records feature. It is a function to effectively track the time worked on individual tasks or even in all fields together. These records can also be exported to an external file, as described in the chapter 13. Reports.
The function is turned on in the administration and allows for each task to record the time worked divided into individual sub-activities. The list of activities is freely configurable and not limited by number.
If this function is active, the "Time Recording" button will be displayed below the comment in detail or edit the task.

Clicking on this button will display a form for entering a time record.

This form provides a description of the activity, the type of activity (defined in the administration), the start date and the start and end time.
Note: You do not need to enter the number of hours because TaskPool automatically calculates it according to start and end times. The second option is to specify the start time and the number of hours, and TaskPool counts the end time. You can set time records in the administration by entering only the number of hours, without additional times.
You can enter any number of time records when editing a task. To do this, press the button Add which saves the current time recording and clears the form for entering the next one. Button Save saves the current time recording and returns to the edit of the task. You still have to save the entire task for change.
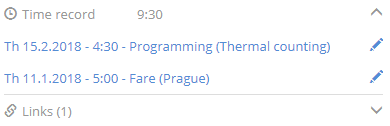
In the task history, the time recording is displayed similarly:

By clicking on each of the time records, you can edit it again.
The total number of hours worked on a given task is shown in the right part of the task detail window.
You can lock the already created time records. This means that the locked records can no longer be edited. This is a fully returnable action, so the records can be unlocked again. The right to lock is set in the administration (see chapter 21.1. Locking time records in the Administrator's Manual) and may be available to any TaskPool users. If the user has a right to lock, he will appear in the "Time Logs".
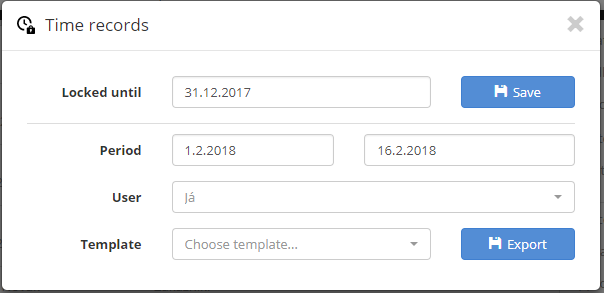
If we want to lock the time records, just set the date that the records are locked and save the settings. Records with a higher date can be edited further.
The Billing feature provides a quick and easy way to select specific time records and export them to an external file or prepare for printing, for example, as a basis for the invoice. The function is not primarily created directly for making invoice, we recommend using it to export time records to other systems, for delivery notes. The advantage of this feature is the ability to record time records from incomplete tasks.
Note: Every user who has the right to lock time records is entitled to create billing.
Click the button Billing in tools, we get to the screen for creating and editing individual bills. We recommend creating separate billing for each project.
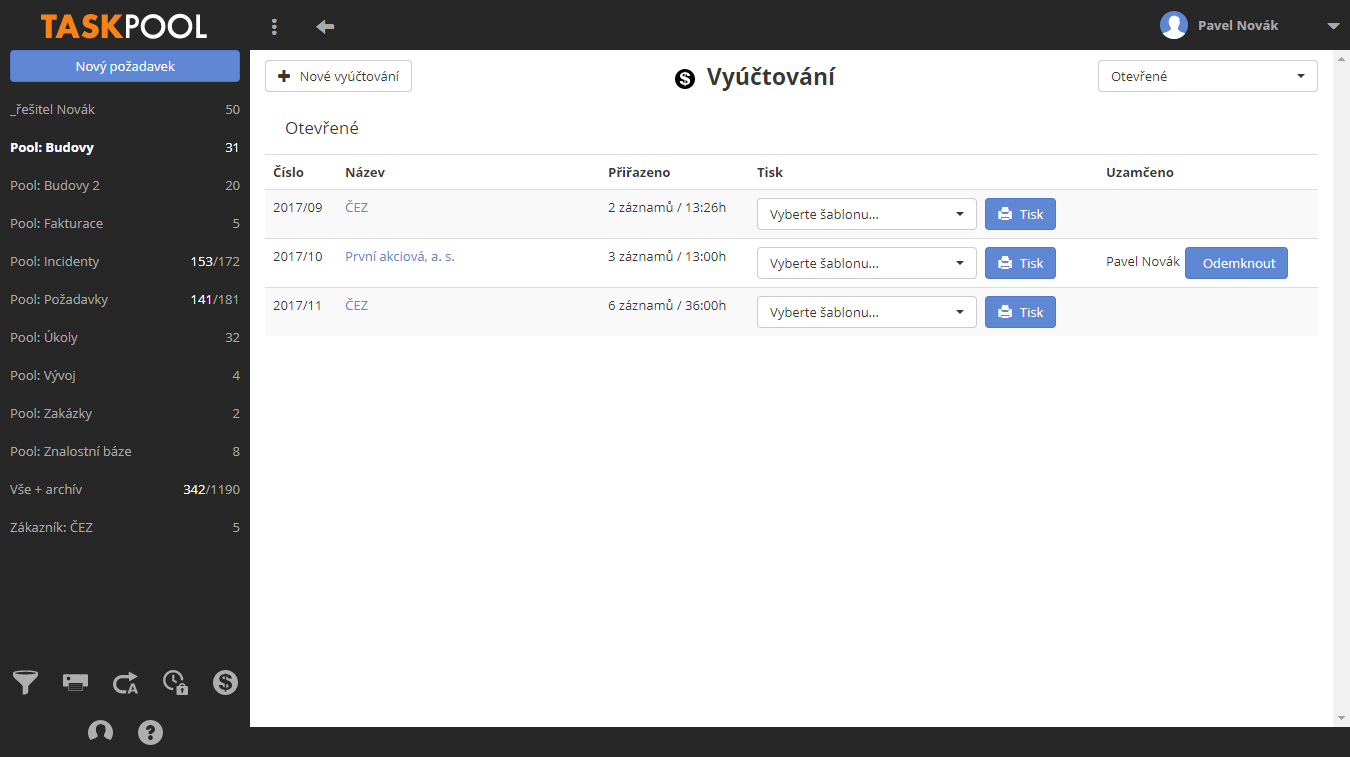
To create a new billing form, use the button New billing above list. Whenever a user's account is being edited, the account is locked to other users at that time, and the currently-editing user is displayed in the "Locked" column. When the user edits out, this information disappears. The cross is used to manually cancel if the editing user for some reason has not finished editing properly.
New billing
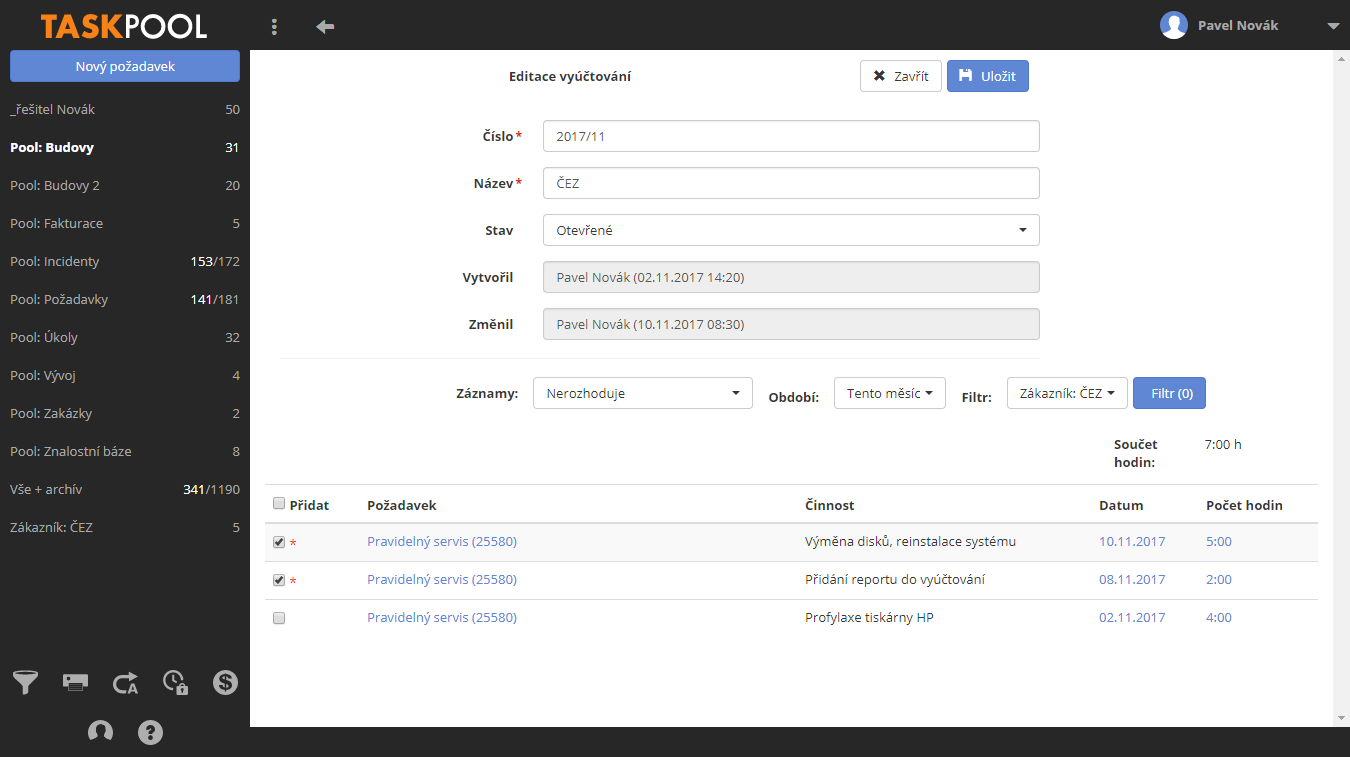
First fill in the account number and name (both fields are mandatory and can be changed at any time). When you open the newly created billing list, you will see a list of free time records that can be added to the billing account and to which the logged-on user has access.
By selecting Records above the list, we can restrict the selection to unassigned (Free) records and those already included in the billing option Add. The content of the displayed records can also be influenced by the "Period" and "Filter" buttons (either pre-defined by custom filters or by filtering under other conditions). Then you can check the records that are to be included in the billing statement. The check is made by selecting the optionAdd.
Note: The rule is that each time record can only belong to one bill. For this reason, we recommend creating at least one billing for internal performance that is not charged to the customer. As a result, they will not be included in the list of records when creating another bill for the customer.
Note: You can directly access the individual tasks that are contained in the billing adjustment (by clicking on the name of the task). You can also change unlocked time records directly by clicking on a specific record. Changes of times are after clicking on the buttonSave will log directly into the database and will also be reflected in the billing.
You can add and remove all displayed records by adding the record header header.
ATTENTION! We need to confirm or edit the bill at the final stage with the button Save at the top right of the form, otherwise the changes will not be saved!
Changes can be made to open billing. Once "Closed", you can no longer edit timesheets. There is also a third state "Canceled". We'll use it where the billing has lost any sense for some reason. The advantage of switching to this state is that all the time records contained in it become suddenly free for other billing.
ATTENTION! Canceling billing is an irreversible action!
Note: Adjusted billing is locked. If the adjustment is not unlocked after you finish editing, you can manually unlock the billing in the billing list. However, it is necessary to make sure that the person who locked the bill does not work on it.
We can export each bill using the button Print in the billing summary. A standard "Billing" template is available to prepare print records. It is possible to use other templates, such as for the mentioned export to other systems, etc., the issue of export templates is described in the administration manual in chapter 12. Templates. When using a standard template, we get roughly this result:
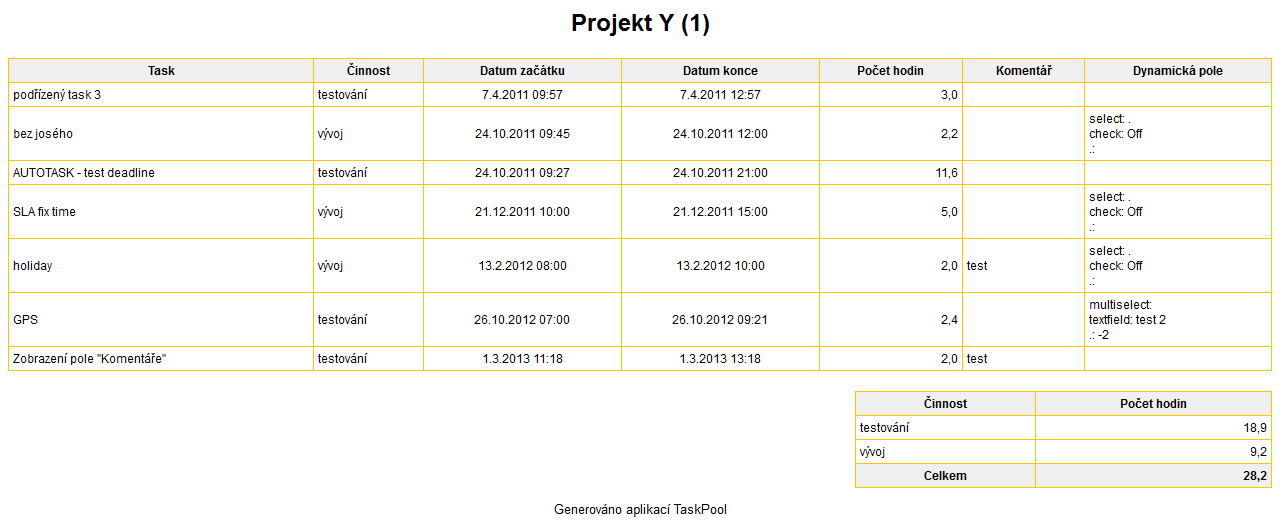
If more templates appear in the print list, ask your administrator for training.
Table of Contents
Filters allow you to define any rules for displaying tasks. We can then show tasks across all pools according to all the properties that are required (agent, priority, date, status, and many others), including a combination of these properties. For example, we can only show tasks that belong to the currently logged-on user, not yet received tasks, etc. Each filter has its name and a list of all available filters is displayed to the logged-in user in the left part of the workplace2.3. Workplace - filters).
Each user can create any number of filters with arbitrary conditions. It can follow the tasks of the agent, unrequested tasks, finished tasks, etc.
Note: Creating filters with conditions is not a trivial matter for a normal user, for a simpler and faster filtering option you can skip directly to the chapter 10.2. Advanced searching. The disadvantage of Advanced search is the impossibility to use some additional conditions, however all the basic conditions in Advanced Search are included.
We'll get the filters from the workplace after you hit the button Filters. The user's view looks like this:
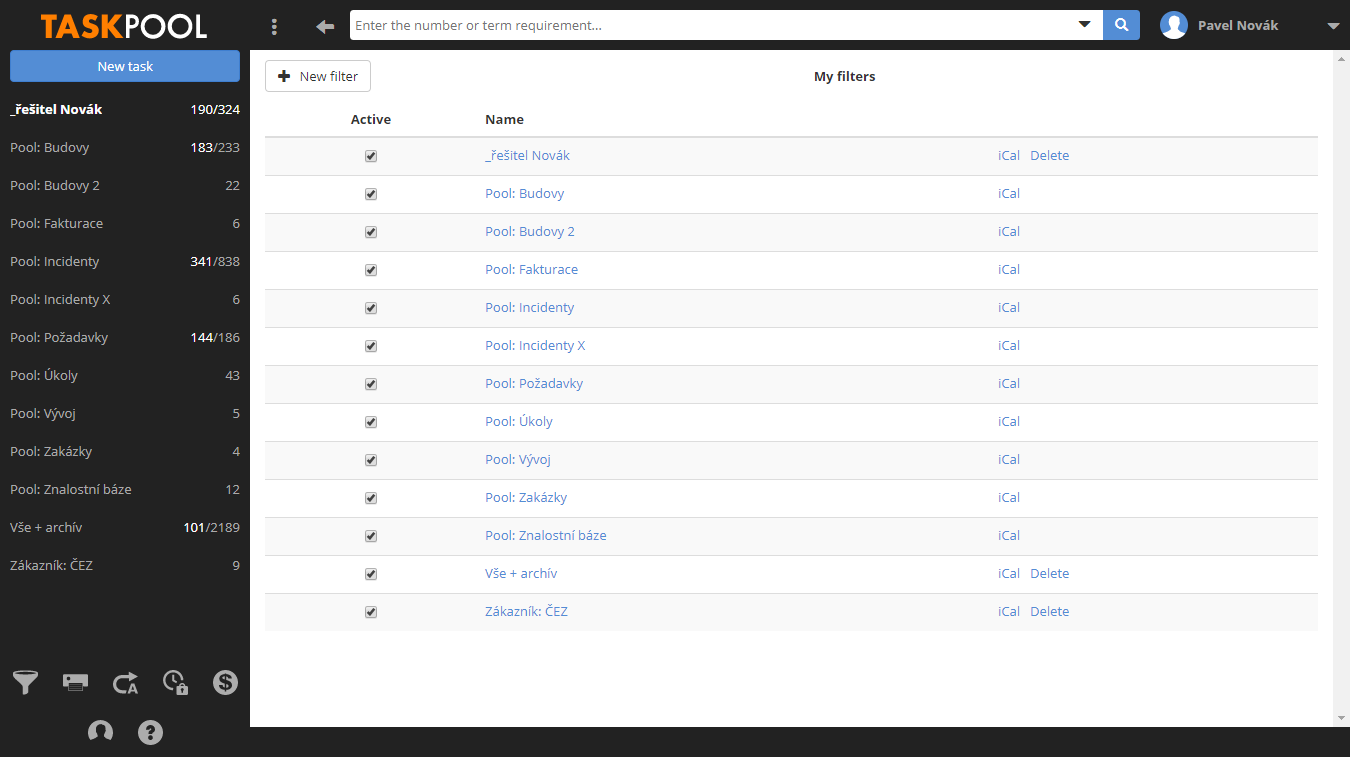
Filters with the prefix "Pool:" are default pool filters. These filters can not be changed.
There is one filter created by the user in the filter list in the image, namely "_řešitel Novák". This filter can be modified at any time. The form to create a new filter will be displayed when you click the "New filter" button. To edit an existing filter simply click on its name.
The "Export to iCal" button is dedicated to the chapter 11. Planning.
The form to create a new filter looks like this.
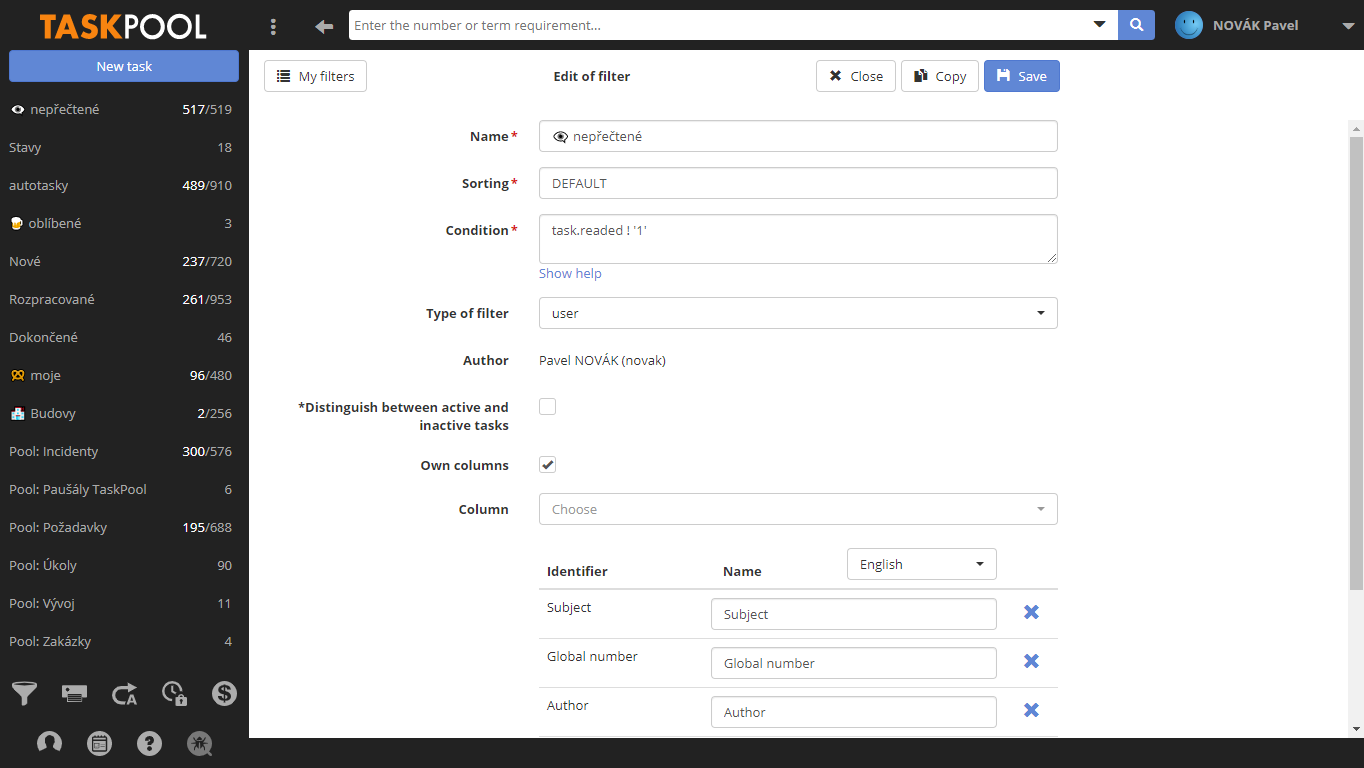
Name can be specified as needed. By name are the filters listed on the Workplace.
Choice Sorting determines the system for displaying the tasks of that filter. We recommend writing the "DEFAULT" option, so the ordering of the items remains the same as in the pool filters. For example, you can sort by task ID and its other properties.
Condition is a text area for editing an SQL query. Either we'll use the pre-populated from Advanced Search or put our own. Completing the condition requires more advanced knowledge of SQL. The current values needed to reach the parameters can be found in "Show help". You can use almost all tasking properties to define the conditions and use the "&" (AND - and) | logic operators (OR - or) conditions to combine.
If the box is not selected Distinguish archived / non archived tasks, the filters will include active, archived and deactivated together.
Choice Own columns unlocks the option to choose custom columns that will be displayed on this workplace tab. Mice can be selected for their order.
Examples of filter definition:
One of the most common parameters when defining a filter is "stateId", the status of the task. Each state is marked with a numeric code.
The input syntax is objekt.property. An object can be either a property or a dynamic array. If we return to the filter definition image, we see the condition:
task.poolId = 1 | task.poolId = 2
Due to this condition, we will see tasks in the filter that are in the pool with ID = 1 and ID = 2 tasks. For example, if we only want to view the tasks from these pools that are already completed, we will extend the condition to the task state stateId:
(task.poolId = 1 | task.poolId = 2) & task.stateId = 20
Note: When using the logical operator "|" (OR) must be bracketed due to a lesser priority than "&" (AND).
Other examples of filters:
task.isStarred = '1'- displays favorite taskstask.readed ! '1'- displays unread taskstask.takenBy = 2- displays user tasks with ID 2task.stateId = 0- list unrequested tasks from all pools that the user has access totask.stateId = 0 & task.poolId = 12- displays unrequested tasks from the pool with ID 12
We can use all other conditions in a similar way, the syntax of each condition is described in the "Task Properties" help under the filter definition.
Each filter can be copied with changed conditions, stored under a different name, etc. After clicking the "Copy filter" button on the filter edit form, the filter name is deleted. When you enter a new name and save, a new filter appears in the list and the original copy will be retained. You can modify the new filter any time before saving.
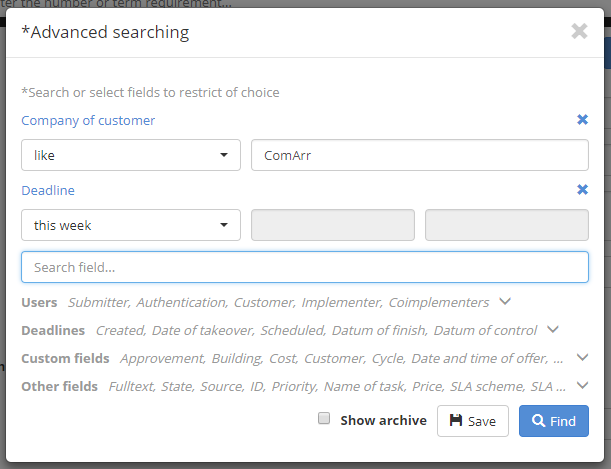
Advanced search is a much more enjoyable filtering experience for users. Its advantage is the simplicity of creating conditions without their complex definition. The advanced search further filters the tasks of the currently displayed pool, admin or user filter. Using Advanced Search is very intuitive.
There is also the option to use Advanced Search to filter through all tasks. For this, it is best to create the classic filter described in the previous subchapter, which will
have the condition: 1 = 1 . This condition is always met, so all the tasks the user has the right to see are displayed in the filter. It is also possible to turn off
the "Distinguish Archived / Non-Archived tasks" field in this filter and archive and deactivated tasks will be included in the selection.
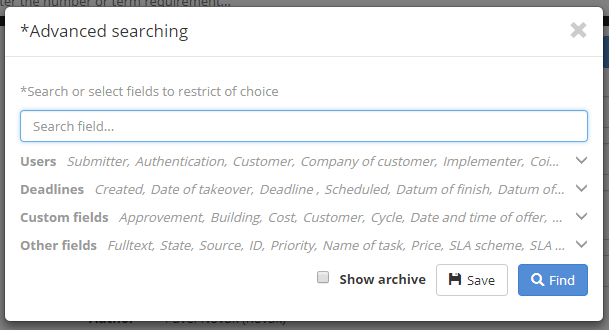
Click the arrow next to the magnifying glass in the search box to open the Advanced search window.
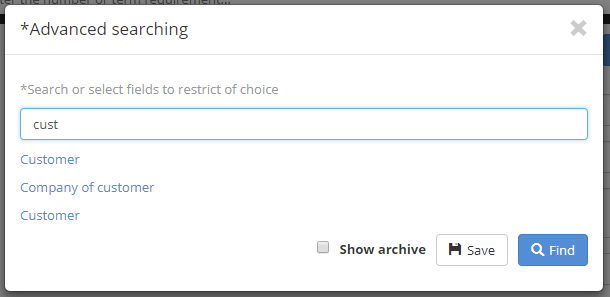
If we know the name of the item, we can use full-text search and list the name in the ready search box.
In this way, we can select other fields, where we then define a condition using the properties of a task such as the submitter, author, agent, deadline, etc. The values can be compared either by equality or inequality or in time intervals (equal, contains, smaller, etc.). This means that you can see, for example, tasks that were entered from January 1, 2018 to January 20, 2018, etc. Fixed values such as today, yesterday, last week, this month, etc. are also prepared for values comparing time. All search conditions can be combined.
You can save the entered values as a new filter using the button Save. Clicking on a button will display a form similar to creating a new filter, with the difference that it already has all the pre-filled values including name. These values can be randomized and saved to the filter after entering the name. This can be invoked at any time from the workplace filter menu and we do not have to reconfigure the new Advanced Search.
You can click on the cross in the upper right corner to cancel the selected values. If we want to include archived tasks in the selection, we will mark "Include archive".
To confirm your search at the workplace, press either the ENTER key or click on the magnifying glass icon.
Conversely, if you do not want to cancel the active search, you can simply undo the items in the search box or move the cursor to the last item, and with the Backspace key, delete each item and confirm with the CENTER key or clicking the magnifying glass icon.
Table of Contents
The planning function serves for a clear record of the schedule of individual tasks. You can schedule any task for any term or time. The Scheduled Requirements Scheme can then be imported into calendar software, tested by Microsoft Outlook, Thunderbird Lightning and Google Calendar.
If the scheduling feature is configured in the administration, another two fields appear in the task editing window:

Depending on the settings in the picture, we have work on a given request scheduled from 6.6.2017 from 10:00 to 6.6.2011 by 12:00.
You can use the module to schedule using an internal calendar Scheduler. It offers all unplanned tasks and allows them to schedule the individual agents in the calendar. The advantage is an overview of the plans of the selected agents, thus eliminating the possibility of planning multiple tasks for one term.
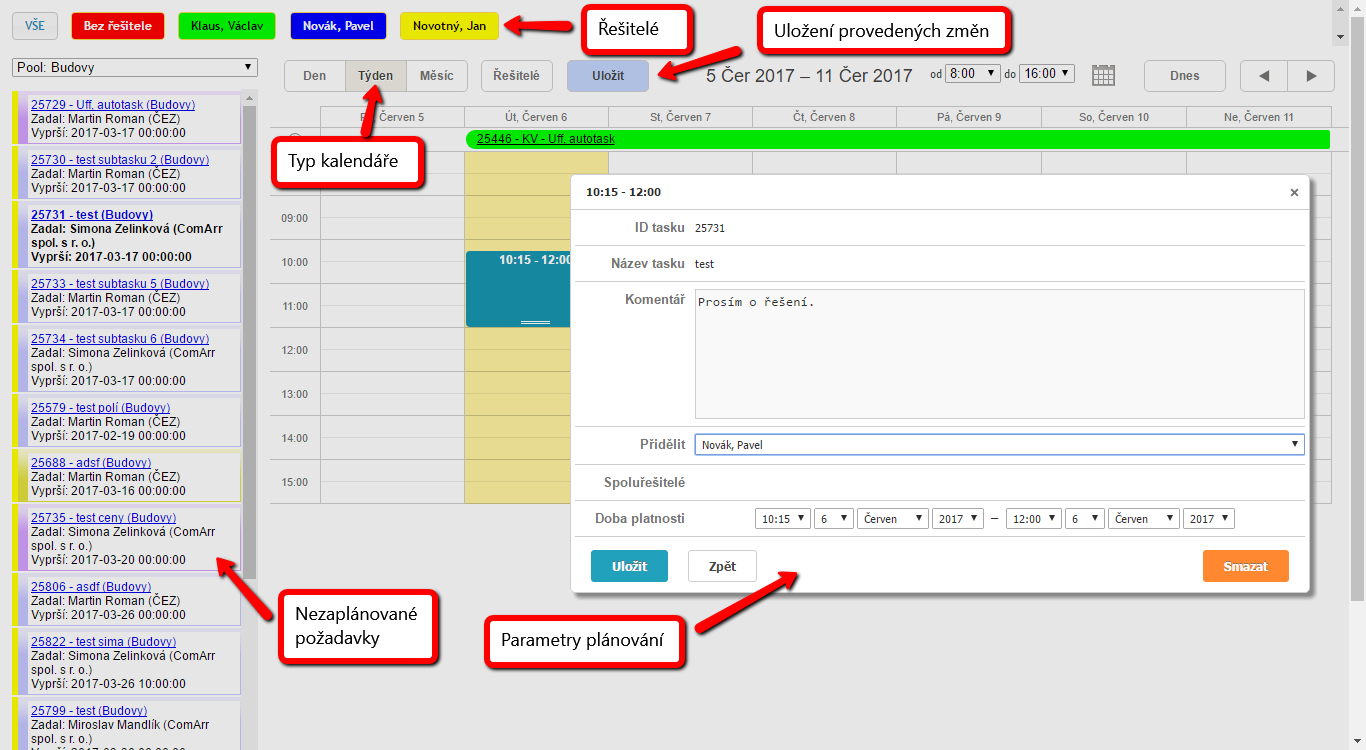
Scheduler can be accessed via a link to the scheduler.do extension (such as https://taskpool.net/scheduler.do) or through shortcut in the tools. It is necessary to register in the implementing role. Check your work at workagent designation, calendar type, and filter with unplanned tasks. Press button Save to enter the data into the database for individual tasks.
Exporting can be scheduled requests from any filter. The easiest way to export is from the screen of the filter list described in the previous chapter. To repeat, let's say we'll get to the list of filters from the workplace using the "Filters" button.
Click the button Export to iCal and your default calendar application will then open and export will take place automatically after the user has reconfigured the settings of the application.
If for some reason automatic import fails, action can also be done manually.
This manual will describe the import to Thunderbird Lightning, and the import procedure in other applications is similar. Use the optionFile -> New object -> Calendar... open the window to create a new calendar.
On the home screen, select "Network" because it will be a so-called remote calendar.
The format of our calendar is "iCalendar".
The URL of the desired calendar can be obtained in two ways:
Please ask your administrator for the URL of the calendar, as described in the Administrator's Manual in Chapter 3.11. Planning.
Right-click on the link "Export to iCal" and select "Copy Link Address".
In the next step, you just have to enter the name of the calendar, and then import data from TaskPool when finished. Updating your calendar data already depends on your software settings. Usually you can choose between automatic update for the selected time period or manual update.
ATTENTION! The URL obtained in the second way will look like this:
webcal://www.taskpool.net//iCal.do?ticket=J2jl5UVCkeKD8eo7dowI9lz8N%2BQTU4G%2B1Bs%2Bh5sPMIA%3D
If we access TaskPool through the protocol "https: //" (this is seen in the address bar of the browser at the beginning of the address), the start of the URL for the calendar is generated as follows:
webcals://www.taskpool.net//...
If this setting does not work, try using the link without the letter "s":
webcal://www.taskpool.net//...
Table of Contents
The TaskPool system allows you to automatically set up specific tasks periodically over the selected time period. These tasks are called autotasks and are used for repetitive tasks such as daily server backups, monthly billing, customer visits, and so on.
The frequency of autotasks can be daily, weekly, monthly and yearly. Creating a self-tracking bundle is subject to the same rules as establishing a standard task, so the user in question must have rights to set up.
We'll get to the auto-tracking report from the workplace via the "Autotasks".
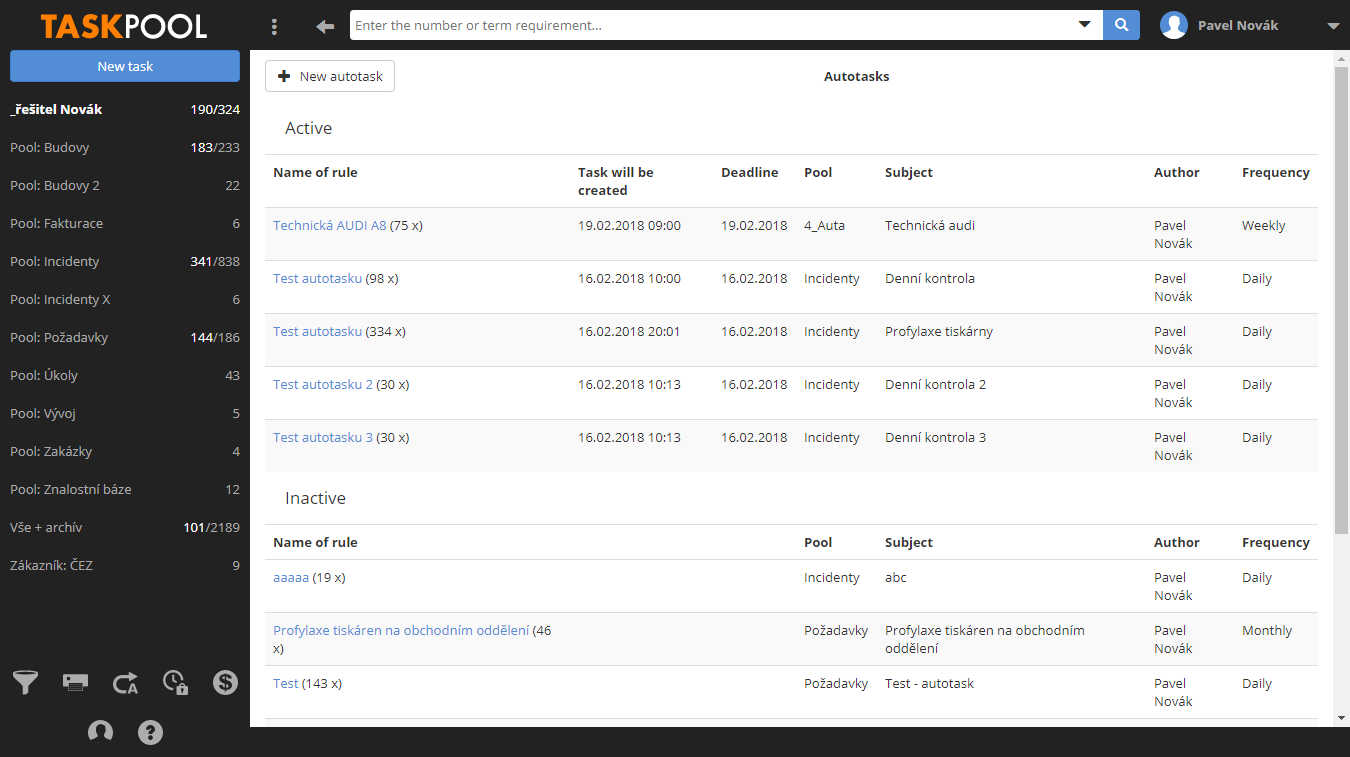
At the top are active autotasks and at the bottom are inactive and finished (each autotask allows you to set the validity period). We also have the ability to see basic information about autotasks, such as the date of its next start, the deadline, the pool to which it will be based, the subject, the user who will be shown as the author of the autotask and the frequency of its creation.
Note: The number in brackets after the autotask name indicates the number of already created tasks according to the rule.
The new autotask is created using the "New" button and the "Workplace" button is used to return to the workplace.
You can edit a autotask by clicking on the name of the autotask rule. The "Copy" button makes it easy to edit the autotask that has already been created without losing the original one.
The top of the window to create a new autotask looks like this:
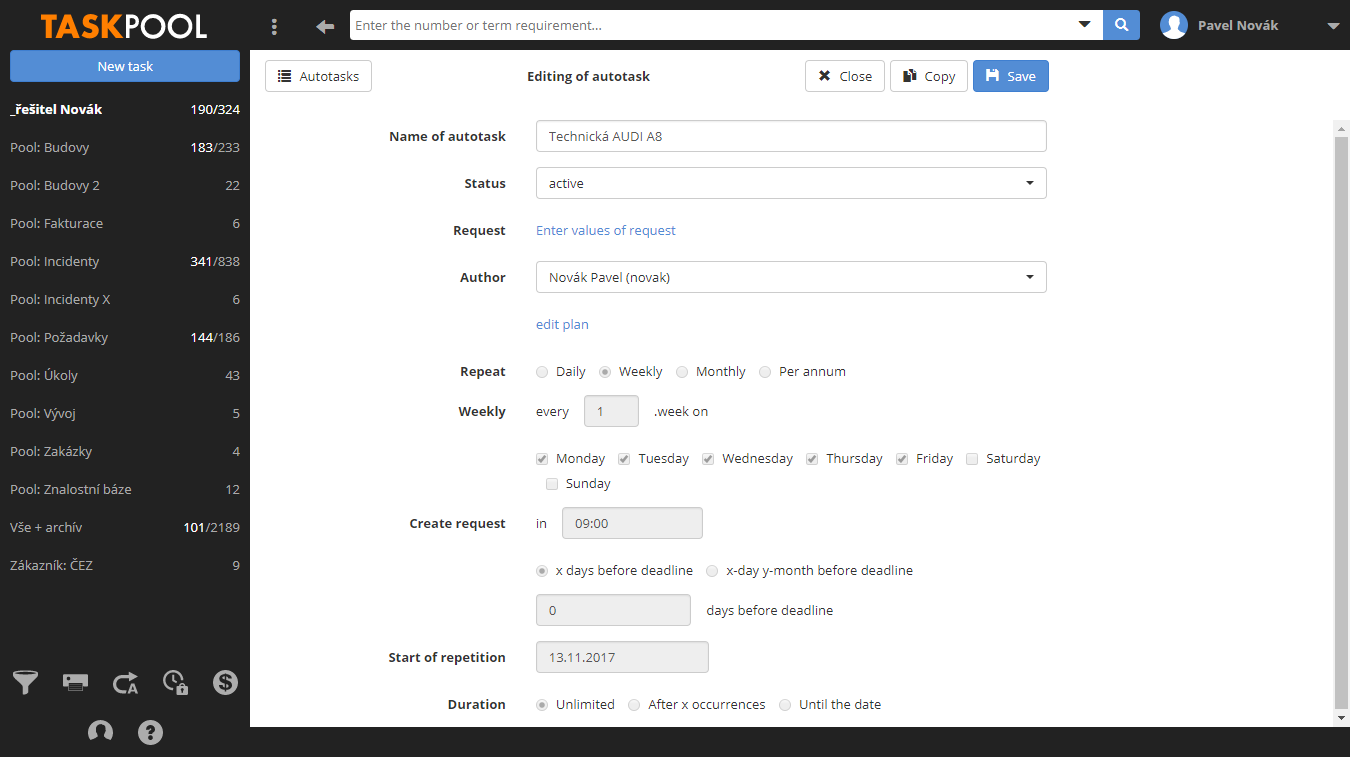
This part of the form differs from the standard task form in just a few details.
Rule name has no effect on the resulting autotask, this name will only appear in the autotask overview as its identifier.
Autotasks can not be deleted because it can be linked to other parts of the system, but it can be deactivated by using the optionState.
The rest of the values are the same as when creating a normal task except the value Author. This option has only service managers set up to task and can then specify any user from that pool, who will then be listed as the task's founder.
At the bottom of the new autotask form is setting of time.
Item Deadline determines the expiration date or the deadline for the autotask. After setting a specific value, we can click the button Recalculate and TaskPool calculates two dates for the next autotasks. We have a choice of individual variants:
Daily - Autotask will be created in days. It is possible to set the periods in which, for example, every day, every other day, every third day,

Weekly - Here you can precisely set which days of the week the autotask will be created. It is also possible to set the repeat after several weeks, eg the task is created every Tuesday every 14 days.
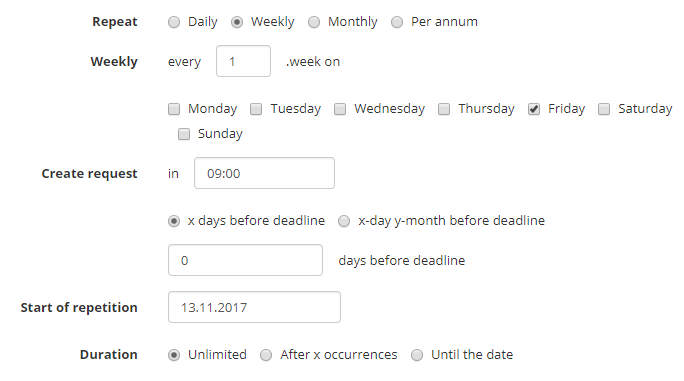
Monthly - With this option, it is possible to set the number of days the autotask will be set up and how many months, eg every 5th day of the month every 2 months.

Annually - Here you can set the exact autotask date.
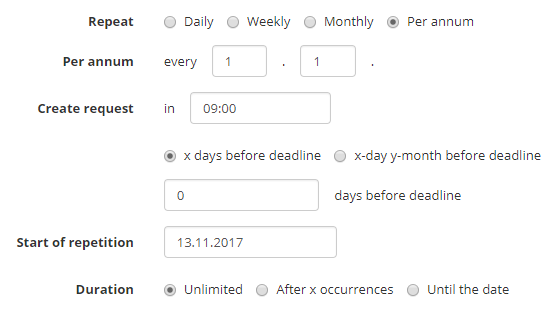
There is a option to let you set how many days before the actual date the autotask will be created (it can be set to 0) and the exact time to create the autotask.
The autotask can also be set to the exact month, so we can use it for example to write a monthly book of rides, etc.
If we set the expiry date on the 31st of the month, TaskPool will automatically recognize the months that do not have 31 days and automatically set the deadline for example on the 30th day. This autotask will therefore always be created on the first day of the month and the expiration date will be the last day of the month.
In addition, it is necessary to set each autotask Repeat start: ie from which data the timing will be set.
The last item is Duration: of autotask. The "Unlimited" option will guarantee that the autotask will be set up until it is manually deactivated by the administrator. Another option is to deactivate the autotask after a certain number of occurrences, or until a certain date.
Button Run serves for a manual start for autotask, which will create new task.

Table of Contents
TaskPool allows you to export all information about tasks to external files. These files can then be processed using other software such as MS Excel, MS Outlook, Thunderbird, text editors, and so on.
There could be unlimited numer of export templates, depending on your TaskPool configuration. Export templates are fully configurable diagrams that can be used to specify how and in what format the listing will be executed. It is possible to export tasks from the current pool, filter, or save the task itself as a separate file of another format. Even math operations can be performed with these task data. For example, you can only export some dynamic fields, count the sums of some values, group values, or create a custom page layout.
Only Administrator has the right to create and modify templates. He can then access them by pool and roles to other users. So, if there are more than one option in the template list in the template list, just ask your administrator for training on these templates.
Using the icon Reports you can use all of these features using the icon in the workplace menu.
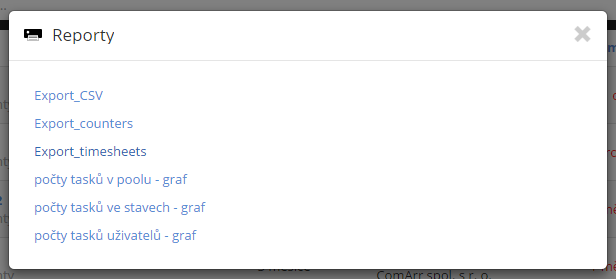
Each of the features always applies to all tasks that fall within the currently displayed filter. Thus, if the default filter of the pool is displayed, all the active tasks of the pool are exported. If one task is displayed, the export will contain only this one.
Print without comments creates a list of all the print version, ie with a white background and a minimum of colors. We will also do this by clicking on the "Print" icon itself. Print with comments creates a similar print template, but a listing of all comments to it will be added to each task.
There are other print templates along the line. These three are implicit for service managers. Administrator can also set their display for other roles. Print template Export_CSV prints all currently viewing tasks to CSV format (can be opened in Excel), each row representing one task and each column specifying a task value. TemplateExport_counters prints all values of the dynamic counter fields (more about dynamic fields in chapter 7. Dynamic fields). Template Export_timesheets exports recorded time records (more about time records in chapter 9. Time record ).
The other three options show statistics charts whose names are quite intuitive.
If the menu contains additional items, these are the above-standard user templates, and ask your administrator for the training of their features.
The following subsection will show an example of the most used export, in CSV format.
TaskPool using CSV export enables the current filter to be saved as a data file. From this file you can then load data into various office applications such as MS Word or MS Excel. The CSV file can also be handled by most database systems.
To export data to this file type, we first select the filter that we want to include in the export. When you click on the "Reports" icon, the Print Template Selection menu appears, and then just click on the "Export_CSV" option. The form of the currently used browser for downloading the file, which will be named "export.csv" will be displayed. For a further work with the file, we will save it to disk.
You can open the exported file in Excel as a classic document. Each row then represents one task and each column contains one task information.
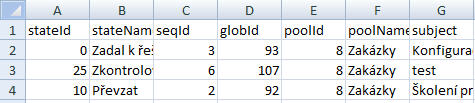
The meanings of each column are as follows:
stateId - ID of the state of the task
stateName - name of the state
seqId - pool number of the task
globId - ID of the task
poolId - number of the pool
poolName - name of the pool
subject - subject of the task
Description - description of the task
createdDate - date and time of create of the task
createdBy - ID of submitter
createdByHdLogin - login of HD user (more about the Helpdesk in the chapter 14. Helpdesk)
createdByHdCompany - HD company
deadline - deadline
toDeadline - days to deadline
takenDate - date of takeover of the task
takenBy - name of the agent
takenById - ID of the agent
finishedDate - date of finish of the task
priority - number of the priority
priorityLabel - name of the priority
reactionTime - reaction time (more info i chapter 8. SLA)
relativeReactionTime - relative reaction time
fixTime - time to fix / finish
relativeFixTime - relative time to fix / finish
slaSchemaId - ID of SLA schema
slaSchemaLabel - name of SLA schema
slaPriorityId - ID SLA priority of the task
slaPrioritySeqId - sequential SLA request priority ID
slaPriorityLabel - name of SLA priority
firstTakenById - ID of the agent who takeover task as first
firstTakenBy - name of the agent who takeover task as first
firstTakenDate - date of first takeover of the task
Table of Contents
The Helpdesk module is used to separate the TaskPool agent interface from external users (customers) using web forms. A Helpdesk user may not have access to TaskPol at all, but may still base and comment on tasks.
When a customer enters a task via the web interface, TaskPool will establish this task as a helpdesk task that we continue to work with as an internal task.
The Helpdesk user acts as the submitter. If the agents party responds to the task, the customer will be notified of the response to his task and will be able to respond again via the webform.
This chapter describes the basic process of assigning and processing the task, both from the customer's point of view and from the point of view of the agent. All pictures are for reference only. The settings of the content and appearance of the helpdesk forms are fully configurable and the system of their creation is described in the administration manual.
The first Helpdesk page varies depending on its configuration. Helpdesk allows you to log in with or without logging in or a combination of these options. The advantage of logging in is that the helpdesk user already has pre-filled personal information when making a task. He also sees an overview of all his previously entered tasks and can continue to work with them. The sign-in screen may look like this:
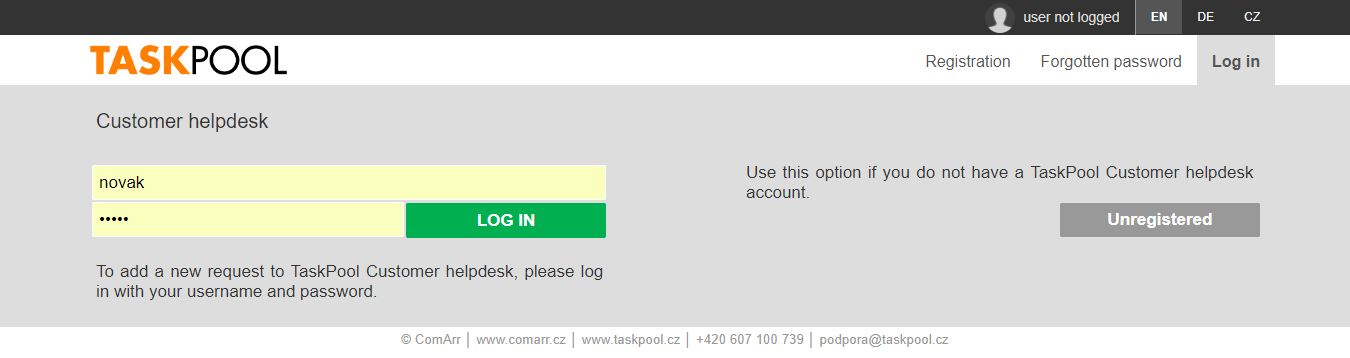
The "Forgot Password" link is used to reset your password to an existing account. We use the "Non-registered Entry" link to enter the Helpdesk without entering your login and password. Sometimes it is also possible to register a new helpdesk account by the user, without having to contact customer support of the Helpdesk.
The customer has the option to enter a task either via a web form or by e-mail (see chapter 14.4. Helpdesk e-mail interface ).
In the example of communication via Helpdesk, we will use a user who logs in to the Helpdesk using logins and passwords. We will also be able to describe the features that access does not allow without login. It's easier to get to know when someone is logged in because they already have a pre-filled personal data (name, e-mail, phone).
The communication takes place in a way that the customer enters the task and is informed by the web team and by e-mail thanks to his acceptance team. These thanks to a link to the details of his task, where the task can be worked further. In TaskPool, the task appears as a new helpdesk task. If someone responds to this task, the customer is notified of this again by e-mail notification. The agent can answer using the form in the details of the task. In this way, there is an interaction between the agent and the customer until the task is completed. The following steps will be discussed in more detail in the following subchapters.
The request form may look like this:
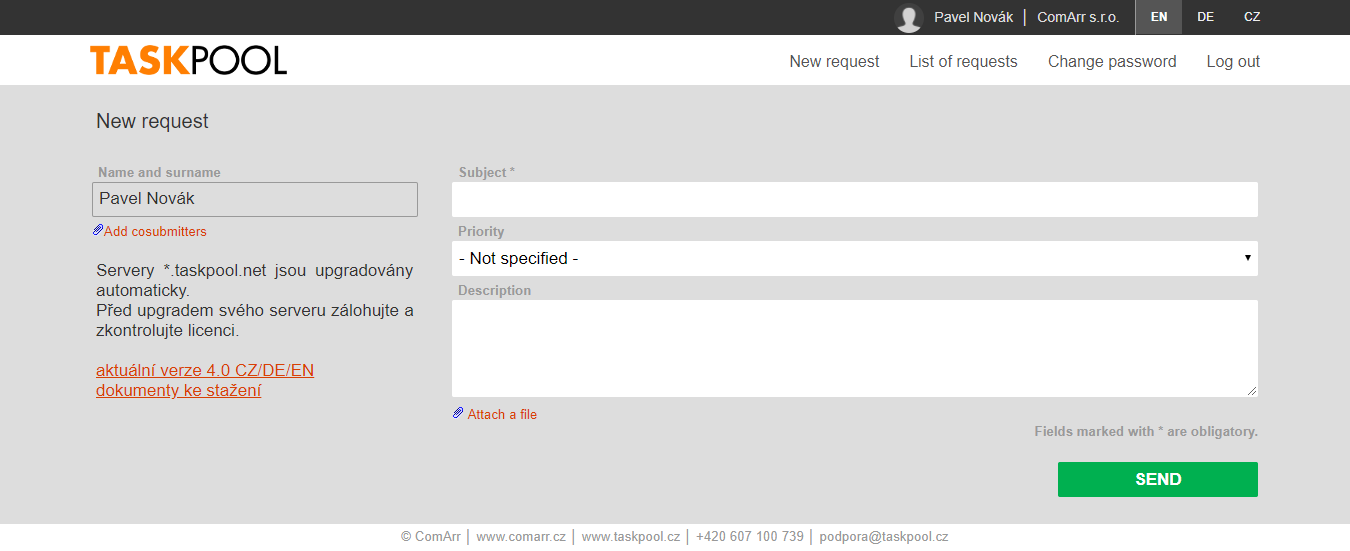
All fields filled in will be transferred to the Workplace request. Choice Co-submitter allows the assignment of a further helpdesk submitter to the requested task, which will also receive notification e-mails about changes to the task and may contribute to it. The co-submitter may be even more, and as a rule all the helpdesk submitters of the company are available. In the field Text a description of the request is written. It is also possible to attach any number of attachments.
Depending on the specific Helpdesk settings, the form may contain additional fields. Some of these may not be included, however, the form is usually very intuitive.
Once the request has been submitted, the abovementioned acknowledgment is displayed with a reference to the task. An example of a web thank you is in the following picture:
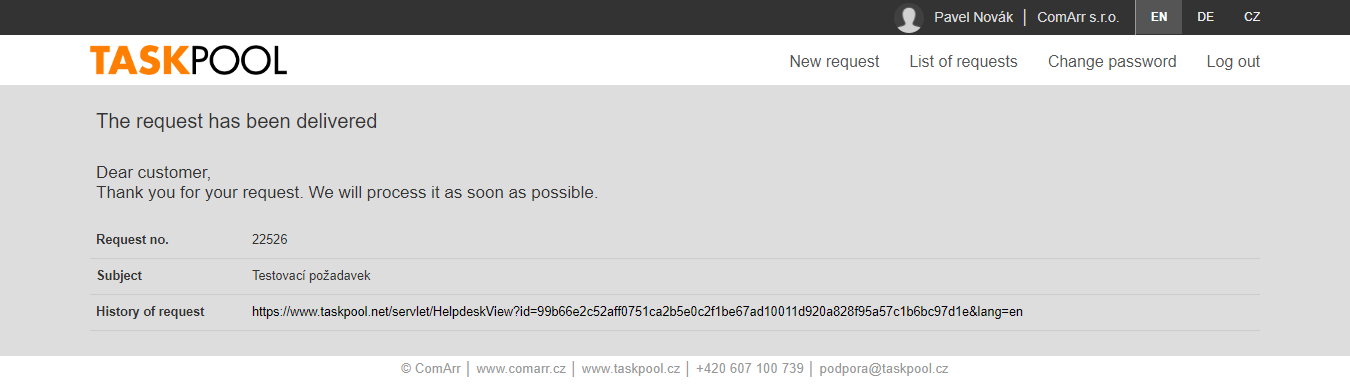
This information will also reach the customer on the specified e-mail. This reference points to the details of the task. The task detail looks like this:
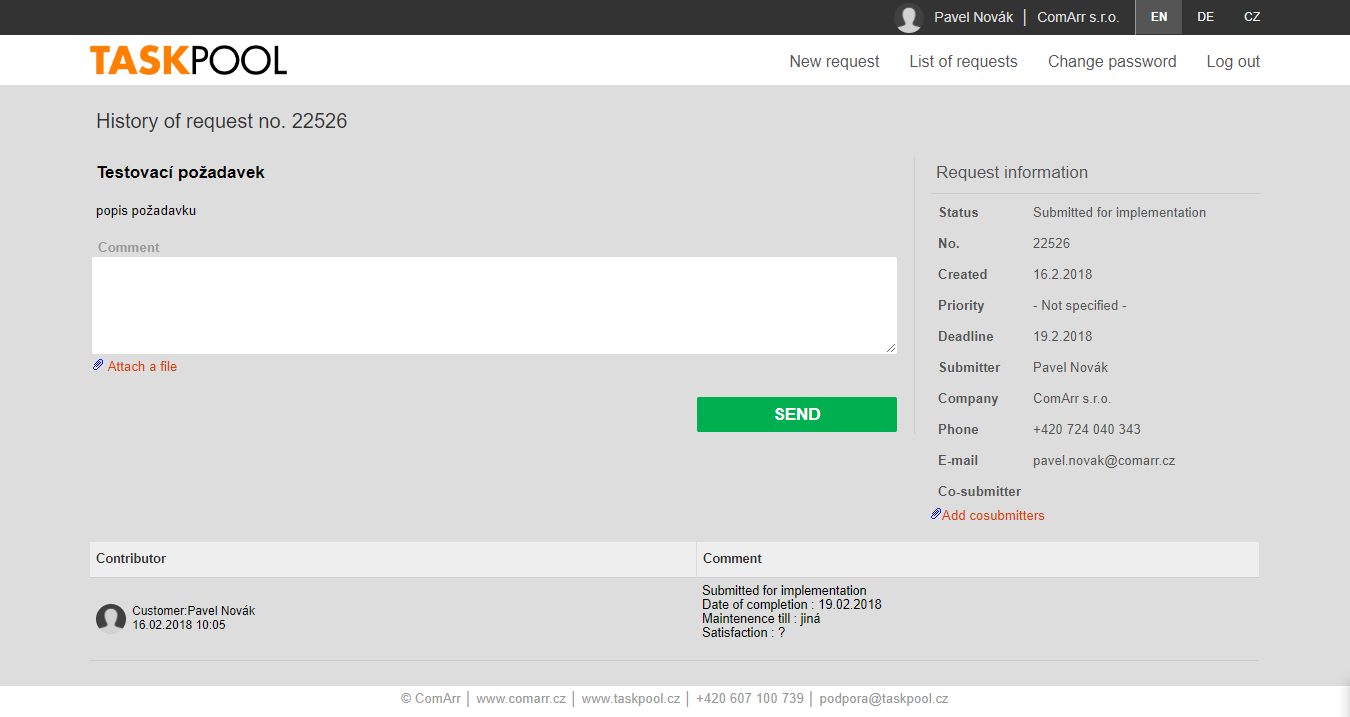
At the top is the subject and description of the task, in the right part there are other up-to-date information about the task.
In the middle, you can add another comment to the task.
At the bottom, we see the complete history of the task, except for the hidden actions of the agents party.
The following options are available only when the customer uses logins and passwords to log in to the Helpdesk. This is above all an overview of all the requirements entered by the customer and changing the password for the user account.
In this Helpdesk, click on the "Your tasks" icon in the request list.
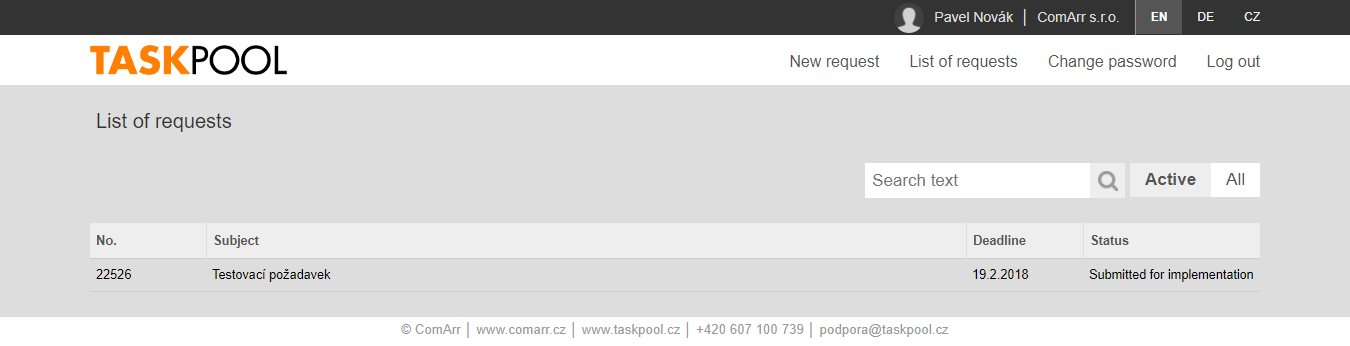
In this window, we see all the tasks entered by the logged-in user. After clicking on the subject of any request we get to his details. Requirements can be sorted ascending or descending according to all available values by clicking on the column name.
The Helpdesk user here also has the ability to change the password to their account. This is done by clicking on the "Change password" button, asking for the original password and the new password, including the confirmation.
When solving the helpdesk tasks, the customer plays the role of the submitter, so he does not see actions that only the agents party sees, such as hidden comments, etc. A public comment will appear in the customer task list history and the notification will be sent.
Customer data can be changed. This is used, for example, if a customer enters the task without logging in and then someone from the agents team creates login to the Helpdesk. In this case, the customer must be assigned to the login. Data changes can also be used if the customer enters the data incorrectly, eg a typo in the email address makes it impossible to send notifications of changes to the task. To modify the data by clicking on the customer name, the following form will appear:
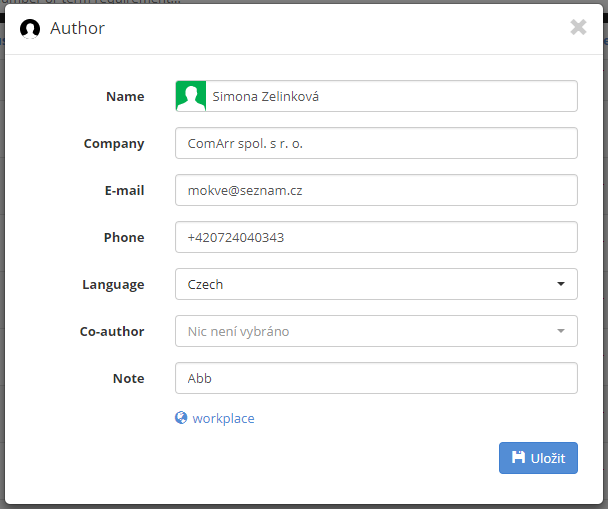
In the box Name can be searched for available validations. Authentication is a database where customer records are located, which then log in to the Helpdesk. Authentication is solely defined by the administrator. It is also possible to completely change the helpdesk submitter. If you do not search for a defined submitter when entering a name, email, company or other data, we select the option New customer. Once you enter the database, we can change the submitter to a registered one. When the submitter changes, the original contact loses access to the task and at the same time stops receiving e-mail notifications. These rights shall be transferred to the newly selected submitter. Use the option Co-submitters it is possible to add co-submitters to the task.
In addition, customer e-mails can be extended by additional email addresses in the submitter window, to which the same notifications will be sent as a registered or unregistered customer. Just add another to the e-mail. Individual e-mails are separated by a comma and space, eg: email1@domain.com, email2@domain.com, email3@domain.com, etc....
The Helpdesk request is completed on the TaskPool by the agent, as the customer plays the role of the submitter on the Helpdesk. Once the task is complete, however, the customer has the opportunity to reopen the task. Reopening is used, for example, in cases where the customer is not satisfied with the solution. Depending on the Helpdesk settings, it is possible to reopen either by a customer's comment or by changing the dynamic field value, if a dynamic field controlling the task workflow is defined. This allows you to open an archived task. A single task that can not be reopened is deactivated.
Helpdesk requests can also be created by sending an e-mail to a predefined e-mail address. When a agent responds to a request, the customer does not receive the notification with a reference to the task, but the response comes directly to the mailbox as a response to his e-mail. He can answer that again and this way communication is taking place. The customer may not even know that there is a Helpdesk or TaskPool. The E-mail Interface must be set up by the administrator at a specific Helpdesk.
The so called Knowledge Base can also be defined on Helpdesk, which usually contains a list of frequently asked questions and answers. This Knowledgebase can also be accessed for users entering the Helpdesk without logging in. The Knowledge Base can, like the Helpdesk, be defined by the Administrator. They can also display customer satisfaction requirements for the helpdesk already solved.
The knowledge base can look for example as in the following picture, after clicking on any question we get to its details, where we can find a more detailed description.
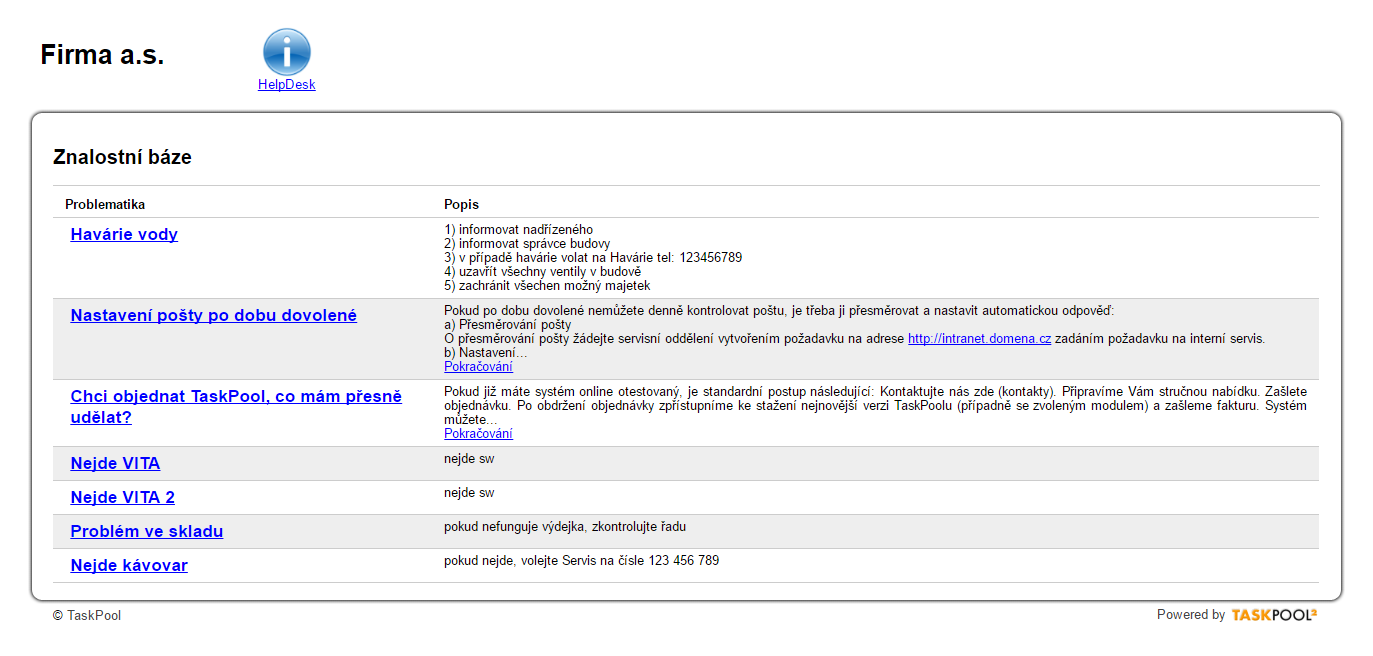
Table of Contents
EDM is primarily used for internal customer database management. You can create Companies and add individual Contacts to them. So every contact must be assigned to one particular company.
Access to EDM is granted to individual users by the system administrator. To open the EDM, use the tool icon in the Workspace.

Each company has an arbitrary name with a maximum width of 50 characters (expanding the database by manager if necessary).
To create a new company simply enter its name.
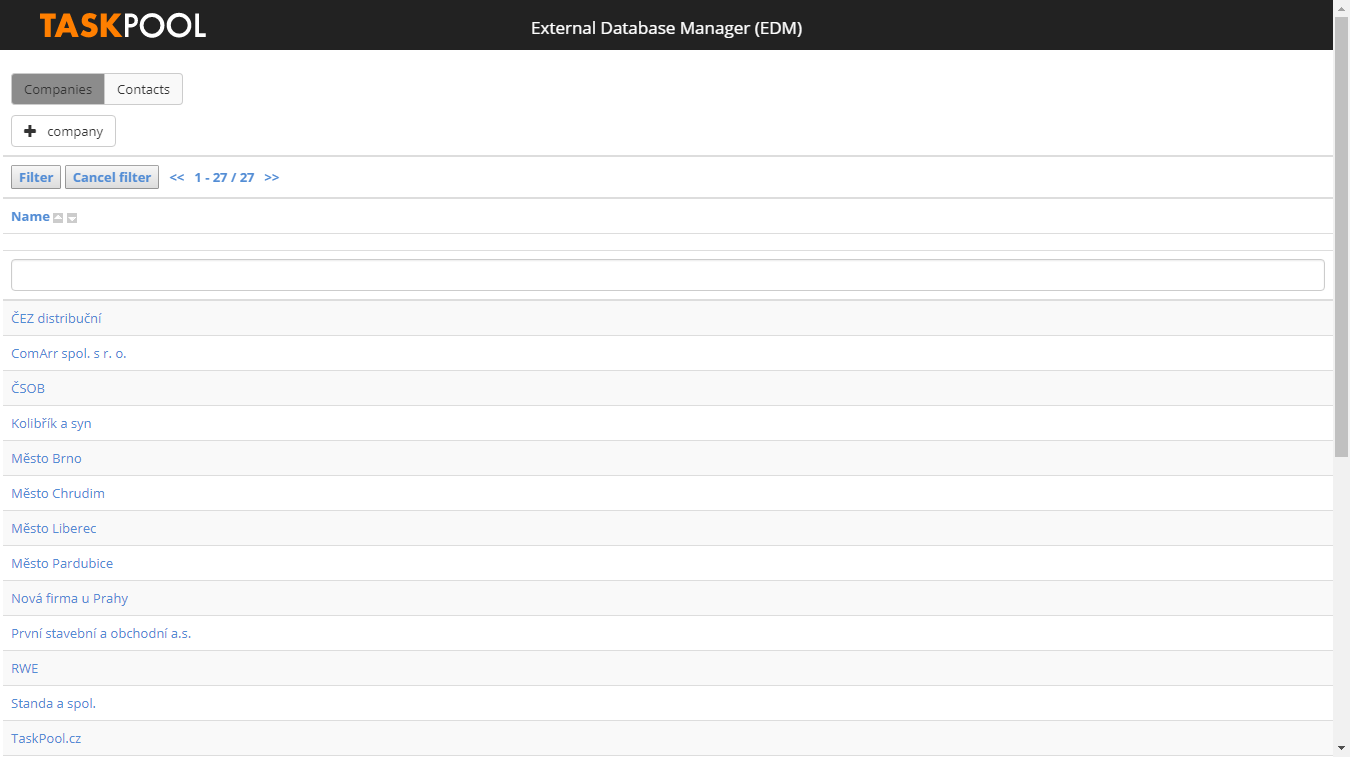
You can use filtering for individual items in the contact list. By default, only active contacts are displayed (can be changed in the filter).
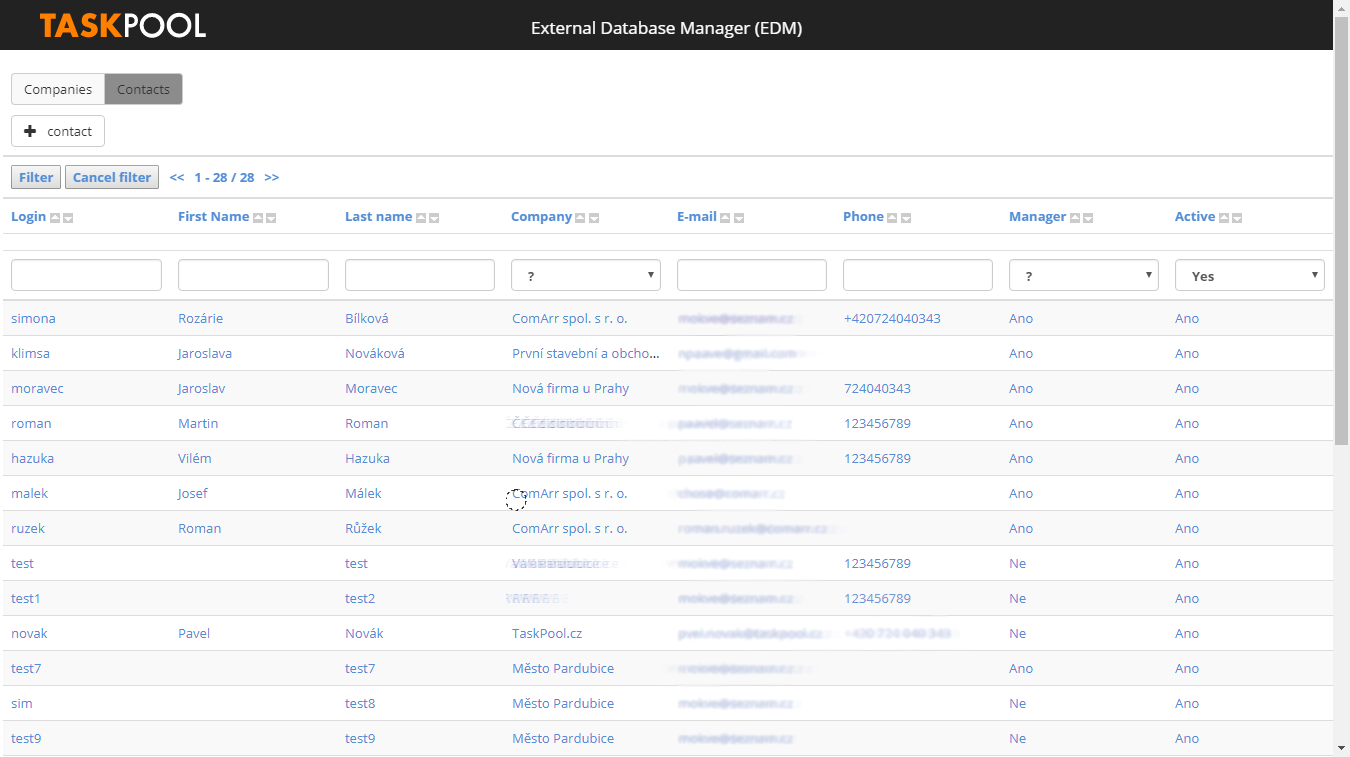
For a new contact, you must complete all required fields (marked with *)
The contact's Username field must be unique throughout the database. Email can be repeated between individual contacts, but the first contact in the list is assigned when the e-mail request is entered, since the exact user identification is missing.
Personal data such as name, surname, phone, e-mail that may identify a particular private person may be present in the EDM. If necessary, these data can be changed not only in the EDM but also in the history of the individual tasks.
Anonymization
Invalidation of data defined in EDM as anonymizing. Most often personal data is available, but this status can be assigned to other fields as well. The override will occur in all of the affected tasks.
Writing history
Use the button to validate and overwrite the current anonymization details of the contact. For example, when you rename a contact, change a phone number atc. This operation may be required to apply the GDPR.
Note: These changes will not be marked in history as an action, nor will they be notified. They are only written to the event log in EDM.
The content of the EDM depends on the EDM and database definition itself. A suitable configuration of the xml file in the EDM definition in the administration can not only affect the names and contents of the Company and Contacts tabs (usable for other language mutations), but also create new cards that can be used to supplement, for example, premises, production numbers, to change information affecting the workflow of the system (definition of the investigator's representative, SLA of individual companies, etc.).
For more information about EDM options contact system manufacturer (www.taskpool.cz).
(c) Copyright 2021 ComArr, spol. s r.o.